
Use And Care Manual


5
ADJUSTMENTS
OPERATING PROCEDURES
3. To turn the tool off, slide the switch back.
Warning: Turn off your tool at once, unplug and inspect it for serious problems if:
Moving parts get stuck
Speed drops to an abnormally low level
The motor housing gets hot
Sparks or odors emit from the casing
ADJUSTMENTS
MAINTENANCE
Keep the vents clear of dust and debris. This will help prevent possible electri-
cal shorts and ensure proper cooling.
Keep the tool housing and handle clean and free of oil and grease by using mild
soap and a damp (not wet) cloth.
Avoid overloading your grinder. It will become hot and lose efficiency. Run-
ning it free of load for a minute or two will allow it to cool itself to normal tem-
perature.
Inspect the cord regularly and have it replaced by an authorized repair facility if
it is damaged.
Lubrication for this tool is done at the factory and should not be necessary
again under normal use.
Check the grinding disc regularly for cracking and other damage. Do not use a
damaged disc.
An authorized repair center should do any repairs, modification, or mainte-
nance that involve disassembling the grinder.
Any damage to the tool should be corrected at an authorized repair center.
Guard
Side Handle
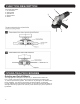
The auxiliary side handle for the grinder may be mounted on either the left or right
side of the tool. Unplug the grinder. Screw the handle firmly into the threaded hole
on either side of the metal grinding head.
Installing a grinding wheel or cutting disc
1. Unplug the grinder.
2. Turn the tool upside down.
3. Place the inner flange on the spindle so that it matches with the flats on the shaft.
4. Fit the disc over the boss on the inner flange.
5. Screw the wheel-retaining nut down over the disc. Depending on the disc thick-
ness, the boss on the outer flange nut can face down or up.
6. Fit the two prongs of the wrench into the holes in the outer flange nut.
7. Depress the spindle lock button and firmly tighten the nut with the wrench.
8. Turn the wheel by hand, checking for any obstruction.
Running the Tool
1. Plug in the tool.
2. Hold the tool firmly with one hand on the side handle and the other gripping
the housing. Check to make sure the abrasive disc is not obstructed. Slide the
switch on the Top of the machine forward with your thumb. Switching the
tool on or off under load will damage the switch.
This grinder comes with an adjustable wheel guard installed. This is to allow you
to grind at various angles and still be protected to some extent from flying residue
or debris. Unplug the grinder. Loosen the clamping screw on the collar and
rotate the guard to give you protection and expose the disc on the appropriate
side. Tighten the screw to clamp the guard in place. Do not use this tool with the
guard removed.