
Installation Instructions


NetWay1DWP/NetWay1DWPH/NetWay1DWPM/NetWay1DWPMH - 3 -
NetWay1DWPM/H User Interface and Programming:
Note: A constant PC connection is not required for proper operations and is used as a local programming/monitoring tool only.
Please note that all interconnecting equipment shall be UL Listed.
Step 1. Set Local Area Connection of your laptop to Static IP mode.
Static IP address of the laptop must be assigned to the same network as the current IP address of
NetWay1DWPM/H. The default IP address of NetWay1DWPM/H units is 192.168.168.168.
This manual assumes that it has not been changed by user.
For Windows XP:
a. Open Network Connections by clicking Start button, then clicking Settings, then clicking Network Connections.
b. Right click the Local Area Connection. Click Properties. Administrator permission required
If you are prompted for an administrator password or confirmation, type the password or provide confirmation.
c. Double click Internet Protocol (TCP/IP) menu item.
d. Choose the Use the following IP address option.
e. Set the IP address to 192.168.168.15 (or another valid IP address on the same network).
f. Click OK. Close all windows.
For Windows 7:
a. Open Network Connections by clicking the Start button, clicking Control Panel, clicking Network and Internet,
clicking Network and Sharing Center, and then clicking Change Adapter Settings.
b. Right click the Local Area Connection icon, and then click Properties. Administrator permission required.
If you are prompted for an administrator password or confirmation, type the password or provide confirmation.
c. Click the Networking tab. Under this connection uses the following items, click either Internet Protocol Version 4
(TCP/IPv4) and then click Properties.
d. Choose the Use the following IP address option.
e. Set the IP address to 192.168.168.15 (or another valid IP address on the same network).
f. Click OK. Close all windows.
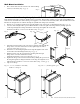
Step 2. Connect a laptop or PC to the Ethernet port of your NetWay1DWPM/H unit.
The NetWay1DWPM/H unit should be powered up at this moment.
Step 3. Open a browser window (it is necessary to update your browser software to the latest version so that the pages
display and function correctly).
Step 4. Enter the NetWay1DWPM/H IP address (the default IP address is 192.168.168.168) into the address bar.
Status page will be displayed.
Step 5. Click Setup link. Setup page will be displayed. You may now program your NetWay1DWPM/H.
All NetWay1DWPM/H units come factory set:
a. Ports - Enabled.
b. Ports - PoE shutdown Disabled.
c. Power Allocation Mode - Class restricted.
Configuring NetWay1DWPM/H for network connection:
Since every Network Configuration is different, please check with your Network Administrator to see if your
NetWay1DWPM/H should use static IP addresses, or DHCP assigned IP addresses and/an Inbound Port assignment prior
to setting up network connection.
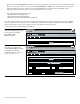
1. Click Network Settings link.
You will be prompted for an
administrative password,
type and submit the
password.
User name: admin
Password: admin
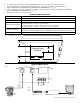
Management Interface
Version 0.88
Status
NetWay Setup
x
x
Setup Network Settings
192.168.168.168
®
Status
Date/Time:
Maximum Power Draw (Watts) Actual Power Draw Watts Port Status
0 0 Enabled
Data Pair
Authentication Required
The server http://192.168.168.168:80 requires a username and
password. The server says: Altronix webpage.
User Name:
Password:
Log In Cancel
x