
Installation Guide


- 2 - Trove1DM1 / TDM1 / Trove2DM2 / TDM2
Overview:
Trove1DM1 and Trove2DM2 accommodate DMP 734 and 734N Wiegand Modules with or without Altronix power supplies
and accessories for access control systems.
Specifications:
• 16 Gauge grey backplane and enclosure with ample knockouts for convenient access.
Installation Instructions for Trove1 and Trove2:
1. Remove backplane from enclosure prior to mounting (do not discard hardware).
2. Trove1DM1 (Pg. 7):
Mark and predrill holes on the wall to line up with the top two keyholes in the enclosure. Install two upper fasteners and
screws in the wall with the screw heads protruding. Place the enclosure’s upper keyholes over the two upper screws;
level and secure. Mark the position of the lower two holes. Remove the enclosure. Drill the lower holes and install the
two fasteners. Place the enclosure’s upper keyholes over the two upper screws.
Install the two lower screws and make sure to tighten all screws.
Trove2DM2 (Pg. 8):
Mark and predrill holes on the wall to line up with the top three keyholes in the enclosure. Install three upper fasteners
and screws in the wall with the screw heads protruding. Place the enclosure’s upper keyholes over the three upper screws;
level and secure. Mark the position of the lower three holes. Remove the enclosure. Drill the lower holes and install the
three fasteners. Place the enclosure’s upper keyholes over the three upper screws.
Install the three lower screws and make sure to tighten all screws.
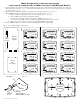
3. Mount included UL Listed tamper switch (Honeywell Model 112 or equivalent) in desired location, opposite hinge.
Slide the tamper switch bracket onto the edge of the enclosure approximately 2” from the right side (Fig. 1, pg. 1).
Connect tamper switch wiring to the Access Control Panel input or the appropriate UL Listed reporting device.
To activate alarm signal open the door of the enclosure.
4. Mount Altronix/DMP modules to TDM1 or TDM2 backplane, refer to pages 3, 4.
Edge of
Enclosure
to Access Control Panel
or U.L. Listed
Reporting Device
Enclosure
Honeywell
model # 112
Tamper Switch
or equivalent
(provided)
Fig. 1
Trove1DM1
Trove1 enclosure with TDM1 Altronix/DMP backplane
• Includes: tamper switch, cam lock, lock nuts,
and mounting hardware.
Enclosure Dimensions (H x W x D):
18” x 14.5” x 4.625” (457mm x 368mm x 118mm).
TDM1
Altronix/DMP backplane only
• Includes mounting hardware.
Dimensions (H x W x D):
16.625” x 12.5” x 0.3125” (422.3mm x 317.5mm x 7.9mm).
TDM1 accommodates a combination of the following:
Altronix Modules:
• One (1) AL400ULXB2, AL600ULXB, AL1012ULXB,
AL1024ULXB2,
eFlow4NB, eFlow6NB, eFlow102NB or eFlow104NB.
• One (1) ACM4(CB), MOM5, PD4UL(CB), PD8UL(CB),
PDS8(CB), VR6.
DMP Modules:
• Up to eight (8) DMP 734 and/or 734N modules.
Trove2DM2
Trove2 enclosure with TDM2 Altronix/DMP backplane
• Includes: tamper switch, cam lock, lock nuts,
and mounting hardware.
Enclosure Dimensions (H x W x D):
27.25” x 21.75” x 6.5” (692.2mm x 552.5mm x 165.1mm).
TDM2
Altronix/DMP backplane only
• Includes mounting hardware.
Dimensions (H x W x D):
25.375” x 19.375” x 0.325” (644.5mm x 482.6mm x 8.3mm)
TDM2 accommodates a combination of the following:
Altronix Modules:
• Two (2) AL400ULXB2, AL600ULXB, AL1012ULXB,
AL1024ULXB2,
eFlow4NB, eFlow6NB, eFlow102NB or eFlow104NB.
• Two (2) ACM8(CB), MOM5, PD4UL(CB),
PD8UL(CB), PDS8(CB), VR6.
DMP Modules:
• Up to sixteen (16) DMP 734 and/or 734N modules.