
Installation Instructions


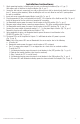


VertiLine33DV / 63DV Series Installation Guide - 7 -
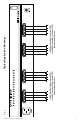
Fig. 4
Mounting Options:
Rack Mount Installation
1. Remove factory installed screws from both sides of the rack chassis (Fig. 4a).
2. Install mounting brackets (A) on the left and right side of rack chassis using the
two (2) flat head screws (B) (included) (Fig. 4b).
3. Place unit into desired EIA 19” rack position and secure with mounting screws (not included) (Fig. 4c).
B
A
Fig. 4a Fig. 4b Fig. 4c
Top Top Top
Front
Left
Front
Left
Front Left
Remove
––––––––––––––––––––––––––––––––––––––––––––––––––––––––––––––––––––––––––––––––
Wall Mount Installation
1. Install mounting brackets (A) on the left and right side of rack chassis using
two (2) flat head screws (B) (included) (Fig. 5a).
2. Place unit at desired location and secure with mounting screws (not included) (Fig. 5b).
Caution: It is necessary to make sure mounting screws are securely fastened to a beam when installing.
Fig. 5
Fig. 5a Fig. 5b
B
A
Fig. 6
––––––––––––––––––––––––––––––––––––––––––––––––––––––––––––––––––––––––––––––––
Shelf Installation
1. Position and affix rubber pads (C) (included) at
each corner on the bottom of the unit (Fig. 6).
2. Place unit in desired location.
A
B
C
Mounting Hardware (Included):
C
Left Side
Rubber Pad
Two (2) mounting brackets
Six (6) flat head screws
for mounting brackets.
Four (4) rubber pads.