
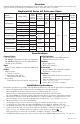
Installation Guide

WayPoint10A Series - 7 -
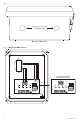
Wall Mount Installation
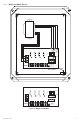
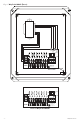
1- Place unit at desired location and secure with mounting
screws (not included) (Fig. 5, pg. 7).
Fig. 5
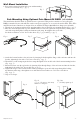
Pole Mounting Using Optional Pole Mount Kit PMK1 (not included):
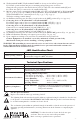
This installation should be made by qualified service personnel. This product contains no serviceable parts.
PMK1 is intended for use with Altronix outdoor rated power supplies or accessories housed in WP1, WP2, WP3
and WP4 enclosures. Brackets are designed for use with the Wormgear Quick Release Straps (two included).
1. Thread one (1) wormgear quick release strap through the slots on the back of a mounting bracket (Fig. 6, pg. 7).
2. Once the desired height of the top Pole Mount bracket is achieved, tighten the straps down by sliding open
end of the strap through the locking mechanism on the strap, then tighten the screw with
flat head screwdriver or 5/16” hex socket driver (Fig. 7, pg. 8 and Fig. 9, pg. 7).
3. Attach the bottom bracket to the enclosure by inserting bolts through the flange of the enclosure and into the
bracket, tightening bolts with a 7/16” hex socket (Fig. 8, pg. 7).
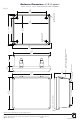
4. Thread the second wormgear quick release strap through the slots on the back of the bottom mounting bracket
(Fig. 6, pg. 7).
5. Mount enclosure onto the top bracket by inserting bolts through flange of the enclosure and into the bracket,
tightening bolts with a 7/16” hex socket (Fig. 8, pg. 7).
6. Tighten the straps of the bottom bracket down by sliding the open end of the strap through the locking
mechanism on the strap, then tighten screw with flat head screwdriver or 5/16” hex socket driver
(Fig. 6, pg. 7).
7. Clip excess straps.
Fig. 6
Fig. 7
Fig. 8
Fig. 9
Fig. 10
2” to 8”(50.8mm to 203.2mm)
diameter round pole
Fig. 10a
5” (127mm) square pole