Please read this user manual first! Dear Cornerstone, Thank you for purchasing this Alts product. We hope that you gel the best results from your product which has been manufactured with high quality and state-of-the-art technology. Therefore, please read this entire user manual and all other accompanying documents carefully before using the product and keep it as a reference for future use, if you handover the product fo someone else, give the user manual as well.
fn Important instructions and warnings for safety and environment General safety Safety when working wi Electrical safety Product safety. Intended use... Safety for children Disposing of the old product Package information. General information 10 Overview Technical specification: Injector table... Installation 13 Before installation Installation and connection High COMPRESSION etc Bypass screw adjustment gums 22 Preparation 23 Tips for saving energy Intel use... . First cleaning of the appliance.
This section contains safety instructions that will help protect from risk of personal injury or property damage. given supervision or instruction. Children being supervised not to play with the Failure to follow these instructions shall void any warranty.
Safety when working with install a mechanical gas ventilation device * Any works on gas (mechanical extractor hood). equipment and systems may only be carried out by authorized qualified persons who are Gas Safe registered. Prior to the installation, ensure that the local distribution conditions (nature of the gas and gas pressure) and the adjustment of the appliance are compatible. This appliance is not connected to a combustion products or evacuation device.
measures in case of gas smell from your local gas provider. What to do when you smell * gas Do not use open flame or do not smoke. Do not operate any electrical buttons (e.g. lamp button, door bell and etc.) Do not use fixed or mobile phones. Risk of explosion and intoxication! Open doors and windows. Turn off all valves on gas appliances and gas meter at the main control valve, unless it's vain confined space or cellar. Check all tubes and . connections for tightness.
replaced by the manufacturer, its service agent or similarly qualified persons in order to avoid a hazard. * The appliance must be installed so that it can be completely disconnected from the mains supply. The separation must be provided by a switch built into the fixed electrical installation, according to construction regulations. * Any work on electrical equipment and systems should only be carried out by-authorized and qualified persons.
* CAUTION: The cooking process has to be supervised. A short term cooking process has to be supervised continuously. + WARNING: Danger of fire: Do not store items on the cooking surfaces. e DO NOT SPRAY AEROSOLS IN THE VICINITY OF THIS APPLIANCE WHILE IT IS IN OPERATION. e DO NOT USE OR STORE FLAMMABLE MATERIALS NEAR THIS APPLIANCE. e DO NOT USE THIS APPLIANCE AS A SPACE HEATER. * DO NOT PLACE ARTICLES ON OR AGAINST THIS APPLIANCE. * NOT SUITABLE FOR USE WITH AFTERMARKET LIDS OR COVERS.
children. Keep children away from the product when iris operating and do not allow them to play with the product. * Do not place any items above the appliance that children may reach for. Disposing of the old product Compliance with the WERE Directive and Disposing of the Waste Produce: This product complies with EU WERE Directive (2012/19/EU). This product bears a classification symbol for waste electrical and electronic equipment (WEE.
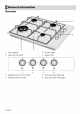
Overview 1 Pan support 3 Buber plate 2 Gas burners knob 4 Base cover Auxiliary burner Front right 3 Normal burner Rear left 2 Wok burner Front left 4 Normal burner Rear right 10/EN
Technical specifications Voltage / frequency 220-240 Vr 50 Hz Cable type / section min HOBV2V2-F 3x 0,75 mm’ Gas type / pressure / Total gas consumption Natural Gas /1.0 kPa 38.0 Mj/h Converting the gas type / pressie’ ~ optional Universal LPG /2.76 kPa 28.9 Mjh External dimensions (height / width / depth) 44 mm/B10 mm/B10 mm Installation dimensions {width / depth) 560 mm Burners Front right Auxiliary burner Power 4.0 Mh (NG) / 3.4 Md (LPG) Front left Wok boomer Power 18.0 MJ/h ING} / 12.
Injector table Auxiliary 0.90 All models Semi Natural gas 105 Rapid Wok 180 1.0 Auxiliary 0.60 Al Universal LPG models em 0.72 Rapid : Wok 1.02 2.
Installation This appliance must be installed by an authorized person in accordance with this instruction manual, AS/NZS 5601 (Gas installations (installation and pipe sizing), local gas fitting regulations, local electrical regulations, local water regulations, local health regulations, Building Code of Australia and any other government authority.
EE — Requirement 1 Overhead clearances {Measurement A} Range hoods and exhaust fans shall be installed in accordance with the manufacturer's relevant instructions, However, in no case shall the clearance between the highest part of the hob of the gas 14/EN x 50 (mind, < S " cooking appliance and a range hood be fess than 800 mm or, for an overhead exhaust fan. 750 mm.
Hose connection Flexible hose assembly (f used) must comply with AS/NZS 1868 Class Bor O, be of appropriate internal diameter, be kept as short as possible {not to exceed 1.2 metronome, must not be kinked or in contact with any het surface. The supply connection point shall be accessible with the appliance installed. Natural Gas (The appliance test point is located at the regulator) The supplied regulator must be fitted to the appliance inlet connection. Gas pressure must be adjusted to 1.
in the technical specification table of this user manual}.
The product must be connected to the mains supply only by an authorized and qualified person. The product's warranty period starts only after correct installation. Manufacturer shall not be held responsible for damages arising from procedures carried aut by unauthorized persons. AH The power cable must not be clamped, bent or rapped or come into contact with hot parts of the product. A damaged power cable must be replaced by a qualified electrician.
Gas connection Product can be connected to gas supply system only by an authorized and qualified person or technician with license. Risk of explosion or intoxication due to unprofessional repairs! Manufacturer shall not be held responsible for damages arising from procedures carried out by unauthorized or unlicensed persons. Before starting any work on the gas installation. disconnect the gas supply.
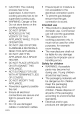
Form as much bend as required to fil the gap in the comers. oO © sure that the skirting sections on the lower housing of the hob are filled with putty. 8.Place the hob on the counter and align i, 8. Using the installation clamps secure 1 2 Screw 3 Installation clamp 4 Counter When installing the hob onto a cabinet, a shelf must be Installed in order to separate the cabinet farm the hob as lust rated in the above figure. This is nat required when installing onto a built-under oven.
A. are gas and electrical components contained within this hol, therefore when fitting the mounting springs/clamps only attach the supplied fixings © the connection holes shown in this manual. Allure to observe this advise may lead to life and property safety Final check (installer to check before leaving) 1. Open gas supply. 2. Check gas installations for secure fitting and tightness, 3. Ignite burners and check appearance of the flame. 4.
For LPG {Butane Propane) tm the sower clockwise. For the natural gas, you should tum the screw counterclockwise. » The normal length of a straight flame in the reduced position should be 6-7 rm. 4.If the flame is higher than the desired position, tun the screw clockwise. If it is smaller turn anticlockwise, 5.
erst ar Ra SEL 1/4 Semi-Rapid {Normal} 112 Ya from fully closed Wok 11/4 Closed The test paint pressure is set with ‘wok’ and one * Semi-Rapid * on maximum.
I Preparation Tips for saving energy The following information will help you to use your appliance in an ecological way, and to save energy: « Defrost frozen dishes before cocking them. » Use pots/pans with cover for cooking. If there is no cover, energy consumption may increase 4 times. * Select the bummer which is suitable for the bottom size of the pot to be used. Always select the correct pot size for your dishes. Larger pots require more energy.
EH How tortoise the General information about cooking Never fill tha pan with oil more than ene third of it. Do not {eave the hob unattended when heating oil. Overheated all bring risk of fire. Never attempt to extinguish a possible fire with water! When ofl catches fire, cover it with a fire blanket or damp cloth, Tum off the hob if iris safe to do so and call the fire department.
A. not use cooking pans beyond the dimension limits given above. Using larger pans causes risk of carbon monoxide poisoning, overheating of adjacent surfaces and conical knobs, Using smaller pans causes your risk of being burned by the flame. Large flame symbol indicates the highest cooking power and small flame symbol indicates the lowest cooking power. In loomed off position {fop), gas is not supplied to the boomers. igniting the gas burners 1.Keep burner knob pressed. 2.
General cleaning information A General warnings * Wait for the product to cool before cleaning the product. Hot surfaces may cause burns! Do not apply the detergents directly an the hot surfaces. This may cause a permanent ¢ The appliance shall be thoroughly cleaned and dried after each operation.
cleaning materials. They can damage the glass surface. Clean the appliance using dish washing detergent, warm water and a microfiber cloth specific for glass surfaces and dry it with a dry microfiber cloth. If there is residual detergent after cleaning, wipe it with cold water and dry with a clean and dry microfiber cloth. Residual detergent residue may damage the glass surface next time.
lime stains may scour as a result of the heat. Ensure that it is dried before operation. 11, Place bummer heads, caps and pot holders respectively. 12. When placing the pot holders, ensure that they center the bu mars.
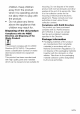
Assembling the burner pairs Place the parts as in the figure after 1 Buber cap 2 Burner head 3 Buber chamber 4 Spark plug {in models with ignition) 1.Place the boomer head ensuring that it passes through the burner spark plug {4}. Turn the burner head right and left to make sure that it is seated in the boomer chamber. 2.Place the boomer cap on the bummer head. Cleaning the control panel = When cleaning the panels with knob control, wipe the panel and knobs with a damp soft cloth and dry with a dry cloth.
» When the metal parts are healed, they may expand and cause noise. not a fat, > This is * No current. Check fuses in the fuse box. Relist nd gas. * Main gas valve is closed. Open gas valve, I gas pie * Burners are dirty, Clean boomer components. » Boomers are wet, Dry the bummer components. * Bummer cap is not mounted sally, Mount the boomer cap proper. * Gas valve Is closed. Open gas valve. * Gas cylinder is empty (when using LPG).