Tel: 800-643-1514 www.alumaxshowerdoor.
Three-Year Limited Residential Warranty Alumax Bath Enclosures by Sapa is pleased to warrant to its dealers and residential customers that the products supplied by it shall be free from defects in material and workmanship for three (3) years from purchase of the product, provided they are installed and maintained according to the manufacturer’s recommended practices and installation instructions.1 The Alumax Limited Warranty applies to the original residential owner only, and is not transferable.
!WARNINGS! Alumax Bath Enclosures by Sapa are intended to be installed by experienced installers. If you need assistance with installation, or locating an experienced installer, contact Alumax Consumer Service at 800‐643‐1514. Ensure that the bath enclosure is installed appropriately. Improper installation can lead to breakage, damage or improper performance of the bath enclosure. Wear safety glasses when drilling or cutting to avoid injury to the eyes.
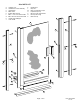
300c PARTS LIST A. B. C. D. E. F. G. H. J. 1 1 1 2 6 6 6 1 1 Shower Curb Glazed Door Panel Assembly Bottom Rail Wall Jamb Plastic Wall Anchors #8 x 1 1/2" Truss Head Screws #6 x 3/8" Pan Head Tek Screws Strike Jamb w/Magnet Pull Handle K. L. M. N. P. R. S. 1 1 1 1 1 1 1 Handle Vinyl Drip Rail Roll of Double-Stick Tape Tapered Drip Vinyl #6 x 3/8" Pan Head Screws Set Drip Rail Plugs Rail End Cap % + ' * ' ( ) * - .
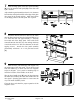
1 The Alumax 300c Continous Hinge Shower Door is completely reversible and may be installed hinge-left or hinge-right. Refer to the illustration to determine the correct position for your installation. For maximum waterproofing, the hinge jamb should always be opposite the shower head. These instructions depict a hinge-left installation. CAUTION: For safety, the door must always open outward. 2 NOTE: Obscure glass doors should be installed with the rough surface of the glass to the exterior of the unit.
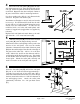
4 Place one of the wall jambs [D] against the wall with the bottom end 3/16" from the raised side of the curb [A]. Plumb the jamb and mark the hole locations on the wall. Repeat for the other wall jamb. Remove all parts and drill the walls for mounting hardware. For tile or marble walls, drill six 3/16" diameter holes and insert the plastic wall anchors [E]. Attachments to fiberglass or acrylic units can be made in two ways.
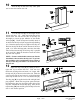
Slide the hinge jamb of the door panel assembly [B] over the mounted wall jamb [D] so the door will open outward. Adjust the door panel assembly so there is 1/4" clearance between the strike jamb and the strike edge of the glass door panel in the closed position. Mark the location of the hinge jamb on the wall jamb with a pencil.
10 Trim the flap on the clear vinyl strike jamb seal to clear the bottom door rail. 11 Cut the drip rail [L] to the length of the bottom rail plus 1 1/4". Clean the inside edge of the bottom door rail and the flat side of the drip rail thoroughly to ensure proper adhesion of the double stick tape [M]. Unroll the tape and carefully attach it to the back of the drip rail (do not peel the tape backing yet). Insert the tapered drip vinyl [N] into the drip rail.
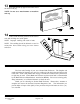
13 Press the rail end cap [S] into the strike end of the bottom rail [C]. NOTE: Do not use a metal hammer to install the end cap. 14 Neatly caulk the inside perimeter of the shower curb and the hinge and strike jambs. NOTE: Improper caulking will result in leaks. NOTE: The caulking should be allowed to cure for twenty-four hours before using your new shower enclosure. The Care and Cleaning of your new Alumax Bath Enclosure.