INSTALLATION INSTRUCTIONS 340 & 350 SERIES BATH ENCLOSURES Copyright © Alumax Bath Enclosures 2014. All rights reserved. 800-643-1514 www.alumaxbath.
Three-Year Limited Residential Warranty Alumax Bath Enclosures by Sapa is pleased to warrant to its dealers and residential customers that the products supplied by it shall be free from defects in material and workmanship for three (3) years from purchase of the product, provided they are installed and maintained according to the manufacturer’s recommended practices and installation instructions.1 The Alumax Limited Warranty applies to the original residential owner only, and is not transferable.
!WARNINGS! Alumax Bath Enclosures by Sapa are intended to be installed by experienced installers. If you need assistance with installation, or locating an experienced installer, contact Alumax Consumer Service at 800‐643‐1514. Ensure that the bath enclosure is installed appropriately. Improper installation can lead to breakage, damage or improper performance of the bath enclosure. Wear safety glasses when drilling or cutting to avoid injury to the eyes.
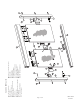
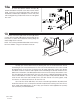
Page 3 of 8 340-350 PARTS LIST C A. 1 Tub Track with Vinyl B. 2 Wall Jambs C. 6 Plastic Wall Anchors D. 6 #8 x 1 1/2 Truss Head Screws E. 2 Nylon Spacers F. 1 Header G. 2 Glass Lites H. 4 Hanger Brackets (Pre-assembled) J. 2 Trim Rings K. 2 Acrylic Towel Bar Brackets L. 2 Towel Bar Bases G03711066 6-9-2014 X B E M D L P K J M. 2 #10-24 x 1/2 Flat Head Screws N. 1 Towel Bar P. 4 Vinyl Shims R. 2 Pull Handles S. 1 PVC Bottom Guide T. 2 #6 x 3/8 Pan Head Screw U. 2 Stainless Bumper Inserts V.
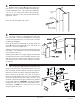
1 Measure the wall-to-wall opening along the center of the tub rim. Cut the tub track [A] 1/16" short of this dimension. An inexpensive miter box available at your hardware store will help you get clean square cuts. If the vinyl silencer (W) is separate from the tub track (A) slide the silencer into the slot in the tub track. Position the tub track in the center of the tub rim with the tall leg to the exterior.
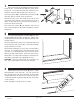
4 Replace one wall jamb [B] and attach to the wall with a #8 x 1 1/2” truss head screw [D] inserted through the top and bottom holes. Slip a nylon spacer [E] over a #8 x 1 1/2” truss head screw and install in the center hole of the wall jamb. Check wall Jamb for plumb and tighten the screws. WALL JAMB NYLON SPACER Note: Do not over tighten the screws. 1 1/2" TRUSS HEAD SCREW 5 This bath enclosure is equipped with safety teelock wall jambs.
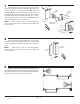
Slide the two trim rings [J] over the acrylic towel bar brackets [K] and attach to the towel bar bases [L] with two #10-24 x 1/2" flat head screws [M]. Force the towel bar [N] onto one of the brackets. At the center of the exterior glass panel, press the base (with towel bar attached) and the vinyl shim [P] over the glass. Install the remaining base in a similar manner, locking the towel bar into place between the two brackets.
10 Lift the interior glass panel into position with the rollers engaging the groove in the header [F]. Repeat for the exterior panel. If panels are not parallel to their respective wall jambs, remove and adjust the rollers up or down in their slots to compensate. 11Locate the nylon bottom guide [S] in the middle of the tub track [A] with the glass panels in the position shown. With a 7/64" bit, drill two holes into the V-groove through the mounting holes in the guide.
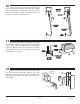
12a To install the optional bottom bumper [X], remove the bottom wall jamb screw closest to the shower head. Insert the screw through the hole in the center of the bottom jamb bumper and replace it in the wall jamb, with the leg pointing inside of the enclosure. Re-tighten the screw. 13 Neatly caulk each end of the tub track [A] where it meets the wall jambs [B] and the interior edge of the wall jambs as shown. Run a bead of caulking along the interior edge of the tub track.