
User Manual


Page 5 of 8
G03711066
6-9-2014
4
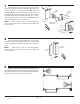
Replace one wall jamb [B] and attach to the wall
with a #8 x 1 1/2” truss head screw [D] inserted through
the top and bottom holes. Slip a nylon spacer [E] over
a #8 x 1 1/2” truss head screw and install in the center
hole of the wall jamb. Check wall Jamb for plumb and
tighten the screws.
Note: Do not over tighten the screws.
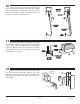
6
Obscure glass lites [G] should be installed with the
rough surface of the glass to the exterior of the unit. Note
that the hanger brackets [H] are mounted in opposite
directions to create an interior and exterior door panel.
Insert a bushing in the hole in the top of the glass.
Place the hanger bracket over the glass and bushing.
Secure the hanger bracket, to the glass with the 1/4-20
flat head screw through the glass and bushing. Repeat
for all hanger brackets. CAUTION – Do not over tighten
the brackets and cause the end to clamp down on pat-
terned glass. Do NOT use a screw gun. This can cause
the glass panel to shatter.
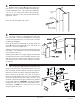
This bath enclosure is equipped with safety tee-
lock wall jambs. When installed properly, the header
is permanently locked to the wall jambs and cannot be
accidentally dislodged.
Measure the wall-to-wall opening at the top of the wall
jambs [B] and cut the header [F] 1/16" short of this di-
mension. Check the header for fit.
Slide the safety tee-lock of the unmounted wall jamb into
the header. The contoured surface of the header goes
to the exterior of the unit.
Holding the header at an angle, engage the end onto
the mounted wall jamb. Pivot the header into place, then
slide the loose wall jamb to the wall and press into posi-
tion on the tub track. Attach to the wall per instructions
in Step #4.
5
1 1/2" TRUSS
HEAD SCREW
NYLON
SPACER
WALL
JAMB