INSTALLATION INSTRUCTIONS 640D & 650D SERIES FRAMED BYPASS BATH ENCLOSURES Page 1 800-643-1514 www.alumaxbath.
LIMITED WARRANTY AND REMEDY ALUMAX BATH ENCLOSURES warrants to its dealers, customers, and all subsequent purchasers and users, that the products supplied by it shall be free from material defects in material and workmanship for a period of one (1) year after shipment, provided they are installed and maintained according to ALUMAX BATH ENCLOSURE's recommended practices and installation instructions.
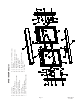
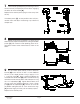
Page 3 G03920296 8-13-09 A. B. C. D. E. F. G. H. I. J. 1 2 6 6 2 2 1 2 4 4 B C S F E Tub Track Wall Jambs Plastic Wall Anchors #8 x 1 1/2” Truss Head Screws Top Jamb Bumper Bottom Jamb Bumper Header Glazed Panels Nylon Roller Bearings #8 – 32 x 3/8” Hex Head Screws D K. L. M. N. O. P. Q. R. S.
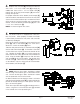
1 Measure the wall-to-wall opening at the center of the tub rim. Cut the tub track [A] 1/16” short of this dimension. An inexpensive miter box (available at your local hardware store) will help you get clean, square cuts. If the vinyl silencer [R] is separate from the tub track [A], slide the vinyl silencer into the slot in the tub track and trim excess silencer material. Position the tub track [A] in the center of the tub rim with the tall leg to the exterior.
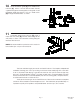
4 Replace one wall jamb [B] and attach to the wall with a #8 x 1 1/2” truss head screw [D] through the middle hole. Place a #8 x 1 1/2” truss head screw [D] through one of the top jamb bumpers [E] and attach through the top hole. For proper orientation of the bottom jamb bumper [F] refer to the detail, and note that the one on the wall jamb closest to the shower head, the lip is turned to the interior of the enclosure, and that the other one is turned to the exterior.
7 Lift the interior glazed panel (with the rough surface closest to the fin) into position with the rollers engaging the roller slot in the header [G]. Repeat for the exterior panel (rough surface away from the fin). If the door panels [H] are not parallel to the wall jams, remove them and adjust the bearings up or down to compensate. 8 Before finishing the installation it is necessary to determine the proper closed position of the glazed door panels [H].
10 Locate the bottom guide [P] in the middle of the tub track [A]. With a 7/64” bit, drill two holes into the v-groove through the mounting holes in the guide. Install the bottom guide with two #6 x 3/8” truss head screws [Q] through the drilled holes as shown. 11 Caulk both ends of the tub track [A] where it meets the wall jambs [B] and the interior edge of the wall jambs as shown. Run a bead of caulking along the interior of the tub track.