INSTALLATION INSTRUCTIONS Tel: 800-643-1514 www.alumaxshowerdoor.com 792 SERIES STIKSTALL SHOWER ENCLOSURE TM Copyright © Alumax Bath Enclosures 1997. All rights reserved.
Three-Year Limited Residential Warranty Alumax Bath Enclosures by Sapa is pleased to warrant to its dealers and residential customers that the products supplied by it shall be free from defects in material and workmanship for three (3) years from purchase of the product, provided they are installed and maintained according to the manufacturer’s recommended practices and installation instructions.1 The Alumax Limited Warranty applies to the original residential owner only, and is not transferable.
!WARNINGS! Alumax Bath Enclosures by Sapa are intended to be installed by experienced installers. If you need assistance with installation, or locating an experienced installer, contact Alumax Consumer Service at 800‐643‐1514. Ensure that the bath enclosure is installed appropriately. Improper installation can lead to breakage, damage or improper performance of the bath enclosure. Wear safety glasses when drilling or cutting to avoid injury to the eyes.
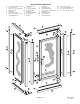
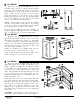
792 STIKSTALL PARTS LIST A. B. C. D. E. F. G. H. 2 Curb Sections (with weep slots) 2 90° Anchor Plates 24 #8 x 1/4" Truss Head Screws 2 Header Sections 2 Wall Jambs 6 Plastic Wall Anchors 6 #8 x 1 1/2" Truss Head Screws 2 Plastic Setting Blocks J. K. L. M. N. P. R. S. 1 Fixed Glass Panel 1 90° Post 2 Clear Vinyl Jamb Seals 1 Glazed Door Panel 1 Pivot Jamb 1 Strike Jamb (Magnetic) 2 Snap-in Fillers 1 Drip Rail T. U. W. X. Y. AA. BB. CC.
The ALUMAX S TIKS TALL framework has been designed to work with a variety of different door types. To ensure correct installation, this 792 Instruction Sheet is designed to be used by itself with a 790 Framed Pivot Door or with an instruction supplement packed with a 390 Frameless Pivot Door, a 790i Intre-Hinge Door or a 1090 Heavy Frameless Pivot Door. Each step in this primary instruction sheet will indicate whether it applies to all door types or if a supplement should be used.
DOORS 3 - ALL Measure the opening at the bottom of the shower stall and trim the ends of the curb assembly [A] (with weep slots) to fit the shower sill. The curb should sit near the centerline of the sill. If required, use a file to round the lower ends of the curb assembly to fit the shower sill properly. Using a 3/16" drill bit, drill the interior face of the curb assembly on both ends as shown.
DOORS 6 - ALL Place two setting blocks [H] into the curb assembly [A] as shown to support the fixed glass panel [J]. The setting blocks should be positioned approximately 3" from each corner of the glass panel. Remove any protective strips from the glass panel and set it into place on the setting blocks approximately 1/2" into the wall jamb [E]. A strip of masking tape 1/2" from each vertical edge of the glass will aid alignment.
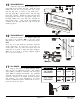
DOORS ONLY 9 - 790 Strip two clear vinyl jamb seals [L] into the door panel [M] splash guard and the pivot jamb [N] and trim flush at the ends. Both vinyls should be turned to trap water from the shower head. Secure the vinyls with a small quantity of glue or caulk at each end or by carefully crimping the vinyl pocket. Set the door panel aside. Press the pivot jamb and strike jamb [p] (with magnetic strip) over the wall jamb [E] and 90° post [K]. Refer to Step #1 for the proper handing of the door.
DOORS ONLY 12 - 790 Insert the two #10-24 x 7/16" square head set screws [X] into the threaded holes in the pivot blocks in the top and bottom rails of the glazed door panel [M]. Position the pivot pins 1 1/2" from the pivot side of the door (the side opposite the magnetic strip). Tighten the set screws just enough to prevent the pivot blocks from moving (finger tight plus a quarter turn). A 3/16" wrench (not supplied by A LUMAX ) will fit the set screw heads.
DOORS ONLY 15 - 790 Adjust the drip vinyl [U] by sliding it left or right until it just touches the curb. Trim the vinyl (flush with the pivot end and notch 1/4" longer than the drip rail as shown on the strike end). The drip plug [T] is supplied with a left and right hand plug together. Break the right and left drip plug apart and insert the appropriate plug into the high (strike) side of the drip rail. Discard the unused drip plug.
DOORS 18 - ALL Cut four pieces of the smaller vinyl [FF] 1" longer than the vertical opening (to prevent gapping from shrinkage) and trim the ends on a 45° angle. Using the masking tape guides, center the glass panel [J] in the frame. Cut four short (1" - 2") pieces of the small vinyl and press into both jambs on each side to hold the glass temporarily. Take one of the long pieces of vinyl, and starting on the outside exterior jamb, press each end into the frame and work toward the middle.
Page 11 of 11 G03711074 8-1-06