INSTALLATION INSTRUCTIONS BATH ENCLOSURES a product of Alcoa Tel: 800-643-1514 Fax: 870-234-3181 www.alumaxbath.com 794S SERIES SPEEDSTALL SHOWER ENCLOSURE TM Copyright © Alumax Bath Enclosures 1997. All rights reserved.
LIMITED WARRANTY AND REMEDY ALUMAX B ATH ENCLOSURES warrants to its dealers, customers, and all subsequent purchasers and users, that the products supplied by it shall be free from material defects in material and workmanship for a period of one (1) year after shipment, provided they are installed and maintained according to A LUMAX B ATH E NCLOSURE 's recommended practices and installation instructions.
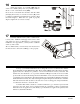
Page 3 of 9 G03711103 8-22-06 X. Y. AA. BB. CC. DD.
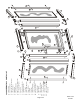
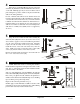
1 The ALUMAX 794 S SPEED STALL Shower Enclosure is completely reversible and may be installed pivot-left or pivot-right. For maximum waterproofing, the pivot jamb should be opposite the shower head. Using the diagram, determine the correct position for the door in your particular SPEEDSTALL installation. This instruction sheet depicts a pivot-right installation. CAUTION: For safety reasons, the door panel must always open outward.
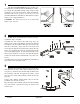
4 Place the two wall jambs [E] into the ends of the curb assembly [A]. Plumb the jambs and mark the hole locations on the wall. Masking tape may be used to hold the curb in place during this operation. Remove all parts and drill the walls for mounting hardware. For tile or marble walls, drill six 3/16" diameter holes and insert the plastic wall anchors [F]. Attachments to fiberglass or acrylic units can be made in two ways.
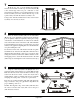
7 Hold the two 135° posts [J] plumb and carefully measure horizontally from the top of each wall jamb [E] to the outside edge of the 135° post. Add 3/16" to each measurement to find the corresponding dimension on the header assembly (from the outside mitered edge to the squared ends) and trim the header assembly to fit. Using a 3/16" drill bit, drill the interior face of the header assembly on both ends as shown.
10 Snap the fillers [P] into the curb assembly [A] and header assembly [D] between the door jambs with the raised lip to the exterior and the pivot holes toward the pivot jamb [M]. Center the curb filler in the curb between the pivot and strike jamb [N] (use masking tape to hold in position). NOTE: The snap-in fillers should be exactly 3/8" longer than the door panel width. 11 Pull the bottom end of the pivot jamb [M] tight to the curb filler [P] and plumb the jamb.
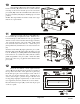
13 Insert the two nylon pivot bushings [Y] into the pivot holes in the head and curb fillers [P]. Lift the door panel [L] and insert the top pivot pin into the pivot bushing in the header filler. Hold the door vertical and insert the bottom pivot pin into the pivot bushing in the curb filler. It may be necessary to remove the header retaining screws and raise the header slightly to install the door.
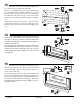
16 Attach the interior door handle [BB] and the exterior door handle [CC] to the door panel [L] with two #6-32 x 1 1/4" round head screws [DD]. Close the door and check the clearance with the strike jamb [N]. If necessary, loosen the set screws [W] on the top and bottom slide bars and adjust the door panel to align the strike magnets. When the door panel is properly aligned, tighten the set screws securely. 17 Carefully caulk the interior jamb-to-wall and curbto-base joints.