INSTALLATION INSTRUCTIONS Tel: 800-643-1514 www.alumaxshowerdoor.
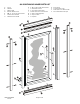
890 CONTINUOUS HINGE PARTS LIST A. B. C. D. E. F. G. 1 1 2 6 6 1 1 Curb Header Wall Jambs Plastic Wall Anchors #8 x 1 1/2" Truss Head Screws Interior Door Handle Exterior Door Handle EPH-N00-06083 6-3-02 H. J. K. L. M. N. P. 2 #6 x 1 1/8" Round Head Screws 1 Glazed Door Panel 1 Vinyl Upper Steam Seal 10 #8 x 1/4" Truss Head Screws 1 Strike Jamb (Magnetic) 2 Snap-in Fillers 1 Drip Rail Page 2 of 8 R. S. T. U.
LIMITED WARRANTY AND REMEDY Alumax Bath Enclosures warrants to its dealers, customers, and all subsequent purchasers and users, that the products supplied by it shall be free from material defects in material and workmanship for a period of one (1) year after shipment, provided they are installed and maintained according to Alumax Bath Enclosures' recommended practices and installation instructions.
1 2 EPH-N00-06083 6-3-02 Page 4 of 8
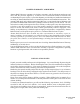
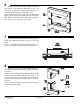
3 Place the two wall jambs [C] into the ends of the curb [A]. Masking tape may be used to hold the curb in place during this operation. Plumb the jambs and mark the hole locations on the wall. Remove all parts and drill the walls for mounting hardware. For tile or marble walls, drill six 3/16" diameter holes and insert the plastic wall anchors [D]. Attachments to fiberglass or acrylic units can be made in two ways.
Measure the horizontal frame opening at the top and bottom. The minimum dimension for the door opening is the glazed door panel width [J] plus 1/2", maximum is the door panel width plus 1 3/4". Using the holes in the ends of the curb [A] and header [B] as a guide, drill four 1/8" holes into the wall jambs [C]. Secure the header and the curb to the wall jambs with four #8 x 1/4" truss head screws [L].
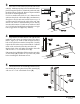
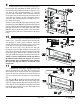
9 Pull the bottom end of the hinge jamb [J] tight to the curb filler [N] and plumb the jamb. Drill two 1/8" holes thru the hinge jamb and into the wall jamb 3/8" to 3/4" from the wall and approximately 1/4" vertically from the ends of the jamb. Drill a third hole centered between the first two and enlarge the outer holes with a 3/16" drill for clearance on the self-tapping screws. Attach the door panel permanently with three #8 x 1/4" truss head screws [L].
The Care and Cleaning of your new Alumax Bath Enclosure. The simplest and preferred method of cleaning your unit is by washing it with clean water and drying with a soft cloth. If soil is still present after drying, a non-abrasive cleanser with a pH of seven to eight may be used. Comet Bathroom Cleaner® has been tested and is recommended by the Bath Enclosure Manufacturers Association (BEMA). Do not use scouring pads, sharp instruments, or acid-based cleansers to clean the unit.