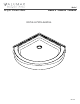
Model Acrylic Shower Base ABB32 - ABB36 - ABB40 INSTALLATION MANUAL 06.
ABB32-ABB36-ABB40 ● Table of Contents IMPORTANT .................................................... CARE FOR YOUR ACRYLIC SHOWER BASE .................. SPECIFICATION. ............................................... TOOLS AND MATERIALS REQUIRED. ........................ 1. PREPARE DRAINING PIPE. ................................. 2. INSTALL THE DRAIN. ...................................... 3. LEVELING THE BASE. ..................................... 4. TESTING THE DRAINAGE..................................
ABB32-ABB36-ABB40 SPECIFICATION. Model Dimensions* A B C D E ABB32 32” [81.3cm] 32” [81.3cm] 5 1/2" [14cm] 12” [30.5cm] 12” [30.5cm] ABB36 36” [91.4cm] 36" [91.4cm] 5 1/2" [14cm] 12” [30.5cm] 12” [30.5cm] ABB40 40 5/16” 40 5/16” [102.5cm] [102.5cm] 5 1/2" [14cm] 12” [30.5cm] 12” [30.5cm] * Tolerance on dimensions: ±1/4” [.6 cm] TOOLS AND MATERIALS REQUIRED. DRILL LEVEL 06.
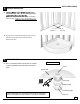
1 1A. ABB32-ABB36-ABB40 PREPARE DRAINING PIPE. modate plumbing. The 2” (5.0cm) drain pipe should Note: Dimensions D and E are 12” ±¼” from wall to center of drain. 12” [30.5 cm] 12” [30.5 cm] 1B. Position base. Verify that the draining pipe location matches the actual location of the base drain. Remove the base. 2 INSTALL THE DRAIN. Drain not included 2A. Prior to install the drain on the base, run a bead of silicone between the drain body and shower base.
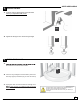
3 ABB32-ABB36-ABB40 LEVELING THE BASE. 3A. Level the base by adjusting the legs underneath. Check your adjustment with a level. 3A 3B. Tighten the hexagon nut to block the legs height. 3B 4 4A. TESTING THE DRAINAGE. the base with a small amount of water. 4A 4B. Check for any leakage around the drain (some bubbles may appear) and below (if you have access to). 4C. Unplug the drain and assure that the drainage is efThere must be no puddle of water accumulation in the base. 06.
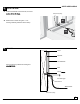
5 ABB32-ABB36-ABB40 FASTEN THE BASE. 5A. Locate and drill with a 3/16” drill bit, the screw Shim if necessary 5B 5B. Fasten base to studs using #8 x 1 1/4” screws (preferably stainless steel screws) 5A 6 FINISHING. Stud. Drywall. Tile adhesive. Tips to achieve a professional looking and Tile. Tiling 3 to 4mm gap. Silicone. Shower base. Shim if necessary. 06.