Model Acrylic Shower Base ABF3260 - ABF3648 - ABF3660 ABF3672 - ABF4260 - ABF4860 INSTALLATION MANUAL 10.
ABF3260 - ABF3648 - ABF3660 - ABF3672 - ABF4260 - ABF4860 T IMPORTANT .................................................... 2 YOUR R .................. 2 ATION. ............................................... 3 T A ! " ........................ 3 TALLATION. ..................................... 4 #" TALL $ $ " ................................. 5 %" P $ " .................................
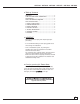
ABF3260 - ABF3648 - ABF3660 - ABF3672 - ABF4260 - ABF4860 SPECIFICATION. B Dimensions* Model A ABF3260 32” [81cm] ABF3648 36” [91.4cm] ABF3660 B C D E E 60” 3” 16” 9” [152.4cm] [7.6cm] [40.64cm] [22.86cm] 48” [121cm] 2 3/4” [7cm] 18” 24” [45.72cm] [60.96cm] 36” 60” [91.4cm] [152.4cm] 2 3/4” [7cm] 18” [45.72cm] 30” [76.2cm] ABF3672 36” 72” [91.4cm] [182.8cm] 2 3/4” [7cm] 18” [45.72cm] 36” [91.4cm] ABF4260 42” 60” [106.7cm] [152.4cm] 2 3/4” [7cm] 21” [53.3cm] 30” [76.
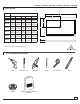
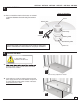
ABF3260 - ABF3648 - ABF3660 - ABF3672 - ABF4260 - ABF4860 TYPE OF INSTALLATION. your type of installation. “Tee Section” Tiling Flange * SINGLE THRESHOLD = 3 TILING FLANGE DOUBLE THRESHOLD = 2 TILING FLANGE TRIPLE THRESHOLD = 1 TILING FLANGE 4 10.
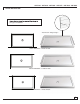
ABF3260 - ABF3648 - ABF3660 - ABF3672 - ABF4260 - ABF4860 1 INSTALL TILING FLANGE. * DOUBLE THRESHOLD INSTALLATION TYPE SHOWN 1A. silicone sealant along the channel. 1B. using self drilling screws #6 x 1” 1A 2 2A. 1B PREPARE DRAINING PIPE. modate plumbing. The 2” (5.0cm) drain pipe should Note: Dimensions D and E from wall to center of drain. ( See chart on page 3) Dim E Dim D 2B. Position base. Verify that the draining pipe location matches the actual location of the base drain.
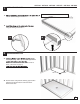
ABF3260 - ABF3648 - ABF3660 - ABF3672 - ABF4260 - ABF4860 3 INSTALL THE DRAIN. Drain not included 3A. Prior to install the drain on the base, run a bead of silicone between the drain body and shower base. Cover* Shower base 3A Drain body Silicone Rubber gasket Cardboard gasket Components might vary according to the model of drain used. Refer to manufacturer’s instructions for the proper installation. 4 Drain nut LEVELING THE BASE. IF THE FLOOR IS LEVEL. PROCEED TO THE NEXT STEP. 4A.
ABF3260 - ABF3648 - ABF3660 - ABF3672 - ABF4260 - ABF4860 5 TESTING THE DRAINAGE. 5A. the base with a small amount of water. 5A 5B. Check for any leakage around the drain (some bubbles may appear) and below (if you have access to). 5C. Unplug the drain and assure that the drainage is efThere must be no puddle of water accumulation in the base. If water doesn’t drain properly even though the base is leveled, do not continue this installation.
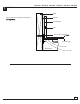
ABF3260 - ABF3648 - ABF3660 - ABF3672 - ABF4260 - ABF4860 7 FINISHING. Stud. Drywall. Tips to achieve a professional looking and Tile adhesive. Tile. “Tee section” Tiling 3 to 4mm gap. Silicone. Shower base. Shim if necessary. 8 10.