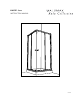
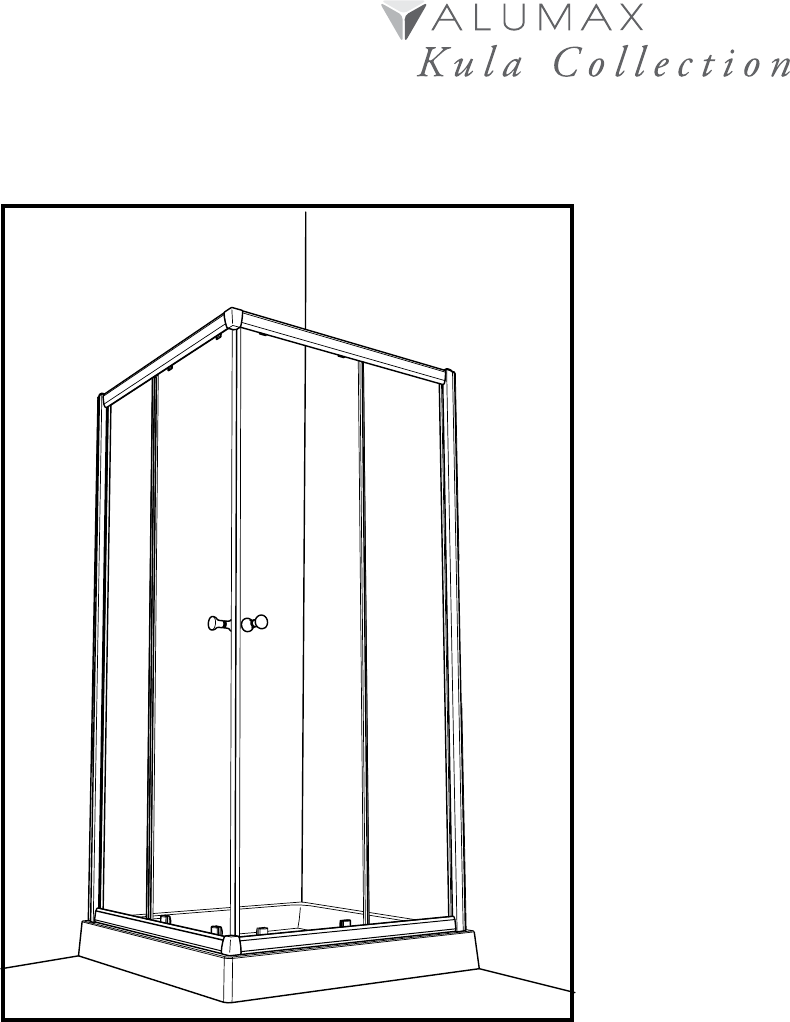
K-KC4Z - Kona INSTRUCTION MANUAL 07.
● Model Number Please keep this manual and product code number for future reference and to order replacement parts if necessary. ● General Instructions - Read this manual carefully and completely before proceeding. - It is recommended that you wear safety glasses at all times during the installation. ● Installation over Ceramic Tiles - Silicone should be used to seal the gap where the panel.
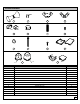
PARTS LISTING NOTE 11 10 9 XX REFERS TO THE MATERIAL FINISH 11122529- Bright Chrome Bright Brass Brushed Nickel Oil Rubbed Bronze 1 2 3 4 5 7 6 ITEM PARTS QTY 1 WALL JAMB 2 2 EXPANDER 2 3 FIXED PANEL 2 4 SET OF HANDLES 2 5 DOOR SIDE GASKET 4 6 DOOR PANEL ASSEMBLY 2 7 BOTTOM TRACK 2 8 SIDE GASKET WALL JAMB SIDE 2 9 TOP TRACK 2 10 MAGNETIC DOOR GASKET 2 11 GLASS SUPPORT 8 3
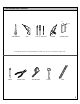
PROVIDED HARDWARE 5 8 10 11 12 13 14 15 16 17 18 4 11a 11b 19a 19 20 19b ITEM HARDWARE QTY 4 SET OF HANDLES 2 5 SIDE GASKET 4 8 SIDE GASKET WALL JAMB SIDE 4 10 MAGNETIC DOOR GASKET 1 11 GLASS SUPPORT 8 12 BOTTOM SLIDER SHIM 4 13 WALL PLUG 8 14 SCREW (M4 x 8) 8 15 SCREW CAP 8 16 SCREW (M4 x 35) 12 17 SCREW (M4 x 8) 8 18 EXPANDER CAP 2 19 CONNECTOR 2 20 WALL JAMB CAP 4
3. INSTALLEZ LE PANNEAU AND MATERIALS REQUIRED / 3. INSTALL THE FIXED PANEL. 8 TOOLS 2˝ 1/2˝ * 6˝ SCREWDRIVERS DRILL 1/4˝& 1/8˝ DRILL BITS SILICONE WOODEN BLOCK * If the shower panels are to be assembled on ceramic tiles, use a 1/4˝ drill bit for ceramic tiles.
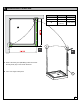
1 CENTER AND INSTALL THE WALLJAMB MODEL MIN (in / cm) MAX (in / cm) 32 31 1/4” (79cm) 32” (81cm) 36 34 1/4” (87cm) 35” (89cm) 42 40 3/8” (102.5cm) 41 1/8” (104cm) 1A 1B 1A. Refer to the limits given (Min/Max),position and center the wall jambs (#1) on the shower threshold. 1B. Trace outer edge of wall jambs.
2 MOUNT THE WALL JAMBS. 1 2B 2A 2A. Reposition one of the wall jambs (#1) on the shower threshold. 2C 2B. Mark drilling location. 2C. With a 1/4” drill bit, drill 4 holes. 2D. Insert 4 wall plugs (#13) and put in each a drop of silicone. 1 2E. Secure the wall jamb (#1) using the 1 3/8” screws (#16). 2D 2F. Repeat the same step for the other wall jamb.
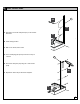
33 BUILD TWO HALVES-FRAMES. 3A. Mount on the each expander (#2) the two track (#7 & #9) to form two halves-frames. 9 2 2 7 7 4 BUILD THE FRAME. 4A. Use the connectors(#19a) to close the frame and add the cover (#19b).
5 MOUNT THE FRAME. 5A. Insert the frame into the installed wall jambs. 1 5A 1 5A 5B 5B. Position and center the frame onto threshold of shower base.
6 INSTALL THE FIXED PANEL. 6A.
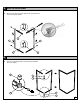
7 DOOR INSTALLATION 7A INTERIOR SHOWER SIDE INTERIOR SHOWER SIDE 7a. Install the rollers on the door panel so that the rollers point towards the outside of the shower. The hole of the handle must always be on the opening side of the door. 7B Shims 7b. Install the bottom sliders on the door panel while placing the hooks towards the outside of the shower. Place the bottom slider shims on the hooks.
7 DOOR INSTALLATION 6 6 7C 10 10 6 7D 10 6 6 7C 12 6 9 7D 7C. Insert door panels(# 6) into the top track (#9) and add magnetic dor gasket (# 10). 7 7D. Insert door panels(# 6) into the bottom track (#7) pushing down the guide and add bottom slider shim (# 12).
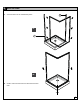
8 VERTICAL ADJUSTMENT. 8A 8C INTERIOR SHOWER SIDE INTERIOR SHOWER SIDE 8B 8E 10 INTERIOR SHOWER SIDE 8D 6 5 8 3 INTERIOR SHOWER SIDE 3 8 5 8A. Loosen the nut with a hex nut driver 5/16’’ 8D. & door panels. Vertical adjustment(verify if the magnetic gasket meetproperly). 8C. Tighten the nut. Close the cover. 8E. Insert side gasket wall jamb side (#8) using a mallet and a small wood block.
9 8 UNITY FIXATION. 9A. Level and adjust unit. 9B. Fasten frame with screw 3/8’’ (#14) and add screw cap (#15).
10 FINISHING TOUCHES. 10A. Insert expander caps (#18). 18 20 10A 1 18 18 20 20 1 1 7 7 HOURS 10B. Silicone exterior the bottom track (#7) and along the wall jambs (#1).