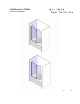
L-RTSX24 and L-STSX24 INSTRUCTION MANUAL L008 08/10
Custom Order FINISH 11- Bright Chrome 12- Bright Brass 22- Polished Nickel 25- Brushed Nickel 29- Oil Rubbed Bronze GLASS 40- Clear 80- Mist Please keep this manual and product code number for future reference and to order replacement parts if necessary.
INSTRUCTION MANUAL ● Table of Contents MODEL NUMBER............................................... 2 GENERAL INSTRUCTIONS .................................... 3 INSTALLATION OVER CERAMIC TILES ....................... 3 NOTICE ......................................................... 3 CARE FOR YOUR FRAMELESS SHOWER DOOR ............. 3 PARTS LISTING................................................. 4 PROVIDED HARDWARE........................................ 5 TOOLS AND MATERIALS REQUIRED ...................
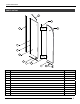
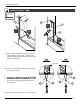
INSTRUCTION MANUAL PARTS LISTING 1 9 2 8 HINGE 3c 3b 3a HINGE 4 15 5 7 6 ITEM PARTS QTY 1 SUPPORT BAR 1 2 WALL JAMB 1 3a SIDE PANEL 1 3b EXPANDER 1 3c GASKET 1 4 ALUMINUM THRESHOLD 1 5 HINGE 2 6 SPACING BLOCKS 2 7 BOTTOM DOOR GASKET 1 8 DOOR PANEL 1 9 SIDE PANEL GASKET 1 4
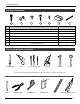
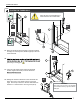
INSTRUCTION MANUAL PROVIDED HARDWARE 10 11 12 13 14 15 16 ITEM HARDWARE QTY 10 WALL PLUG 4 11 SCREW CAP 4 12 SELF DRILLING SCREW 3/8˝ 3 13 SELF-DRILLING SCREW 1 1/4˝ 3 14 FLAT HEAD SCREW 3/4˝ 1 15 CLIP 1 16 FLAT HEAD SCREW 2 1/2˝ 1 TOOLS AND MATERIALS REQUIRED * SCREWDRIVERS DRILL SILICONE 1/4˝& 1/8˝ DRILL BITS HAMMER MALLET *If the shower panels are to be assembled on ceramic tiles, use a 1/4˝ drill bit for ceramic tiles.
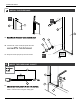
INSTRUCTION MANUAL 1 MOUNT THE WALL JAMB. 2 10 2 1C 1A 1B 13 1D 1A. Place the wall jamb (#2) on the center of the tub edge and align it using a level. Trace the outer edge of the wall jamb and the holes onto the wall. Remove the wall jamb. TOP VIEW TOP VIEW WALL STUD 1B. With a 1/4˝ drill bit, drill 3 holes into the wall using the marks as a guide. 1C. the drilled hole location, skip this step. (b) Insert the wall plugs (#10) and put in each a drop of silicone. 10 2 2 13 13 1D.
INSTRUCTION MANUAL 2 FASTEN THE THRESHOLD. COVER THE PLIER’S TEETH BEFOREHAND TO AVOID SCRATCHING THE ALUMINUM PARTS. 3 15 2 2B 2A 2 2C 2B 2B 3 4 15 15 2A. Place the aluminum threshold (#4) on the tub threshold and align it to the wall jamb ,add the clip(#15) to the end of the threshold. 4 2D 2B. 2 jamb using a locking plier. 2C. Trace the outer edges of the aluminum threshold and the clip(front and side) on the tub threshold. 14 4 2D.
INSTRUCTION MANUAL 3 INSTALL THE FIXED PANEL. 3A 3B 3 2 3b 3a 3A. the aluminum “u” channel. Secure it with the plier. 12 11b 11a 3B. Combine the 3 3/8˝ screws (#12) with the inner 3C. Snap the screw caps (#11a) over the screws. 4 INTERIOR SHOWER SIDE 3C INSERT THE FIXED PANEL GASKET. 9 3 INTERIOR SHOWER SIDE 3 4A. threshold (#4). Insert it with a 2˝ x 6˝ x 1/2˝ block and a mallet. Trim the excess using the cutting plier.
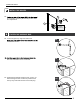
INSTRUCTION MANUAL 5 5A. INSTALL THE HINGES. 5 Do not tighten all the way for this step to allow other door adjustments. 3 INTERIOR SHOWER SIDE 6 FASTEN THE SUPPORT BAR. 6A. Loosen the glass clip. Align the slotte to the 6A inside of the shower. tub. Level it and trace an arc on the wall. 6C. Isolate the wall bracket and drill a hole, using a 1/4˝ drill bit through the wall. Locate the position of this hole by way of the wall bracket. Insert a wall plug.
INSTRUCTION MANUAL 6 FASTEN THE SUPPORT BAR. (CONTINUED) 6D. Secure the wall bracket to the wall by way of the screw. Assemble the cylindrical joint to the wall bracket. 6D 6E. Secure the glass fastener and wall bracket screws to complete the installation process.
INSTRUCTION MANUAL 7 INSTALL THE DOOR PANEL. 7 8 IT IS BEST TO HAVE 2 PEOPLE WORKING ON THIS STEP. LIP 7A. Cut the bottom door gasket (#7) as illustrated. The lip should be about 3/4˝ longer than the rest. 7A 8 3 7B. mallet, insert the bottom door gasket (#7) at the bottom of the door. Make sure the lip faces the bath side. 7 15 FINAL RESULT 7C. Install the 2 leveling blocks (#6) onto the bottom lip of the gasket. 7D. 8 7 (#3). The holes for the hinges should be aligned. 6 7E.
INSTRUCTION MANUAL 8 SILICONE SEAL THE EXTERIOR. HOURS 4 15 8A. Silicone seal the exterior of the shower along the wall and the aluminum threshold (#4) and around the clip(#15).