M-CDPY-66 INSTRUCTION MANUAL Curved glass Panel and door 07.
Please keep this manual and product code number for future reference and replacement parts ordering if necessary. GENERAL INSTRUCTIONS • Read this manual carefully and completely before proceeding. • It is recommended that you wear safety glasses at all times during the installation. INSTALLATION OVER CERAMIC TILES • Silicone should be used to seal the gap where the ceramic tiles meet the panel.
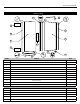
INSTALLATION MANUAL Configurations possibleFRM2-460 / Possible configurations FRM2-448 FRM2-472 BASE SOLD SEPARETLY.
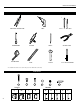
INSTALLATION MANUAL PS66 * LONG NOSE LOCKING PLIER DRILL SCREWDRIVERS TAPE MEASURE 1/4˝& 1/16˝ DRILL BITS SILICONE PENCIL LEVEL MALLET CUTTING PLIER 5/16” HEX NUT DRIVER * To install the shower door on ceramic tiles, use a 1/4’’ drill bit for ceramic tiles.
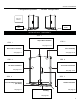
INSTALLATION MANUAL PARTS LISTING 12 6 7 9 HINGE 1 HANDLE 4 3 2 8 9 HINGE 5 10 11 ITEM PARTS QTY 1 WALL JAMB 1 2 3 DOOR PANEL SIDE PANEL 1 1 4 WALL SIDE GASKET 1 5 BOTTOM DOOR GASKET 1 6 MAGNETIC DOOR GASKET 1 7 MAGNETIC SIDE PANEL GASKET 1 8 HANDLES 1 9 HINGE 2 10 GLASS SUPPORT 2 11 THRESHOLD 1 12 ITEM 13 SUPORT BAR HARDWARE WALL PLUG # 1/4” x 1” 1 QTY 3 14 SCREW CAP 4 15 BACK SCREW CAP 4 16 17 18 PAN SELF DRILLING SCREW #8-3/8” PAN HEAD SELF DRILLIN
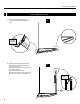
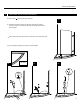
INSTALLATION MANUAL PS66 WALL JAMB INSTALLATION 1 1a. Use a measuring tape and pencil to mark the center of the threshold of the base. 1a INTERIOR SHOWER SIDE 1b Place the wall jamb against the wall so that the holes are located towards the interior of the shower. Center the opening of the wall jamb on the line marked previously. Ensure verticality with a level. Mark the holes position with a pencil using the holes of the wall jamb for reference.
INSTALLATION MANUAL PS66 1 WALL JAMB INSTALLATION (CONTINUED) 1c Drill the holes in the wall with Ø1/4’’ drill bit intented for ceramic tiling . 1c 1d Insert one drop of silicone in each hole in the wall before inserting the wall plug (x3) . 1e Apply silicone at the bottom of the wall jamb on the side that goes on the wall as illustrated. 1f Ensure verticality with the level. Screw the wall jamb on to the wall using the screws 1 1/4’’ (x3) .
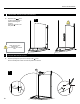
INSTALLATION MANUAL PS66 FIXED PANEL INSTALLATION 2 2a Place glass supports (x2) on the bottom of the 2b Slide the panel. panel temporarily into the wall jamb. MAKE SURE TO PLACE THE GLASS SUPPORTS AS ILLUSTRATED. 2c Mark the glass supports locations on the base.
INSTALLATION MANUAL FIXED PANEL INSTALLATION (CONTINUED) 2 2d Remove the panel and the glass supports. 2d 2e Reposition the glass supports on the base using the line marked previously. Use a 1/16” drill bit to drill holes into the base through the glass supports. 2f Remove the clips and insert one drop of silicone in each hole in the base. 2g Screw the glass supports by using the screws supplied.
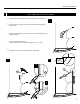
INSTALLATION MANUAL 2 2h FIXED PANEL INSTALLATION (CONTINUED) Reposition the panel in place ensuring that it is placed inside the glass supports. panel to the Clamp the wall jamb.* 2h COVER THE PLIER’S TEETH BEFOREHAND TO AVOID SCRATCHING THE ALUMINUM PARTS. 3 3a SUPPORT BAR INSTALLATION Place temporarily the suport bar on the top of the panel. Ensure verticality with a level and mark the position on the wall.
INSTALLATION MANUAL 3 SUPPORT BAR INSTALLATION 3b Remove the suport bar and take apart the wall end component (A) with the provided Key. Replace the wall end component on the wall using the marked lines. 3b A B 3c Use a 1/4” drill bit to drill a hole into the wall through the wall end component (A). 3c Wall end component A 3d Apply a bead of silicone in the hole and insert a wall plug. Use a screw to secure the wall end component (A) to the wall .
INSTALLATION MANUAL 3 SUPPORT BAR INSTALLATION 3e Reposition the suport bar as illustrated. To ease subsequent installation on the panel insert bar in the wall end component (A) on a horizontal plane as shown. Make sure you insert the clear gasket as shown before installing it on the pannel . 3e TOP VIEW 3f. Level support bar and tighten the set screws.Secure the glass fastener and wall bracket screws to complete the installation process.
INSTALLATION MANUAL 4 INSERT THE MAGNETIC GASKET (FIX PANEL) 4a Use a mallet to install the magnetic gasket on the panel. Make sure it touches the base. INTERIOR SHOWER SIDE 4a 6 DOOR INSTALLATION 5 5a Fasten the hinges to the door as illustrated. Use the provided hex. Key.
INSTALLATION MANUAL 5 DOOR INSTALLATION (CONTINUED) 5b Use a mallet to install the magnetic gasket on the door as illustrated. 6 5c Use the two wood blocks that are supplied to place the door on the center of the base threshold . 2 5b 5d Adjust the glass panels. Adjust the hinges positions in reference to the door panel to ensure contact between backplate gasket and the wall. The magnetic gaskets must be aligned and in contact.
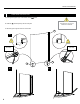
INSTALLATION MANUAL DOOR INSTALLATION (CONTINUED) 5 5e Mark the hinges and drilling locations on the wall 5e 5f Remove the door temporarily and drill holes in each location . 5g Insert one drop of silicone in each hole before inserting the wall plug (x4) . 5h INTERIOR SHOWER SIDE Remove the hinges Take apart the hinge’s front part (A) with the provided hex Key. Place the hinge’s front part (A)on the wall using the marked lines and screw it in place using the screws supplied.
INSTALLATION MANUAL 5 DOOR INSTALLATION (CONTINUED) 5j Reposition the door . Place on the door the hinge’s back side (B) and screw it in place using the screws supplied. 5j A B INTERIOR SHOWER SIDE 5k Secure the 5l Remove the wood blocks. panel with the screws 3/8” (x3) ensuring that the magnetic gaskets are still in contact . 5l 5k 15 16 14 REMOVE THE WOOD BLOCKS.
INSTALLATION MANUAL 6 ACCESSORIES INSTALLATION 6a The gasket must be installed inside the shower. 6b Insert the bottom gasket as illustrated. SWIPE THE EDGE OF THE DOOR PANEL CLEAN TO ENSURE THAT THE ADHESIVE GASKET ADHERES TO THE PANEL.
INSTALLATION MANUAL 6 5 ACCESSORIES INSTALLATION (CONTINUED) 6c Trace the location of the door on the base (when closed). 6c 6d. To have a correct place the threshold against the wall and the glass support before adding the silicone.
INSTALLATION MANUAL 65 ACCESSORIES INSTALLATION (CONTINUED) 6e Apply a bead of silicone to the underside of the threshold before replacing it on the base. 6e HANDLE INSTALLATION 7a See sheet for installation, install the handle as shown.
INSTALLATION MANUAL PS66 8 SEALING 8a Silicone the outside of the shower unit between the wall and the wall jamb (Fig.1), below the side of the aluminum threshold (Fig.3). 8b Wait 24 hours before using the shower to allow the silicon to dry. panel (Fig.