M-PDP95X 06.
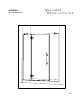
● General Instruction - Read carefully and completely before proceeding. - This shower door should be installed by a recommended installer. - It is recommended that you wear safety glasses at all times during installation. ● Installation over ceramic tiles - Silicone should be used to seal the line where ceramic tiles meets the side panels. - If your shower door is to be installed over ceramic tiles, tiles should be completely under both wall jambs.
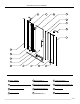
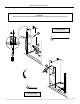
PACKAGING CHECK LIST & HARDWARE 12 9 11 4 10 10 9 1 1 2 3 4 5 1 2 3 4 6 WALL JAMB (2) SIDE PANEL WITH HINGES (1) THRESHOLD (1) HINGE (2) 7 8 5 3 DOOR PANEL (1) 9 6 BOTTOM DOOR GASKET (1) 10 7 LEVELING BLOCKS (2) 11 8 SIDE PANEL (1) 12 SUPPORT BAR (2) MAGNETIC DOOR GASKET (2) KNOB (1) SIDE PANEL GASKET (1) PAGE 1
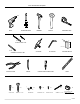
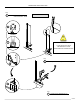
TOOLS AND MATERIALS REQUIRED DRILL HAMMER SCREWDRIVERS MALLET MEASURE TAPE 1/8” ½’’ 1/4” 2’’ ACRYLIC DRILL BIT 6’’ (APROX.DIM) 1/4” SILICONE CERAMIC TILE DRILL BIT CUTTING PLIER PENCIL WOODEN BLOCK ALLEN KEY LEVEL LONG NOSELOCKING PLIER PACKAGING CHECK LIST & HARDWARE X6 X6 a X6 X6 X1 X1 X2 b WALL PLUG SCREW 1 1/4" LG SCREW CAP SCREW 3/8" LG SCREW 3/4" LG SCREW 2 1/2” LG BOTTOM GLASS CLIP (BTM GL CLIP 1.
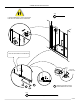
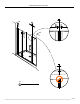
SHOWER DOOR INSTALLATION STEPS WARNING Wall jamb must be supported and fastened with provided anchors into a stud framing.
SHOWER DOOR INSTALLATION STEPS Step 3 SLIDE THE FIXED PANEL OVER THE WALL JAMB ON BOTH SIDE 3A 3B COVER THE PLIER’S TEETH BEFOREHAND TO AVOID SCRATCHING THE ALUMINIUM PARTS.
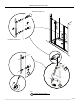
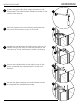
SHOWER DOOR INSTALLATION STEPS Step 7 IT IS RECOMMENDED TO HAVE TWO PEOPLE FOR THE FOLLOWING INSTALLATION STEP.
SHOWER DOOR INSTALLATION STEPS INTERIOR HANDLE (1) U P / H AU T EXTERIOR HANDLE (1) 8A 8C 8B Step 8 HANDLE INSTALLATION PAGE 6
SHOWER DOOR INSTALLATION STEPS UP Step 9 MAGNETIC DOOR GASKET (1) PAGE 7
ADDENDUM INSTALLATION GUIDE 1 Loosen the glass clip (#1d). Align the slotte to the fixed panel. The slotted screw head should be on the inside of the shower. 1 2 Rest the support bar on the fixed panel inside the tub. Level it and trace an arc on the wall. 2 3 Isolate the wall bracket and drill a hole, using a 1/4˝ drill bit through the wall. Locate the position of this hole by way of the wall bracket. Insert a wall plug.
SHOWER DOOR INSTALLATION STEPS Step 12 A SUPPORT BAR(1) B C UP D Step 11 GASKET ON FIXED PANEL (1) INTERIOR SHOWER SIDE B Step 10 SCREW 3/8" LG + SCREW CAP (6) A PRIOR TO FASTENING DOOR ASSEMBLY, VERIFY MAGNETIC DOOR GASKET ALIGNMENT AND ALL PANELS SHOULD BE LEVELED.
SHOWER DOOR INSTALLATION STEPS UP Step 13 SILICON SEAL EXTERIOR INTERIOR SHOWER SIDE Step 14 THRESHOLD (1) Recommended: 24 Hours To ensure optimal leak protection, it is recommended to install the aluminum threshold by running a bead of silicone under the part and position it between the fixed panels and underneath door panel.