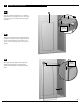
P-DR1W-48 | P-DR1W-60 OWNER’S MANUAL SHOWER ENCLOSURES 2 PEOPLE REQUIRED IT IS MANDATORY TO HAVE A WALL STUD ON EACH SIDE OF THE SHOWER UNIT TO SECURELY FASTEN THE RAIL TO THE WALLS. 06.
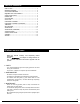
TABLE PANNEAU OF CONTENTS FIXE / FIXED PANEL 1 PARTS LISTING ........................................................ 3 PROVIDED HARDWARE ............................................... 4 GLASS PANEL DIMENSIONS .......................................... 4 REQUIRED TOOLS AND MATERIALS ................................. 4 GASKET INSTALLATION............................................... 5 RUNNING RAIL. ....................................................... 6 GLASS HOLDERS ....................................
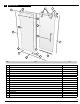
1 PARTS LISTING 1 5 3 2 3 2 4 6 7 10 8 9 12 16 11 13 14 15 ITEM 17 QTY PARTS 1 RUNNING RAIL 1 2 WALL BRACKET 2 3 STOPPERS 2 4 GLASS HOLDERS 2 5 TWIN ROLLERS 2 PAIRS 6 SLIDING DOOR PANEL 1 7 FIXED PANEL 1 8 STRAIGHT HANDLE 1 9 GASKET (DOOR) 1 10 GASKET (FIXED PANEL) 1 11 BOTTOM GLASS CLIP 1 12 GASKET (GLASS CLIP) 2 13 BOTTOM GUIDE 1 14 GASKET (BOTTOM GUIDE) 1 15 THRESHOLD 1 16 DOOR PANEL SIDE GASKET 1 17 DOOR PANEL BOTTOM GASKET 1 3
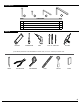
HARDWARE 19 18 ITEM 21 20 QTY HARDWARE 18 #12-3 SELF-THREADING SCREW 4 19 #6-1 SELF-THREADING SCREW 2 20 HEX KEY 3mm 1 21 HEX KEY 6mm (7/32˝) 1 TOOLS * HACKSAW SCREWDRIVERS DRILL 1/4˝& 1/8˝ DRILL BITS SILICONE If the shower panels are to be assembled on ceramic tiles, use a 1/4˝ drill bit for ceramic tiles.
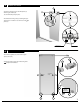
1 GASKET INSTALLATION 1A Using the cardboard packaging box as platform, install bottom door gasket (17) onto door panel (6) using a block and a mallet. Notice the gasket orientation. 6 1A 6 INTERIOR SHOWER SIDE 17 1B Place door panel (6) inside tub to simplify following installation procedures. Ensure placing the panel onto a cushioned surface, such as a towel or card board, to prevent damage either to the panel or the tub. 1B Thoroughly clean the edge of the fixed panel (7).
2 RUNNING RAIL 3 1 2A Position the stoppers (3) on the running rail (1) as illustrated. Secure them temporarily in place. 2 1 2B Position the wall brackets (2) on the running rail (1) as illustrated. Secure them temporarily in place.
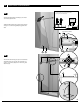
3 GLASS HOLDERS 7 Fasten the running rail (1) to the fixed panel (7) with the glass holders (4). Secure them temporarily in place. 1 4 Ensure that the running rail (1) is at the highest possible position in reference to the holes of the xed panel (7). 4 1 GLASS HOLE 4 WASHER GLASS CLIPS Insert bottom gaskets (12) in the bottom glass clips (11) and (13). 13 11 Position the bottom glass clip and bottom guide xed panel as illustrated.
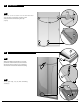
5 FIXED PANEL PLACEMEMENT 5A The bottom guide (13) can hang off the threshold (B) as long as it can be well-fastened. Position the fixed panel assembly (7) on threshold of base (B) as shown . 13 Adjust the fixed panel (7), by way of the running rail (1), so as to force the gasket (10) against the wall. INTERIOR 6 SHOWER SIDE B 1/2” max (12.7mm) 1 7 10 7 B 5B Ensure that the running rail (1) is level and that the fixed panel (7) is square.
5 CONTINUED 5C M a r k t h e s c r e w lo c a t io n s f o r t h e w a ll b r a c k e t s (2) on the walls on both sides of shower as well as the placement of the bottom glass clips (11) (13). 2 11 13 11 6 13 S THRESHOLD 6A 15 Remove the fixed panel assembly so as to allow placement of the threshold (15) onto the base. Ensure that a bead of silicone (S) is applied to the underside of the threshold before installing. 6A 15 6B 6B Secure glass clips (11) (13) with self-drilling screws (19).
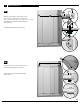
7 WALL BRACKETS 2 7A 1 2 Mark the screw locations on the walls on both sides of shower. Remove the running rail (1) f r o m t h e w a ll b r a c k e t s ( 2 ) . D r ill h o le s in w a lls until wall stud is reached with a drill bit intended for ceramic tiles. WALL STUD Fasten the wall brackets (2) with #12-3 (18). 2 18 11 7 7B Insert fixed panel (7) back, ensuring that it’s placed in the bottom glass clips (11) (13).
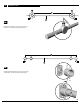
8 SLIDING DOOR 8A 5 Assemble the 2 top rollers (5) to the door panel (6) as illustrated. 6 INTERIOR SHOWER SIDE 1 6 5 8B 6 Install sliding door (6) ensuring that rollers (5) are fixed over the running rail (1). Ensure that sliding door (6) is placed within the bottom guide (13).
8 CONTINUED WASHER 5 8C Install bottom rollers, making sure that they are tangent to the running rail (1). Through the use of the nonconcentric washers, adjust rollers so that the sliding door panel is parallel to the running rail. 1 WASHER 5 GLASS HOLE 9 HANDLE See sheet for installation and install the handle as shown.
10 GASKETS INSTALLATION 10A Thoroughly clean the edge of the sliding door, closest to the side where the handle is located. Apply the door gasket (9) to this edge of the sliding door (6). 10A 6 9 INTERIOR SHOWER SIDE 10B Install door side gasket (16) onto sliding door panel (6).
11 STOPPERS 10 Ajuster le positionnement des butoirs (3) afin d’obtenir une ouverture ainsi qu’une fermeture optimale de la porte coulissante. Assurer que le joint de rétention (9) de la porte coulissante s’écrase contre le mur. DOOR CLOSED 3 3 9 Adjust the position of the stoppers (3) so as to ensure a maximum opening and closing range. Ensure that the sliding door gasket (9) is forced against the wall. DOOR OPEN 6 12 SILICONE 7 APPROX.