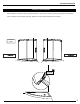
WC-66-75 INSTRUCTION MANUAL SHOWER DOOR 05.11 2 PEOPLE REQUIRED KW002 IT IS MANDATORY TO HAVE A WALL STUD ON EACH SIDE OF THE SHOWER UNIT TO SECURELY FASTEN THE RAIL TO THE WALLS.
INSTRUCTION MANUAL GENERAL INSTRUCTIONS Read this manual carefully and completely before proceeding. It is recommended that you wear safety glasses at all times during the installation. INSTALLATION OVER CERAMIC TILES If your shower door is to be installed over ceramic tiles, the tiles should lay completely under the wall jamb. Silicone should be used to seal the gap where the ceramic tiles meet the panel. NOTICE Caulking: no sealant is required inside the shower.
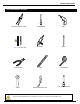
INSTRUCTION MANUAL TOOLS AND MATERIAL REQUIRED LONG NOSE LOCKING PLIER CUTTING PLIER MALLET L BITS SCREWDRIVERS DRILL SILICONE LEVEL RUBAN DOUBLE FACE VHB PENCIL TAPE MEASURE 5/16” HEX NUT DRIVER TO INSTALL THE SHOWER DOOR ON CERAMIC TILES, USE A 1/4’’ DRILL BIT FOR CERAMIC TILES.
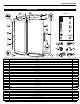
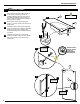
INSTRUCTION MANUAL PARTS LISTING 9 19 16 HARDWARE 18 13 5 14 20 23 24 21 22 25 6 1 11 3 8 4 7 2 12 4 17 15 10 14 19 13 16 17 15 ITEM PARTS 1 WALL JAMB (REGULAR PUNCH) QTY 1 2 FIXED PANEL 1 3 UNIVERSAL EXPANDER 1 4 FIXED PANEL GASKET 1 5 MIDGASKET 1 6 DOOR PANEL 1 7 BOTTOM DOOR GASKET 1 8 DOOR SIDE GASKET 1 9 RUNNING RAIL 1 10 DOOR FRONT THRESHOLD 1 11 STRAIGHT HANDLE BAR 1 12 U CHANNEL 1 13 ROLLERS 2 14 ANTI-JUMP 2 15 DOOR RECEIVER 1
INSTRUCTION MANUAL POSSIBLE CONFIGURATIONS Recommended door panel according to showerhead location. Choose right or left door opening, according with recomandations. Trace a centerline on the threshold of the base. Determine on which side the wall jamb will be mounted. BASE SOLD SEPARETLY.
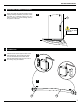
INSTRUCTION MANUAL 1 1a 1b 1c 1d VvVV DOOR PANEL ASSEMBLY Use a mallet to install the bottom gasket (7) on the bottom of the door panel (6). To facilitate installation place the door panel on the cardboard packaging box and use it as platform. Notice that the holes are situated at the top of the door panel. 6 1a DOOR HANDLE HOLES Measure and cut 3/8” off the edge of the gasket. Cut on the opposing side of the door handle holes.
INSTRUCTION MANUAL 1 DOOR PANEL ASSEMBLY (CONTINUED) 1e Place door panel (6) inside the shower area to simplify following installation procedures. Place the panel on a cushioned surface, such as a towel or carboard, to prevent damage either to the panel or to the base. 1e 6 !! CARBOARD OR TOWEL TO PROTECT 2 2a 2b RUNNING RAIL Unfasten the set screws (x4) from each of the wall brackets (18). Remove the back plates from the wall brackets and set them aside.
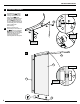
INSTRUCTION MANUAL 3 3a 3b FIXED PANEL ASSEMBLY Assemble the panel with the running rail. Align running rail holes with the holes of the panel. Install glass fasteners(19) to join the panel(2) and the running rail (9). Be sure to place gaskets between all contact with glass and metal parts. Fasten with hex 3mm key. SIDE VIEW 3a 9 19 2 Place U-channel (12) temporarily on the bottom of the panel (2). Slide the panel pre-assembled with expander (3) and gasket (4) into the wall jamb (1).
INSTRUCTION MANUAL 3 3c 3d 3e FIXED PANEL ASSEMBLY (CONTINUED) Reassemble temporarily the angled wall back plate to the wall bracket on the running rail. Temporarily place bottom guide (17) on the bottom of the panel (2). 3d 3c Place temporarily the panel assembly on the threshold of the base on the line that was marked previously. Push wall brackets against wall (x2) and level. Trace the outer edges of the wall brackets (x2).
INSTRUCTION MANUAL 4 WALL JAMB INSTALATION 4a Push the wall jamb against the wall. Lock into position by clamping the wall jamb and expander with pliers. Trace the position of the wall jamb on the wall as illustrated. Trace the position of the U channel (12) and of the bottom guide (17) on the threshold of the base. Mark the location of the bottom guide’s hole. 4b Remove the panel assembly with the running rail along with the wall jamb , wall brackets the U-channel and the bottom guide. Put aside.
INSTRUCTION MANUAL 4 WALL JAMB INSTALATION (CONTINUED) 4c Replace the wall jamb against wall using centerline previously marked as a guide. Be sure to center the slotted holes with the centerline. Level and mark locations of the four holes to be drilled. Remove the wall jamb. 4d Drill a hole in each location with a 1/4” drill bit. 4e 4d 4c 1 Insert one drop of silicone in each hole in the wall before inserting the supplied wall plugs(x4).
INSTRUCTION MANUAL 4 WALL JAMB INSTALATION (CONTINUED) 4f Add silicone to the exterior bottom edge of the wall jamb. 4g Fasten the wall jamb to the wall with 1-1/4” screws (24) through the previously installed wall plugs. (x4) 4h Add silicone to interior bottom edge of wall jamb 4f 4g 24 4h INTERIOR SHOWER SIDE 7a 5 5a 5b WALL BRACKET BACK PLATE Align the back plates of the wall brackets to previously traced mark lines on the wall.
INSTRUCTION MANUAL 5 WALL BRACKET BACK PLATE (CONTINUED) 5c Insert one drop of silicone in each hole bored in the wall before inserting the wall plugs. Screw in 5d 5c head screws through holes to 5d secure back plate of bracket to wall (x2) SAME PROCEDURE FOR OPPOSITE SIDE OF WALL 6 6a 6b U-CHANNEL LOCATION Apply double sided VHB tape to the bottom of the U-channel (12). 6a Place the u-channel against the wall jamb and align it to the line marked previsouly on base.
INSTRUCTION MANUAL 7 BOTTOM GUIDE INSTALLATION 7a Place bottom guide to the edge of the U-Channel .Center the front bottom guide channel to the center of the U-Channel. Once in place mark hole location and remove bottom guide. 7b Drill with 1/8” drill bit in marked location, then apply a drop of silicone in hole. 7c Reposition bottom guide and secure in place. Top with screw cap. 7d Place the gasket in the bottom guide.
INSTRUCTION MANUAL 8 8a 8b 8c FIXED PANEL INSTALLATION Install the panel. Insert the running rail into the wall bracket back plates that were installed previously. Insert the glass panel in the front bottom guide channel. 8a Push wall brackets towards the wall and lock in with the back plates previously secured to the wall. Repeat on opposite side. Tighten set screws to secure in place with provided Allen key.
INSTRUCTION MANUAL 9 SECURE THE WALL JAMB AND EXPANDER 9a Drill through the wall jamb a hole with the 1/8” drill bit, to perce through the expander. (x3) 9b Screw 3/4” screws (23) through holes to hold expander and wall jamb together in place. (x3) Cover all screws with screw caps (21).
INSTRUCTION MANUAL 11 11a 11b 11c 11d DOOR GASKETS INSTALLATION Temporarily install midgasket (5) and the door gasket (8) to door panel. 11a Close door entirely, mark interference of the gaskets with the running rail. Cut gasket at marked locations using cutters. Note that midgasket (5) needs only to be cut below the running rail. The top part is no longer required for assembly. 5 8 REMOVE GASKET FROM PANEL BEFORE CUTTING. Reinstall gaskets from bottom working your way up.
INSTRUCTION MANUAL 126 ANTI-JUMP & DOOR STOPPER 12a 12b Install Anti-Jump (14) in lower holes of door panel located below the running rail. Be sure to place gaskets between contact of glass and aluminium parts. (x2) 12a Install door stopper (16) located in the interior shower next to wall jamb. Use hole provided in running rail.
INSTRUCTION MANUAL 13 DOOR RECEIVER INTALLATION Place door receiver (15) against the wall, so 13a that the door panel slides smoothly into the 13b 13a receiver. Mark hole location. Remove door receiver and drill in marked 13b location with 1/8” drill bit. 13c 15 Insert one drop of silicone into hole. Reposition and secure in place with 13d provided screw then place the screw cap. 13c 14 14a 14b 13d THRESHOLD Place threshold (10) between wall and bottom guide as shown in 14a.
INSTRUCTION MANUAL 15 SEALING 15a Silicone the outside of the shower unit along the wall jamb and the exterior side of aluminum threshold and U-channel. 15b Wait 24 hours before using the shower to allow silicon to dry.