
User's Manual
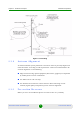
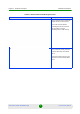
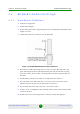
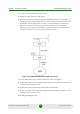
Table Of Contents
- BreezeNET B130/B300 GigE Technical User Manual
- Chapter 1 - Getting Started
- Chapter 2 - Hardware Description
- 2.1 Power supply units (IDU)
- 2.2 Outdoor Units (ODU)
- 2.3 Installation Preparations
- 2.3.1 Required Components and Accessories
- 2.3.2 Antenna Placement
- 2.3.3 Antenna Poles Usage
- 2.3.4 Poles with Stretching
- 2.3.5 Wall Mounted Pole
- 2.3.6 Antenna Poles Requirements
- 2.3.7 Grounding when Using IDU-BS-G
- 2.3.8 Antenna Alignment
- 2.3.9 Precaution Measures
- 2.3.10 Service Cable Soldering Procedure
- 2.3.11 Tools Required at the Installation Site
- 2.4 BU/RB-B130D/B300D-5X-GigE
- 2.5 BU/RB-B130/B300-5X-GigE
- 2.6 Mounting Kit (MOUNT-KIT-85)
- 2.7 Specifications
- Chapter 3 - Basic Configuration Instructions
- Chapter 4 - Link Configuration
- Chapter 5 - Configuration Via Web Interface
- Chapter 6 - Supplementary Information

Chapter 2 - Hardware Description Installation Preparations
Alvarion BreezeNET B130/B300 GigE 19 Technical User Manual
Step 3. Put connector parts on the
STP service cable as shown.
Attach RJ-45 connector without
grounding to the STP service cable
according to the "RJ-45" soldering
scheme (in the "Supplementary
information" chapter of this manual)
and crimp the connector using a
crimp tool.
Please tightly crimp the
RJ-45 connector. Not
crimped or badly crimped
connector damages the
unit when assembled into
it which is not considered
as a warranty case.
Step 4. Put Part 4 on the attached in
the previous step RJ-45 connector.
Step 5. Screw Part 2 on Part 4. This
fixes the "RJ-45" connector on the
cable. Check that the connector is
properly fixed on the cable.
Table 2-3: RJ-45 Connector Soldering Procedure
Illustration Description