
User's Manual
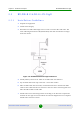

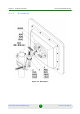
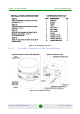

Table Of Contents
- BreezeNET B130/B300 GigE Technical User Manual
- Chapter 1 - Getting Started
- Chapter 2 - Hardware Description
- 2.1 Power supply units (IDU)
- 2.2 Outdoor Units (ODU)
- 2.3 Installation Preparations
- 2.3.1 Required Components and Accessories
- 2.3.2 Antenna Placement
- 2.3.3 Antenna Poles Usage
- 2.3.4 Poles with Stretching
- 2.3.5 Wall Mounted Pole
- 2.3.6 Antenna Poles Requirements
- 2.3.7 Grounding when Using IDU-BS-G
- 2.3.8 Antenna Alignment
- 2.3.9 Precaution Measures
- 2.3.10 Service Cable Soldering Procedure
- 2.3.11 Tools Required at the Installation Site
- 2.4 BU/RB-B130D/B300D-5X-GigE
- 2.5 BU/RB-B130/B300-5X-GigE
- 2.6 Mounting Kit (MOUNT-KIT-85)
- 2.7 Specifications
- Chapter 3 - Basic Configuration Instructions
- Chapter 4 - Link Configuration
- Chapter 5 - Configuration Via Web Interface
- Chapter 6 - Supplementary Information

Chapter 2 - Hardware Description BU/RB-B130/B300-5X-GigE
Alvarion BreezeNET B130/B300 GigE 25 Technical User Manual
2.5 BU/RB-B130/B300-5X-GigE
2.5.1 Installation Guidelines
1 Unpack the equipment
2 Check items integrity
3 Determine the STP cable length that is used to connect IDU and ODU. The
total cable length between LAN (behind IDU) and ODU should not be longer
than 100 meters.
4 Install (solder) connector for ODU on the STP cable and isolate it
5 Lay the STP cable "from top to bottom" - from ODU to IDU
6 After the STP cable has been laid, use distribution box to switch from STP
cable to UTP cable with RJ-45 connectors. Service cable connecting IDU and
ODU should be STP Cat 5E cable.
7 Install ODU on the mounting bracket according to the direction required for
the link. Do not tight it too hard unless the antenna alignment is not complete.
Install ODU connectors down.
Figure 2-12: BU/RB-B130/B300-5X-GigE Installation 1