
User's Manual
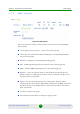
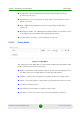


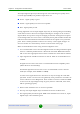
Table Of Contents
- BreezeNET B130/B300 GigE Technical User Manual
- Chapter 1 - Getting Started
- Chapter 2 - Hardware Description
- 2.1 Power supply units (IDU)
- 2.2 Outdoor Units (ODU)
- 2.3 Installation Preparations
- 2.3.1 Required Components and Accessories
- 2.3.2 Antenna Placement
- 2.3.3 Antenna Poles Usage
- 2.3.4 Poles with Stretching
- 2.3.5 Wall Mounted Pole
- 2.3.6 Antenna Poles Requirements
- 2.3.7 Grounding when Using IDU-BS-G
- 2.3.8 Antenna Alignment
- 2.3.9 Precaution Measures
- 2.3.10 Service Cable Soldering Procedure
- 2.3.11 Tools Required at the Installation Site
- 2.4 BU/RB-B130D/B300D-5X-GigE
- 2.5 BU/RB-B130/B300-5X-GigE
- 2.6 Mounting Kit (MOUNT-KIT-85)
- 2.7 Specifications
- Chapter 3 - Basic Configuration Instructions
- Chapter 4 - Link Configuration
- Chapter 5 - Configuration Via Web Interface
- Chapter 6 - Supplementary Information

Chapter 5 - Configuration Via Web Interface Basic Settings
Alvarion BreezeNET B130/B300 GigE 75 Technical User Manual
5.3.5 MAC Switch
This section allows stating the switch mode on the unit and creating multiple
switch groups.
"Create Switch Group" button - creates a new switch group
"ethX" and "rfx" check-boxes allows including the corresponding interfaces
into the switch group
Enabled - enables the corresponding switching group
STP - enables Spanning Tree Protocol feature at the switching group
IGMP - enables IGMP-Snooping feature at the switching group
Repeater - starts the repeater mode. In this mode the group switches the
packets simply by sending them to all the device's interfaces except the one
the packet was received from.
Admin - sets the switching group as the admin group. All the packets
originated by the unit itself (e.g. RIP/OSPF or ping) leave the MINT network via
the admin group. If "No Admin Group" is selected such packets isn't able to
leave the network
"X" button - deletes the group
Up and down arrows allows to change the group's order
Figure 5-6: MAC Switch