
User's Manual


Amplifier Kit
BreezeNET PRO.11 Series 0-2 User’s Guide
Installation and Mounting
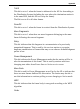
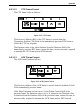
The amplifier can be mast mounted using the steel U-bolt included with the unit.
The amplifier should be installed with the connectors facing downward. After
placing the assembly on the mast, use an open-end wrench to carefully tighten the
nuts. Take care not to over-tighten the nuts or you may inadvertently strip the
threads. See the diagram below for proper assembly.
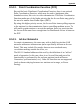
It is very important to waterproof the RF connectors on the
amplifier. However, it is recommended that you do not seal the connectors until
after all system tests have been performed. Be sure to use the high quality weather
resistant vapor wrap included with you amplifier kit to seal all the outside
connections.
The DC Power Injector is not in a waterproof enclosure and must be protected from
the weather. It can be permanently mounted to a surface using the mounting flanges.
Refer to the BreezeCom Amplifier Installation Details diagram shown later in this
manual.
NOTE: When using the 24dB gain dish antenna in the United States,
the external filter (P/N: SPF-1) must be installed to comply
with FCC emission requirements.
AMP
MAST