
User Manual

风 琴 折 - 成 品 尺 寸 :7 0 * 1 0 0 m m
ALXUM S1204B 说明书 128G双铜 四色双面印刷
AX-S204B
USB3.1 Gen2 Type C to M.2 SSD
(NVME/SATA) Enclosure
USER MANUAL
www.alxum.com
Customer Service
If there is any question, please contact us.
www.alxum.com
Life Time Technical Support
support@alxum.com
www.alxum.com/pages/contact-us
24H-Customer Service Support
2-Year Warranty
4 5
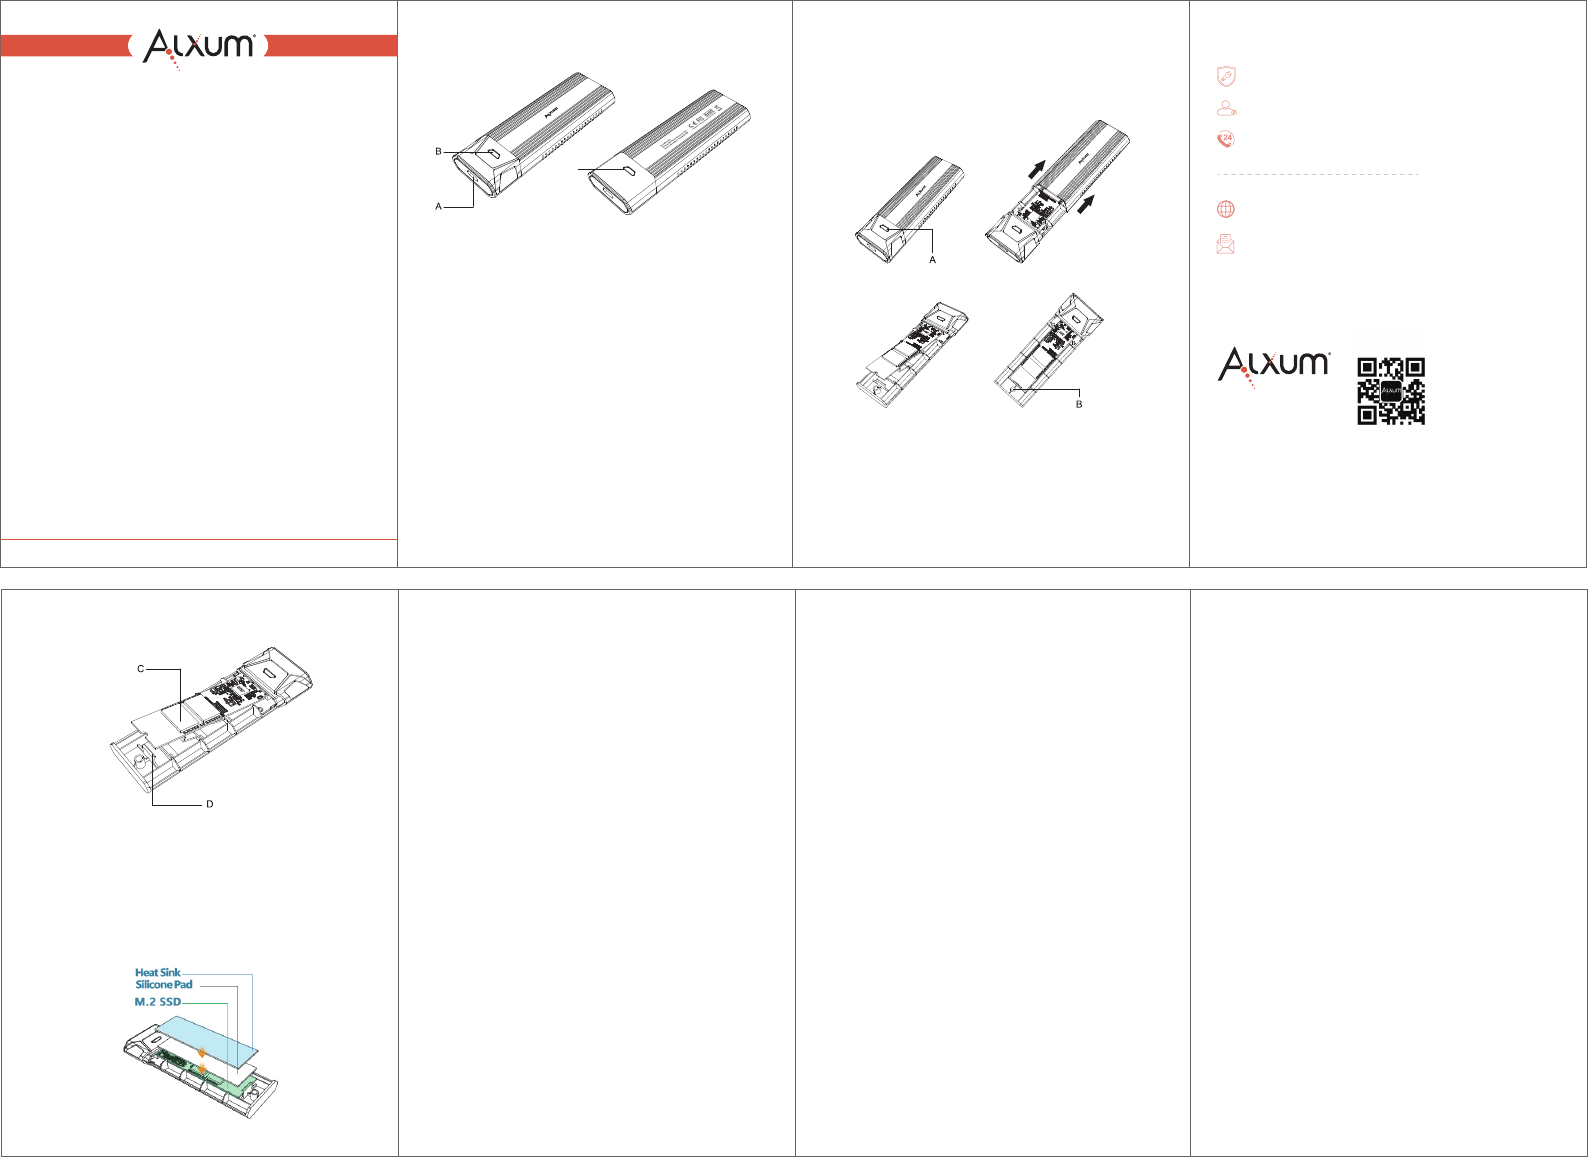
Product Schematic Diagram
Product Features
A.Upstream USB Type-C Interface
B.Blue LED Light
Status 1: Light on when switch on
Status 2: Blinking when read and write
Status 3: Sleep indication, off for 3 seconds, light for 1 second,
cycle display
C.The lock button
1. Support PCIe Gen2 interface, apply NVME / SATA protocol.
2. M.2 M key and M+B Key interface are supported, compatible with
a variety of sizes of M.2 SSD (42mm/ 60mm/ 80mm).
3. With USB3.1 Gen2 Type-C interface, supports up to PCIe
10Gbps data transfer speed and SATA 6Gbps M.2 SSD(in
accordance with AHCI specifications). It’s a reversible plug
connector, easy to plug in and out. Backward compatible with
USB3.0 / 2.0.
4. Support UASP and TRIM, maximize the data transfer speed and
II.42/60mm M.2 SSD Installation
How to Install the Heat Sink
1. Remove the silicone pad and heat sink from the package;
2. Paste the silicone pad accessories on the M.2 SSD card below;
3. Paste the heat sink accessories on the silicone pad below.
FAQ
Q: Why it can’t reach the data transfer speed of USB3.1 Gen2?
A: This product passed rigorous testing. Under normal situation, it
can read and write with the speed of USB3.1 Gen2 (10Gbps).
1). Please make sure your host (computer) supports USB3.1 Gen 2
specification. Otherwise, there will only a corresponding speed of
either USB3.1 Gen1 or USB2.0.
2). If you use other USB C cable in the market, please confirm
whether the cable that you are using supports USB3.1 GEN2
version. If not, there will be only USB3.0/USB2.0 speed.
Q: After installing new M.2 SSD, why I can’t find it on “My
Computer”?
A: You must do “partition” (format) for hard disk before using it.
Q: Why Windows XP can’t recognize the hard disk which is more
than 2TB?
A: Windows XP has limitation, it able to read up to 2TB (max.) hard
disk only. We suggest to upgrade the OS to Vista (64bit) and
above. Recommended to convert the disk GPT disk partition,
otherwise the OS will not support more than 2TB of disk partition.
Q: How to remove the device safely?
A: It’s recommended to click “Safely Remove Hardware and Eject
Media” on bottom right of your screen.
Packaging Content
1 x USB3.1 Gen2 Type-C to M.2 SSD Enclosure
1 x USB-C to USB-C Data Cable
1 x USB-C to USB-A Data Cable
1 x Heat Sink
1 x Silicone Pad
1 x User Manual
Tips
1. This product using M key interface / M+B key interface and
PCIe/NVMe/SATA interface, please ensure that you have
purchased the correct M.2 SSD interface.
2. Please make sure disconnect the power before remove or install
the M.2 SSD.
3. When installing the M.2 SSD to the PCBA board of this product,
keep your hands dry and avoid causing phenomena such as
static electricity to burn the SSD. If necessary, touch the metal
objects or put on chemical fiber clothing in winter to reduce the
static electricity.
4. Be careful not to damage the components of the circuit board.
5. Please keep all the removable parts properly.
6. After using, before removing the hard disk box, please select the
safe removal on the computer and manually pull out, otherwise it
may cause data loss in the hard disk and damage to the hard
disk.
7. Since Windows 10 and above and Mac OS are the best
compatible with NVMe, this product is recommended to get
better transmission performance in Windows 10 or higher or Mac
OS system.
21
6
1. Press the lock button on the back of the product (shown in A on
back side).
2. Pull out the mainboard.
3. Insert the M.2 SSD diagonally down into the PCIe / NVMe slot.
4. Gently press down on the M.2 SSD with your fingers and snap it
into the plastic snap-on case. When disassembling, also push
the buckle outward to release it (shown in B).
lifespan of SSD.
5. With a blue LED light to indicate the working status.
6. Plug and play, hot swappable, no need to install driver.
How to Install M.2 SSD
I.80mm M.2 SSD Installation
1. Hold the inner tray after inserting the M.2 SSD, then use your
finger to press the position indicated by C and insert the SSD
card to the buckle indicated by D.
2. Use the finger under the inner tray and lightly press the position
indicated by D (use your finger from the button to the top to hook
the SSD), hear a click or actually hook the SSD card. It can be
simply disassembled when you pull the buckle from the top to the
opposite direction.
3
C