
Installation Manual
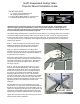

STEP 5 - If your kit includes 2 Suspension Rods the height can
be adjusted by adding or removing one of the sections. Loosen
the ceiling frame scissor clamp on the suspension rod and
open the clamp to an X shape. Place the scissor clamp on the
reinforced ceiling frame location and close the clamp assuring
that all 4 wings are wrapped over the suspended ceiling metal
frame. Now add the lock washer to the scissor clamp nut and
screw on the suspension rod clockwise.
STEP 6 - You can now mount the projector on to the
suspension rod coupling as shown. Then add the 2 tilt adjust
screws on the sides of the mount as shown. Lighten tighten the
screws with the supplied Hex Key.
If the projector is off balance and tilts in the wrong direction with
the lens aiming up, you will need to remove the projector from
the coupling, set in on the table and re-adjust the projector
mount legs to reposition the location of the mount head. This
may require trial and error such that the projectors natural tilt is
near correct. Minor tilt adjustments can now be made with the
tilt adjust screws by loosened and then re-tightened.
Now you will need to install the power and signal cords and
start the projector to project an image for alignment.
Physical alignment is obtained by loosening the 4 tilt adjust cap
screws while handling the projector to adjust alignment. your
image will require key stone adjustment in the projector
settings.
Projector cords can be run above the ceiling tiles or we offer
accessory T-Bar Hooks for below ceiling cable management.
ALZO sells accessory 8 inch extension rods if your ceiling is
very high and you need to lower the projector.
Coupling
Suspension Rod
Scissor Clamp
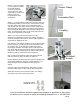
ACCESORY T-BAR
HOOKS (SET OF 4)
If you have additional questions regarding the installation or application of this product,
we welcome you to contact us directly at csupport@alzodigital.com or 800-582-7009.
1023 IS
Tilt Adjust
Screws
STEP 4 - Prep the coupling
by removing and set aside
the 2 lower tilt adjust
screws as shown here.
Then loosen the 2 upper
screws about 1/4 inch such
that they fit into the
Projector Mount Head
slotted holes.
Upper
Screws