BUILT BE_'YE_ THAH IT HAS TO BE _= Covering model A CM/ 460A / A CM2t 60A Contents important Safety information .......................................3 Installation..................................................................... 5 Other Helpful Information............................................. 6 Cooking Utensils........................................................... 8 Electric Keep instr_ctions Be sure Feature Diagram ..........................................................
Thank you for buying an Amana Please take the time to complete the registration card and return promptly. if the registration card is missing, call Amana Consumer Affairs Department. When contacting Amana, provide product information from serial plate: Model Number Manufacturing (P) Number Serial Number (S/N) Purchase Date Microwave! Asure TM Extended Service Plan Amana Appliances offers long-term service protection for this new microwave.
IMPORTANT SAFETY INFORMATION CAUTION To avoid risk of personal injury or property damage, observe the following: 1. Be certain to place the front surface of the door three inches away or more from the countertop edge to avoid accidental tipping of the appliance in normal usage. 2. For the most accurate programming of the electronic units, touch the center of each pad securely. Do not touch several pads at one time or touch between pads.
IMPORTANT Recognize SAFETY INFORMATION this symbol as a SAFETY message WARNING To reduce the risk of burns, electric shock, fire, injury to persons, or exposure to excessive microwave energy: 1. Read all instructions before using the appliance. 2. Read and follow the specific PRECAUTIONS TO AVOID POSSIBLE EXPOSURE TO EXCESSIVE MICROWAVE ENERGY found on page 3 of this manual. 3. This must be grounded. Connect only to properly grounded outlet. See GROUNDING INSTRUCTIONS found on page 5 of this manual.
D. PLACEMENT I WARNING ] To avoid risk of electrical shock or death, this oven must be earthed. I A WARNING ] To avoid risk of electrical shock or death, do not alter the plug. A. GROUNDING INSTRUCTIONS This appliance must be grounded. In the event of an electrical short circuit, grounding reduces the risk of electric shock by providing an escape wire for the electric current. This appliance is equipped with a cord having a grounding wire with a grounding plug.
Other Helpful Information GETTING THE BEST RESULTS FROM YOUR MICROWAVE OVEN SPECIAL TECHNIQUES MICROWAVE COOKING IN Keep an eye on things. The instructions in this book have been formulated with great care, but your success in preparing food depends, of course, on how much attention you pay to the food as it cooks. Always watch your food while it cooks.
Other Helpful Information Elevating: Thick or dense foods are often elevated so that microwaves can be absorbed by the underside and center of the foods. Piercing: Foods enclosed in a shell, skin, or membrane are likely to burst in the oven unless they are pierced prior to cooking. Such foods include both yolks and whites of eggs, clams and oysters, and many whole vegetables and fruits. Testing if cooked: Because foods cook so quickly in a microwave oven, it is necessary to test food frequently.
Cooking Utensils CAUTION ] To avoid risk of personal injury or property damage, do not use stoneware, alumium foil, metal utensils, or metal trimmed utensils in the oven. MICROWAVE-SAFE UTENSILS Never use metal or metal-trimmed utensils in your microwave oven: Microwaves cannot penetrate metal. They will bounce off any metal object in the oven and cause arcing, an alarming phenomenon that resembles lightning. Most heat-resistant non-metallic cooking utensils are safe for use in your microwave oven.
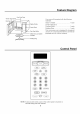
Feature Diagram Oven Front Plate Window Door Screen Your oven will be packed with the following materials: Door Seal ¢ DisplayWindow J Control Panel Door Open Button Safety Door Lock System Glass Turntable ...................................... 1 each Owner's Manual & Cooking Guide ........................................ 1 each Rotating Ring .......................................... 1 each This microwave oven is designed for household use only.
Operating Instructions SETTING CLOCK TIME COOK When your oven is plugged in for the first time or when power resumes after a power interruption, the numbers in the display reset to ":". This function allows you to cook food for a desired amount of time. Because many foods need slower cooking (at less than HI-POWER), there are 10 power level settings in addition to HI-POWER. NOTE: When cooking is complete, beeps will sound. The word END shows in the display window. Then the oven shuts itself off.
Operating Instructions MULTI-STAGE TIME COOK CHILD LOCK For Multi-Stage cooking, touch PROGRAM and repeat Time Cook steps 1-3 on previous page before touching the START pad. Auto Defrost can be programmed before the first stage to defrost first and then cook. This safety feature prevents unwanted oven operation. Once the child lock is set, no cooking can take place. The Child Lock feature is also useful when cleaning the control panel.
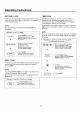
Operating Instructions CONTROL SET-UP CONTROL SET-UP provides five modes which make using your microwave oven quite handy. You can select SOUND ON/OFF, CLOCK ON/OFF, SCROLL SPEED, LBS/KG, and DEMO MODE. Example 1: To turn off Sound of beeper. 1. Touch CONTROL SET-UP CONTROL Example 2: To select SET-UP. kg unit. 1. Touch C©NTR©L SET-UP Five modes show in the display repeatedly. You can set them according to your intention. CONTROL SET-UP. Five modes show in the display continuously.
Operating Instructions MORE/LESS SENSOR By using the MORE or LESS keys, all of the AUTO COOK, TIME COOK, EASY COOK, SENSOR COOK programs can be adjusted to cook food for a longer or shorter time. Pressing MORE will add 10 seconds to the cooking time each time you press it. Pressing LESS will subtract 10 seconds of cooking time each time you press it. You must wait until heating begins to count down before adding or subtracting time.
Operating Instructions SENSOR Code 1 COOK CHART Direction Amount Potato Pierce each potato with a fork and place on the oven tray around the edge, at least one inch apart. 1 - 4 medium approx. 8 ounce each Fresh Vegetable Prepare as desired, wash, and leave residual water on the vegetables. Place in an appropriately-sized microwave container, cover with plastic wrap and vent. 1 - 6 cups Frozen Vegetable Remove from package, rinse off frost under running water.
instructions SENSOR SENSOR POPCORN SENSOR POPCORN lets you pop commercially packaged microwave popcorn (1.75z3.5 ounces). For best results, use a fresh bag of popcorn. Place only one bag of prepackaged popcorn on the center of turntable. Example: To pop Code microwave REHEAT CHART Category Direction Amount 1 Dinner plate Place foods to be heated on dinner plate or similar dish. Cover with plastic wrap. Approx.
Operating Instructions AUTO COOK This feature allows to cook foods that you select by touching AUTO COOK pad. It has 6 foods categories. Example: To cook four slices of bacon 2. Touch 1. Touch AUTO number Display TOUCH COOK. 1. scrolls the words 2 TO 6 SLICES. BACON Display scrolls the words SELECT MENU I TO 6 -- SEE COOKING GUIDE BEHIND DOOR. 3. Touch number 4. The oven will start automatically. AUTO COOK CHART • First, touch AUTO COOK pad, then select food and amount.
Operating Instructions AUTO DEFROST • For best results, remove fish, shellfish, meat, and poultry from its original closed paper or plastic package (wrapper). Otherwise, the wrap will hold steam and juice close to the foods, which can cause the outer surface of the foods to cook. Three defrost sequences are preset in the oven. The defrost feature provides you with the best defrosting method for frozen foods.
Fresh Vegetable Chart Amount Cook time at HIGH (minutes) 2 medium 4 medium 5-8 10-12 Asparagus, Fresh, spears 1 lb. Beans, green & wax Vegetable Artichokes (8 oz. each) Instructions Standing Time Trim. Add 2 tsp. water and 2 tsp. lemon juice. Cover. Cook stem end up. 2-3 minutes 3-7 Wash and turn half of spears around. Add 1/2cup water. Cover. 2-3 minutes 1 lb. 7-10 Add 1/2cup water in 11/2 qt. casserole. Stir halfway through cooking. 2-3 minutes Beets, Fresh 1 lb.
Cook using Sensor Cook VEGETABLES Ground Beef and Noodle Casserole, serves 4 Vegetable Medley, serves 4 as a side dish or 2 as a meal 5 ounces egg noodles, cooked according to package directions 2 large carrots, cut into 1 inch pieces 1 large baking potato, diced 1 medium red onion, thinly sliced 4 cloves of garlic, peeled 2 stalks celery, cut into 1 inch pieces 2 tablespoons olive oil salt and pepper to taste 1 pound lean ground beef, cooked and drained 2 cups cooked chopped broccoli, either fresh OR
Cook using Sensor Cook EGGS Peel and Eat Shrimp, serves 2 1/2cup dry white wine 2 cloves garlic, minced 2 tablespoons lemon juice 4 tablespoons butter 1 pound large shrimp in shells Hard Cooked Eggs for Egg Salad If you've ever made an egg salad the traditional way you know it's quite a task. You have to boil the eggs, allow them to cool and then peel them before you chop them and add the other ingredients.
Cook using Sensor Cook EZ Eggs and Sausage for Two - MEATLESS This is a great recipe for two busy people who have to get off to work without a lot of breakfast preparation.
Cleaning CAUTION To avoid risk of property damage, unplug the microwave oven or disconnect power at source by removing fuse or throwing circuit breaker. Before cleaning the oven, unplug the power supply cord of the oven. If impossible, open the oven door to prevent an accidental oven start. Part Description INSIDE OF THE OVEN Use a damp cloth to wipe out crumbs and spillovers. It is important to keep the area between door and cavity front clean to assure a tight seal.
Troubleshooting WARNING To avoid risk of severe personal injury, electrical shock or death, do not remove outer case of at any time. Only an authorized servicer should remove outer case. BEFORE CALLING FOR SERVICE Check the following list to be sure a service call is really necessary. A quick reference of this manual as well as reviewing additional information on items to check may prevent an unneeded service call.
Amana Warranty r Full ONE Year Warranty Amana Appliances will repair or replace, including related labor and travel, any part (f.o.b. Amana Iowa) which proves defective as to workmanship or materials. Limited Warranty After one year from the date of original retail purchase, Amana will provide a free part, as listed below, to replace any part that fails due to a defect in materials or workmanship. The owner will be responsible for paying all other costs including labor, mileage, and transportation.