Owner's Manual Covering Models ACS7270A and ACS7280A Contents Electric Slide-In Smoothtop Range Keep instructions for future reference. Be sure manual stays with range. Important Safety Information .................. 3 Cooking on the Smoothtop .................... 6 Cookware Recommendations ................ 7 Before Using the Oven .......................... 8 Using the Oven Control........................ 10 Self-Cleaning ....................................... 13 Display and Signals ...................
Thank you for buying an Amana Range! Please take the time to complete the registration card and return promptly. If registration card is missing, call Amana Consumer Affairs Department.
IMPORTANT SAFETY INFORMATION ! WARNING ! WARNING To reduce risk of the appliance tipping, it must be secured by a properly installed anti-tip bracket. To make sure bracket has been installed properly, remove the storage drawer or panel and look under the range with a flashlight. Bracket must be engaged in the rear corner of the range.
IMPORTANT SAFETY INFORMATION (cont'd) ALL APPLIANCES SURFACE COOKING UNITS 1. Proper InstallationBe sure your appliance is properly installed and grounded by a qualified technician. 2. Never Use Your Appliance for Warming or Heating the Room. 3. Do Not Leave Children AloneChildren should not be alone or unattended in the area where the appliance is in use. They should never be allowed to sit or stand on any part of the appliance. 4.
IMPORTANT SAFETY INFORMATION OVENS (cont'd) In Case of Fire 1. Use Care When Opening Door Let hot air or steam escape before removing or replacing food. 2. Do Not Heat Unopened Food ContainersBuild-up of pressure may cause container to burst and result in injury. 3. Keep Oven Vent Ducts Unobstructed. 4. Placement of Oven RacksAlways place oven racks in desired location while oven is cool. If rack is removed while oven is hot, do not let potholder contact hot heating element in oven. 5.
Cooking on the Smoothtop Cooking Safely with Surface Elements ! WARNING To avoid risk of serious personal injury, property damage, or fire, do not leave surface elements unattended while in operation. Grease and spillovers can ignite causing a fire. ! WARNING To avoid risk of electrical shock or serious personal injury, never cook on a broken smoothtop cooking surface. Spillovers can penetrate broken surface and cause electric shock. never clean broken cooktop.
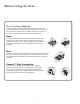
Utensil Recommendations What Should I Consider in Cookware? 6(/(&7 $92,' Flat bottomed cookware. Cookware with rounded or warped bottoms. Pans with aluminum disk bottoms. Glass, glass-ceramic, enamel porcelain or cast iron cookware, canners or pressure cookers. Heavy gauge metal cookware. Light gauge metal cookware. Handles that are secure, that are not heavy enough to tilt pan. Cookware with loose or broken handles. Proper pan size.
Before Using the Oven Oven Cooking Methods This oven provides conventional Baking, Broiling, and EvenAir Plus Convection Cooking. During EvenAir Plus Convection Cooking, the oven fan in the rear of the oven cavity circulates air while the oven cooks. The circulating air provides even browning and faster baking times. Bake %DNH Broil (upper) and bake (lower) elements operate during bake.
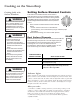
Before Using the Oven (cont'd) Oven Racks and Rack Positions Your range has 5 oven rack positions to accommodate all type of cooking and cookware . The EvenAir Plus convection baking feature allows you to use multiple racks simultaneously while providing even browning and faster baking times. Oven Rack Placement Position oven rack before turning oven on. 1. Pull rack forward to stop position. 2. Raise front edge of rack and pull until rack is out of oven. 3. Place rack in new rack position.
Using the Oven Control 8888 HR DELAY : BAKE CLN STOP 888 TIMER BROIL CONV O DELAY BAKE N CLEAN LOCKED Setting Electronic Clock Flashing Display When power is connected to oven display flashes. Press OVEN CANCEL to stop flashing. Making the Numbers Increase at a Faster Rate Time increases in larger increments the longer + or - pad is held. The 12 hour clock does not display AM, PM or military time. When power is connected or restored, display flashes until CLOCK pad is pressed. 1. Press CLOCK pad.
Using the Oven Control (cont'd) Preheating Baking or Convection 1. Arrange racks to desired position and place food in oven. 2. Press BAKE or CONV pad. BAKE and - - - ° display 3. Press MORE or LESS pads until desired temperature is displayed. Initial temperature is 350°F. BAKE, ON , and baking temperature display Convection will take less time than conventional baking. Check food frequently 4. Press OVEN CANCEL pad when finished baking. Remove food from oven when cooking time has elapsed.
Using the Oven Control (cont'd) ! CAUTION To reduce risk of food poisoning due to bacterial growth and production of toxins, never hold meat, milk or eggs for more than 2 hours before cooking. What's the difference between TIMED and DELAYED cooking? When using TIMED cooking, the oven begins to heat immediately after the oven control is set. Then, the oven cooks for the desired length of time set. When using DELAYED cooking, the oven begins to cook later in the day.
Using the Oven Control (cont'd) ! WARNING ! CAUTION To avoid fire or smoke damage, remove any flammable materials from storage drawer. Items like plastic containers and paper manuals can melt or burn. ! CAUTION To avoid risk of fire or smoke damage, clean excess spills before starting Self Clean. To avoid risk of personal injury, do not touch oven vents or area around vents during self-cleaning. These areas can become hot enough to cause burns.
Display and Signals 8888 888 : 8888 HR CLEAN Timer Signal When time elapses, timer beeps 3 times then approximately once every 6-10 seconds until TIMER ON/OFF pad is pressed. Preheat Signal 888 : OVEN CLN STOP TIMER BROIL DELAY CLEAN CONV BAKE LOCKED O N HR DELAY BAKE CLN STOP TIMER BROIL DELAY CLEAN O CONV N BAKE LOCKED Displays time-of-day, timer and timed or delayed settings. Displays temperature and cooking method or function for oven.
Custom Features 12-hour automatic cancel This safety feature turns off the oven if it has been left on for over 12 hours. To prevent the oven from shutting off after 12 hours of use, simply press any option. Any time a pad is touched, 12-hour automatic cancel is reset. Child lockout This safety feature prevents children from accidentally programming oven by disabling electronic oven control. It is also useful when cleaning the oven control by preventing accidental programming.
Cooking Baking Guidelines Remember when baking with a new oven temperatures vary from oven to oven. Store-bought thermometers are generally not accurate and cannot be used to evaluate oven temperatures. A general rule with a convection bake cycle is to reduce your temperature by 25°F. Ingredients should be at ambient temperature prior to baking. Hints for Cookies, Shiny, flat cookie sheets should be used. Avoid cookie pans with high sidesthis will cause uneven browning on the top.
Cooking (cont'd) Common Baking Problems Adjusting to a new oven can be hard, especially making a change to a convection oven. If you begin to notice consistent problems refer to the chart below for possible solutions. If baking results are still poor, contact Amana Consumer Affairs at (800) 843-0304. 3UREOHP &DXVH Lopsided cakes (bake unevenly) Pans touching each other or oven walls. Batter spread unevenly in pan. Incorrect use of aluminum foil. Oven is not level.
Cooking (cont'd) Meat Basics While cooking has always been a talent, it is now becoming a science, also. Amana provides this information as a guide to aid in preparation. For specific questions regarding meat preparation, handling, or storage contact USDA Meat & Poultry Hotline at (800) 535-4555. Handling Hints Cooking Tips When shopping, put meat in its own separate plastic sack to keep drips off other foods. Defrost frozen meats in refrigerator, not at room temperature.
Cooking (cont'd) Broiling Guidelines Broiling is a dry heat cooking method that allows a restaurant quality charbroiled flavor. Meat is exposed directly to the heating element at high temperatures. 1. Place meat on rack in broiler pan, with the surface of cuts the specified distance from the heating element (specified below). 2. Broil for half the recommended time, or until the surface is browned. 3. Turn meat and continue broiling to desired internal temperature. 4. Season, if desired.
Cooking (cont'd) Roasting Guidelines Tender cuts such as rib and loin cuts are best cooked by dry heat methods, such as roasting. When using convection to roast, meat may roast more quickly. To roast: 1. Heat oven to desired temperature. 2. Place roast directly from refrigerator fat side up in a shallow roasting pan. 3. Insert ovenproof meat thermometer so tip is centered in thickest part of roast. Make sure thermometer does not rest in fat or on bone. 4.
Cooking (cont'd) Braising Guidelines Less tender cuts such as those from the round, chuck, brisket and shank require moist cooking. A longer cooking time at lower temperatures with moisture helps soften the meat. If using the convection element, less time may be required to braise the meat. 1. Brown meat with a small amount of oil in heavy pan. 2. Pour off excessive drippings, season, if desired. 3. Add small amount of liquid (1/2 to 2 cups) and cover tightly.
Care and Cleaning Removing Oven Door 1. Make sure oven is cool. 2. Open door fully. 3. Remove screw on each side of lower portion of oven door. 4. Close door to first stop, grasp door firmly on each side, and lift upward until door is off hinges. Do not lift door by handle. Glass can break. If necessary, push hinges closed once oven door is removed. Use both hands when closing hinges. Hinges snap closed. Cleaning Oven Door Not all areas of the oven are cleaned by the self-clean cycle.
Care and Cleaning (cont'd) Replacing Oven Light ! WARNING To avoid risk of burns or electrical shock: disconnect electrical supply to oven before changing light bulb. before replacing light bulb make sure oven and bulb are cool. Do not operate oven without bulb and cover in place. ! CAUTION Wear gloves to protect hands from accidental bulb breakage. 1. Disconnect electrical supply. 2. Remove oven door if desired. 3.
Care and Cleaning (cont'd) Cleaning Stainless Steel (Some models) Can I use liquid cleaners on my stainless steel? Just because a cleaner is a liquid does not mean it is nonabrasive. Many liquid cleansers designed to be gentle on tile and smoothtop ranges still damage stainless steel. Cosmetic damage from using non-recommended products is not covered under warranty.
Troubleshooting You may save time and money by checking items below before calling for service. List includes common concerns that are not the result of defective workmanship or materials. If your question is not explained below, contact Amana Consumer Affairs Department at 800-843-0304. 7RSLF 3RVVLEOH &DXVH 6ROXWLRQ Appliance not working Power outage Make sure appliance is plugged in. Verify that circuit breaker is not tripped. Replace fuse but do not change fuse capacity.
Troubleshooting (cont'd) NOISE Normal Fan will cycle on and off during and after oven use. Normal To maintain a temperature for baking, the oven cycles on and off. Frequent cycling off and on of surface units Normal Smoothtop burners cycle on and off to maintain proper heating temperature. Cracking or popping sound Normal Wet cooking utensils or possible spillage. Gritty dirt or rough surface on cooking utensils Use recommended smoothtop cleaner conditioner.
Amana Warranty Full ONE Year Warranty Amana Appliances will repair or replace, including related labor and travel, any part (f.o.b. Amana Iowa) which proves defective as to workmanship or materials. Limited Warranty After one year from the date of original retail purchase, Amana will provide a free part, as listed below, to replace any part that fails due to a defect in materials or workmanship. The owner will be responsible for paying all other costs including labor, mileage, and transportation.