
Installation guide
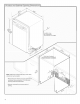

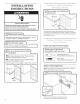


Slowlyroutewatersupplylinethroughholeincabinet.(ifusing
coppertubing,itwillbendandkinkeasily,sobegentle.)It
shouldbefarenoughintothecabinetopeningtoconnectitto
thedishwasherinletonthefrontleftsideofthedishwasher.
Slowlyturnwatershutoffvalveto"ON"position.Flushwater
intoashallowpanuntilcleartogetridofparticlesthatcould
clogtheinletvalve.Turnshutoffvalveto"OFF"position.
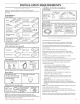
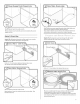
IMPORTANT:Alwaysuseanewdrainhose.Checklocalcodes
todetermineifanairgapisrequired.
Ifneeded,drilla11/2"(3.8cm)diameterholeincabinetwallorside
oftheopeningclosesttothesink.
Routedrainhoseasshownthroughholeincabinettothefront
centerofopeningwheredrainconnectionwillbemade.Tape
drainhosetothefloorinareashown.Thiswillkeepitfrommoving
whendishwasherismovedintocabinetopening.
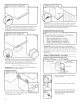
3J Connect drain hos
C0nnect drain h0se t0 waste te e or Waste dispoSer
using one of the fo!!owing options: I
Opti0n A; WaSte disposer :nO air gap I
Option B; N0 waste disposer-no air gap
i option C, Waste disp0ser with air gap
IMPORTANT: The drain hose connection of the disposer or a
waste tee must be made before the drain trap and at least 20"
(50.8 cm) above the floor where the dishwasher will be installed.
Helpful Tip: To reduce vibration of the hose, keep the hose away
from the floor.
Option A, Waste disposer = no air gap
1. Using a hammer and screwdriver, knock
plug into disposer.
2. Use needle nose pliers to remove plug.
3. Attach drain hose to disposer inlet with
large silver drain hose clamp (provided).
Use pliers to squeeze clamp open and
move into position.