PACKAGE TERMINAL AIR CONDITIONER/HEAT PUMP Standard and Remote Applications INSTALLATION INSTRUCTIONS & OWNER’S MANUAL P TAC with LED Control ` Made in USA ATTENTION INSTALLING PERSONNEL As a professional installer you have an obligation to know the product better than the customer. This includes all safety precautions and related items. Prior to actual installation, thoroughly familiarize yourself with this Instruction Manual. Pay special attention to all safety warnings.
Contents Unit Features ........................................................................................... 3 General Information ................................................................................ 5 Installation Instructions .......................................................................... 6 Wiring ....................................................................................................... 8 Operating Instructions .....................................................
Unit Features This unit has many features which are different than those found on conventional PTAC units. The servicer must be familiar with these features in order to properly service the unit. • LCDI or AFCI Power Cords - Underwrites Laboratories and the National Electric Code (NEC) now require power cords that sense current leakage and can open the electrical circuit to the unit on units rated at 250 volts or less.
Unit Features • Energy Management System Features Temperature Setback - This option can save energy dollars for unrented or unoccupied rooms by automatically setting back the operational temperatures. This mode of operation is selected through the configuration routine (see Configuration Settings section). If none of the keys on the control pad have been pressed for an 18-hour period.
General Information TRANSPORTATION DAMAGE All units are securely packed in shipping containers tested according to International Safe Transit Association specifications. The carton must be checked upon arrival for external damage. If damage is found, a written request for inspection by the carrier’s agent must be made immediately. In the event of damage, the consignee must: 1. Make notation on delivery receipt of any visible damage to shipment or container. 2.
Installation Instructions To ensure that the unit operates safely and efficiently, it must be installed, operated and maintained according to these installation and operating instructions and all local codes and ordinances or, in their absence, with the latest edition of the National Electric Code. The proper installation of this unit is described in the following sections. Following the steps in the order presented should ensure proper installation.
Installation Instructions 2. SLEEVE INSTALLATION In order for condensate water to drain properly inside the unit, the sleeve must be installed properly: Pull the bottom of the cabinet front away from the chassis until the retaining clips disengage. NOTE: If front is secured with screws, remove front mounting screw, then follow front removal procedure. • Level from right to left. • A slight downward pitch from the indoor side to the outdoor side as shown below.
Installation Instructions Screws (3 on each side of unit) 4. Wall Sleeve Secure the chassis to the wall sleeve using three screws on each side of the chassis to ensure a proper seal between the chassis and the wall sleeve. The screws are supplied in a plastic bag attached to the power cord. IMPORTANT NOTES: Chassis Outside Wall Chassis Installation View 2 1. The unit is equipped with a rubber grommet mounted compressor. These grommets are factory set and require no adjustment. 2.
Wiring VOLTAGE MEASUREMENTS Power Cord Requirements Heater Size (kW) 1.5 2.5 3.5 3.7 5.0 230/208 Volt Units 265 Volt Units Power Cord Power Cord Rating (amp) Rating (amp) 15 20 15 20 20 Not Applicable Not Applicable 20 30 30 Once the unit is properly wired, measure the unit supply voltage. Voltage must fall within the voltage utilization range given in Table 2.
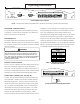
Operating Instructions SW2 P10 AUXILIARY P11 P12 M1 COM A DS1 DS2 MS1 MS2 EH IN REMOTE THERMOSTAT LS FD1 FD2 TF- TF+ C R GL W2 Y/W1 B GH P13 M2 COM B ON / OFF MASTER SWITCH IAT BLACK Control Board User Inputs* *NOTE: The PTAC Wire Harness Kit (PWHK01C) is required for the auxiliary or remote thermostat options. ADDITIONAL CONTROL INPUTS installation of a front desk switch.
Operating Instructions Vent Open Vent Closed Vent Door Lever Positions No holes are permitted in chassis basepan or wallsleeve when routing low voltage wire. Route the low voltage wires through the indention on the front of the basepan. Hydronic Heat Installations To avoid the risk of freezing the steam or water coil during prolonged shut down periods, the vent door must be left closed Low Voltage Wires Routing when the outdoor temperature might fall below freezing.
Operating Instructions 3. Remove the four (4) nuts which secure the discharge air grille to the cabinet front. • Concealed pipes and chimneys • Unheated (uncooled) areas behind the thermostat, such as an outside walls Consult the instruction sheet packaged with the thermostat for further details on mounting and operation. REMOTE THERMOSTAT OPERATION Approved thermostats vary slightly in construction and, with few exceptions, are operated similarly.
Operating Instructions 3. Run 6 to 8 wires during initial installation. Tape or cap off any unused wires. AUXILIARY REMOTE THERMOSTAT C R W2 LS FD1 FD2 TF- TF+ G* DS1 DS2 MS1 MS2 EH IN GL W2 Y/W1 B GH Control Board Connections X1 O B** Y W1 R Thermostat Connections Wiring Schematic for Straight Cool Unit *NOTE: For high speed fan operation, connect “G” to “GH”.
Maintenance and Cleaning WARNING TO AVOID THE RISK OF PROPERTY DAMAGE, ELECTRICAL SHOCK OR PERSONAL INJURY, CLEAN AIR FILTERS AND COILS REGULARLY. CLOGGED OR SEVERLY RESTRICTED FILTERS OR COILS REDUCE AIRFLOW WHICH CAN ` CAUSE DRASTIC EFFICIENCY LOSS AS WELL AS SEVERE COMPONENT DAMAGE TO COMPRESSORS, ELECTRIC HEATER OR FAN MOTOR. IN EXTREME CASES, CLOGGED FILTERS AND/OR COILS MAY CREATE A FIRE HAZARD AND WILL VOID THE WARRANTY.
Maintenance and Cleaning Cabinet Front Basepan and Condenser Coil The cabinet front and discharge air grille can be cleaned with a CAUTION water dampened cloth . Under no circumstances should hydrocarbon-based cleaners (e.g. acetone, benzene, naphtha gaso- DO NOT USE COMMERCIAL GRADE COIL CLEANERS. SOME OF THESE ETHYLENE DIAMINE TETRACETIC ACID (EDTA) CLEANERS MAY CONTAIN line, etc.) be used to clean the front or air grilles. Use care when WHICH CAN SHORTEN THE LIFE OF THE CONDENSER COIL.
Obtaining Service In the event this unit requires repair or servicing beyond what is covered in this manual, contact an authorized service organization. To obtain an authorized servicer, contact your sales representative or agency. Normal Operating Sounds and Conditions Water trickling sounds Water is picked up and distributed over the coil. This improves the efficiency and helps with water removal. Water dripping Water will collect in the base pan during high humidity days.
Configuration Settings The control can be configured to operate a wide range of options. The options listed below with the * are the factory default settings. If these are acceptable, then the unit does not require any additional configuration and is fully operable. To configure the unit, first select the configuration feature code setting and then an option code to change from the factory default setting. To enter configuration feature mode: 1.
Diagnostic Maintenance & Status Report The Diagnostic Maintenance & Status Report provides detailed information on PTAC control operation and operational status including present modes, failures, airflow restriction warnings, operating temperatures, and past failures. The lower right hand dot on the center display flashes in this mode. In some cases the green LED located in the lower left hand corner of the touchpad below the OFF key will also be lit.
Diagnostic Codes CODE M O D E S F A I L U R E S A I R F L O W W A R N I N G S STATUS DISPLAY ERROR LIGHT SUGGESTED ACTION FP Freeze Protection Engaged. The room temperature measured by the wireless remote thermostat or indoor ambient thermistor active sensor falls below 40°F. Y N No Action required. This setting will disengage when the room temperature rises above 43°F. Fd Front Desk switch is closed. All outputs are switched off. Y N Open front desk switch to allow occupant unit operation.