STANDARD CLEANING GAS RANGE Use & Care Guide For questions about features, operation/performance, parts, accessories or service, call: 1-800-843-0304 or visit our website at...www.amana.
TABLE OF CONTENTS RANGE SAFETY .............................................................................3 The Anti-Tip Bracket ....................................................................4 COOKTOP USE ..............................................................................5 Cooktop Controls.........................................................................5 Surface Burners ...........................................................................6 Home Canning ......................
RANGE SAFETY Your safety and the safety of others are very important. We have provided many important safety messages in this manual and on your appliance. Always read and obey all safety messages. This is the safety alert symbol. This symbol alerts you to potential hazards that can kill or hurt you and others. All safety messages will follow the safety alert symbol and either the word “DANGER” or “WARNING.
The Anti-Tip Bracket The range will not tip during normal use. However, the range can tip if you apply too much force or weight to the open door without the anti-tip bracket fastened down properly. WARNING Tip Over Hazard A child or adult can tip the range and be killed. Verify the anti-tip bracket has been properly installed and engaged per installation instructions. Re-engage anti-tip bracket if range is moved. Do not operate range without anti-tip bracket installed and engaged.
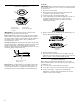
COOKTOP USE Cooktop Controls A B C E D A. Surface burner locator B. Left rear burner control knob C. Left front burner control knob WARNING F D. Oven temperature control knob E. Right front burner control knob F. Right rear burner control knob To Set Burner Temperature: 1. Push in and turn knob counterclockwise to LITE. All surface burners will click. Only the burner with the control knob turned to LITE will produce a flame. 2. Turn knob to anywhere between HI and LO. The clicking will stop.
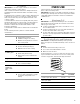
To Clean: Surface Burners A C B D IMPORTANT: Before cleaning, make sure all controls are off and the oven and cooktop are cool. Do not use oven cleaners, bleach or rust removers. 1. Remove the surface grates. 2. Remove the burner cap from the burner base and clean according to “General Cleaning” section. 3. Clean the gas tube opening with a damp cloth. 4. Clean clogged burner ports with a straight pin as shown. Do not enlarge or distort the port. Do not use a wooden toothpick.
Cookware IMPORTANT: Do not leave empty cookware on a hot surface cooking area, element or surface burner. Ideal cookware should have a flat bottom, straight sides and a well-fitting lid, and the material should be of medium-to-heavy thickness. Rough finishes may scratch the cooktop or grates. Aluminum and copper may be used as a core or base in cookware. However, when used as a base they can leave permanent marks on the cooktop or grates.
BAKEWARE Oven Vent To cook food evenly, hot air must be able to circulate. Allow 2" (5 cm) of space around bakeware and oven walls. Use the following chart as a guide. NUMBER OF PAN(S) POSITION ON RACK 1 Center of rack. 2 Side by side or slightly staggered. 3 or 4 Position bakeware on racks as shown. A A. Oven vent The oven vent releases hot air and moisture from the oven, and should not be blocked or covered.
Broiling BROILER BROILING CHART The broiler is located below the oven door. Use an oven rack for broiling. To remove a rack, pull it out to the stop position, raise the front edge, then lift out. Reverse the steps to replace a rack. Always broil with both the broiler and the oven doors closed. ■ To avoid damage to the broiler, do not step on or apply weight to the broiler door while it is open. For best results, place food 3" (7.0 cm) or more from the broil element.
RANGE CARE General Cleaning IMPORTANT: Before cleaning, make sure all controls are off and the oven and cooktop are cool. Always follow label instructions on cleaning products. Do not wipe down any of the inside surfaces until the oven has completely cooled down. Soap, water and a soft cloth or sponge are suggested first unless otherwise noted.
3. Tilt top of door toward range. Insert bottom door hinge notch down onto front frame edge. Oven Door For normal range use, it is not suggested to remove the oven door. However, if removal is necessary, make sure the oven is off and cool. Then, follow these instructions. The oven door is heavy. To Remove: 1. Open the oven door. Insert the hinge locks into both hinge hangers. See the following illustration. Do not unlock hinges while the door is removed from the range. 4.
TROUBLESHOOTING Try the solutions suggested here first in order to avoid the cost of an unnecessary service call. Nothing will operate Surface burner makes popping noises ■ WARNING Is the burner wet? Let it dry. Gas range noises during Bake and Broil operations Electrical Shock Hazard Plug into a grounded 3 prong outlet. Do not remove ground prong. Do not use an adapter.
■ Is there proper air circulation around bakeware? See the “Positioning Racks and Bakeware” section. ■ Is the batter evenly distributed in the pan? Make sure batter is level in the pan. ■ Are baked items too brown on the bottom? Decrease oven temperature 10° F to 30°F (5°C to 15°C). ■ Are crust edges browning early? Use aluminum foil to cover the edge of the crust and/or reduce baking temperature.
ASSISTANCE OR SERVICE Before calling for assistance or service, please check “Troubleshooting.” It may save you the cost of a service call. If you still need help, follow the instructions below. When calling, please know the purchase date and the complete model and serial number of your appliance. This information will help us to better respond to your request. If You Need Replacement Parts If you need to order replacement parts, we recommend that you use only factory specified replacement parts.
AMANA® MAJOR APPLIANCE WARRANTY LIMITED WARRANTY For one year from the date of purchase, when this major appliance is operated and maintained according to instructions attached to or furnished with the product, Amana brand of Whirlpool Corporation or Whirlpool Canada LP (hereafter “Amana”) will pay for factory specified parts and repair labor to correct defects in materials or workmanship. Service must be provided by an Amana designated service company.
W10620422A © 2013. All rights reserved.