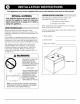
RV Cooking Appliances Installation Instructions (Appliance • SAFETY IF YOU SMELL • INSTALLATION ......... INSTRUCTIONS 3 to 5 .. 6 to 9 • Range FOR YOUR SAFETY Do not store or use gasoline or other flammable vapors and liquids in the vicinity of this or any other appliance. any open flame. 4. Do not touch electrical switches or use any phone or radio in the vehicle. 5. Do not start the vehicle's electric generator. use) all 2. Shut off the gas supply at the gas container or source. 3.
Thank You... for purchasing our cooking appliance. To help you obtain the maximum in cooking satisfaction, we offer these suggestions: Review all safety and caution instructions. Review the Troubleshooting Chart on pages 22 to 24 if service becomes necessary. Include the model and serial numbers of your appliance when requesting service. • Proof of purchase such as sales receipt will be needed for warranty service.
Read all instructions before using this appliance. The following instructions are based on safety considerations and must be strictly followed to eliminate the potential risks of fire, electric shock, or personal injury. Have your appliance installed and properly grounded by a qualified installer according to the installation instructions. Have the installer show you the location of the gas shut off valve and how to shut it off in an emergency. Always disconnect power to appliance before servicing.
Topreventpotentialhazardto theuseranddamageto theappliance, neveruse appliance as a space heatertoheator warma room.Also,donotuse thecooktopor ovenas a storageareaforfood or cookingutensils. f,r Donotobstructtheflow ofcombustion andventilationairby blocking the oven vent or air intakes. Restriction of air flow to the burner prevents proper performance and increases carbon monoxide emission to unsafe levels. Avoid touching oven vent area while oven is on and for several minutes after oven is turned off.
Usepanswithflatbottomsandhandlesthatareeasily graspedandstaycool.Avoidusingunstable,warped, easilytippedor loosehandledpans.Pansthatareheavy to movewhenfilledwithfoodmayalsobehazardous. Besureutensilis largeenoughto properlycontainfood andavoidboilovers.Pansizeis particularly importantin deepfat frying.Besurepanwillaccommodate thevolume offoodthatisto beaddedaswellas thebubbleactionof fat.
Your appliance SPECIAL may not be equipped with some of the features referred to in this manual. WARNING service this appliance, Read the important Safety Instructions on pages 3 to 5 before using the appliance, The rating plate is located under the cooktop. The following information is listed on this plate. 1. The model and serial numbers. 2. The spec code number. When inquiring about your appliance be sure to include these numbers with your inquiry.
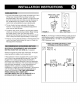
For RV Cooktops 1. Cut opening in accordance with diagram shown below. , 2. Align the 3/8" gas supply line with the hole provided in burner box so it will slide into place when the range is placed into the opening. 3. Place the range in position and fasten down with four wood screws through holes provided in the side trim. 4. Connect gas supply line. 5. Check all gas connections for leaks with non corrosive leak detection fluid. Do not use open flames for checking gas leaks.
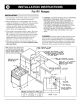
For RV Ranges 1. Cut opening as shown below (range can be suspended from top flange; no other support is necessary.) CAUTION: LIQUIFIED PETROLEUM (L.P.)/PROPANE GAS SUPPLY LINE MUST HAVE A L.P. GAS PRESSURE REGULATOR. INLET PRESSURE TO THIS APPLIANCE SHOULD BE REDUCED TO A MAXIMUM OF 14 INCHES WATER COLUMN (0.5 P.S.I.) INLET PRESSURES IN EXCESS OF 0.5 P.S.I. CAN DAMAGE THE APPLIANCE PRESSURE REGULATOR AND OTHER GAS COMPONENTS IN THIS APPLIANCE AND CAN RESULT IN A GAS LEAK. , 2.
1.Theoventhermostatinthisrangewillenableyoutoturn offtheOvenConstantPilotbysimplyturningthe thermostatdialtothe"OFF"position.Tolightovenpilot, pushtheControlknobandrotatecounterclockwise to the"OVENPILOTON"position.Pushandholdthe controlknobwhilelightingtheovenstandingpilot. 2.Theairshutterhasbeenadjustedatthefactory, however,it mayrequiresomeadditional adjustment whenusedathighaltitudes. 3.Toadjust,opentheairshuttertothefullopenposition whereyouwillhavea blowingcondition.
Electrodomesticos de cocina para RV Instrucciones (El electrodomestico de instalacion no esta aprobado para uso maritimo) CONTENIDO • INSTRUCCIONES DE SEGURIDAD ... 3 a 5 ADVERTENCIA POR SU SEGURIDAD GAS: SI HUELE 1. Abra las ventanas y evacue las personas del vehiculo. • INSTRUCCIONES DE INSTALACION . 6 a 9 • Superficie para cocinar A a todas POR SU SEGURIDAD No use ni almacene gasolina u otros liquidos o vapores inflamables cerca de este u otros electrodomesticos. 2.
Gracias... CONTENIDO por su compra del electrodomestico. Para ayudarle a obtener la maxima satisfacci6n al cocinar, le ofrecemos estas sugerencias: INSTRUCCIONES DE SEGURIDAD []_= Revise todas las instrucciones de seguridad y INSTRUCClONES DE INSTALAClON ........... Aviso para el instalador ........................ Ubicaci6n de la placa de clasificaci6n ............ Estufa del RV ................................. Superficie para cocinar del RV ................ precauci6n.
Lea todas las instrucciones antes de usar este electrodomestico. Las siguientes instrucciones estan basadas en consideraciones de seguridad y deben seguirse estrictamente para eliminar los riesgos potenciales de incendios, descargas el6ctricas o lesiones personales. Haga que un instalador calificado instale y conecte a tierra el electrodom6stico de acuerdo con las instrucciones de instalaci6n. Pida al instalador que le muestre la ubicaci6n de la valvula de cierre y c6mo cerrarla en caso de emergencia.
Paraevitarpeligrospotenciales alusuarioy dafiosal electrodom6stico, nunca useelelectrodom6stico comocalentador para calentarunahabitaci6n. Tampoco uselasuperficieparacocinaro el hornocomoareade almacenamiento para alimentos o utensilios decocina. Siempre ajuste la llama del quemador de la superficie para cocinar de manera que no se extienda por fuera del borde de la base de la cacerola.
Usecacerolasconfondopianoy asasquepuedan sujetarseconfacilidady permanezcan frias.Eviteusar cacerolasinestables, deformes, quesevolteenfacilmente o conlasasasflojas.Lascacerolas quesondemasiado pesadasparamoverlasconalimentos podriansertambi6n peligrosas. AsegQrese dequelosutensilios seanIosuficientemente grandesparacontenerlosalimentos y evitarlosderrames. Eltamafiodelacacerolaesespecialmente importante cuandosefrieenaceiteabundante.
Su electrodomestico ADVERTENCIA Solamente instalar ESPECIAL el personal o electrodomestico. dar podria no estar equipado con algunas de las caracteristicas mencionadas en este manual. calificado servicio Lea las debera a este Instrucciones importantes de seguridad en las paginas 3 a 5 antes de usar el electrodomestico. La placa de clasificaci6n est_ Iocalizada debajo de la superficie para cocinar. La siguiente informaci6n est_ listada en esta placa. 1. Los nQmeros de modelo y de serie. 2.
Para superficies para cocinar de vehiculos de recreacion (RV) 1. Corte el hueco de acuerdo con el diagrama que se muestra a continuaci6n. , 2. Alinee la tuberia de suministro de gas de 3/8" con el orificio proporcionado en la caja del quemador de manera que se deslice en su lugar cuando se coloque la estufa en el hueco. 3. Coloque la estufa en su lugar y suj6tela con cuatro tornillos para madera a trav6s de los orificios provistos en el adorno lateral. 4. Conecte la tuberia de suministro de gas. 5.
Para estufas en vehiculos de recreacion (RV) 1. Corte el hueco como se muestra a continuaci6n (la estufa puede suspenderse de la pestafia superior; no se necesita ningQn otro soporte.) , , 2. Las estufas equipadas con un foco de 120 voltios en el horno requeriran la instalaci6n de un receptaculo el6ctrico de 120 voltios conectado a tierra, directamente detras de la estufa (para ver la ubicaci6n correcta consulte el dibujo a continuaci6n).
1. El termostato del homo de esta estufa le permitira apagar el piloto constante del homo simplemente colocando el disco del termostato en la posici6n de apagado "OFF". Para encender el piloto, oprima la perilla de control y girela en sentido contrario al de las manecillas del reloj hasta la posici6n de piloto encendido 'OVEN PILOT ON'. Oprima y mantenga oprimida la perilla de control mientras enciende el piloto permanente del homo.
APPAREIL DE CUISSON POUR VI HlCULE DE PLAISANCE Notice de mise en service (Appareil non homologue pour usage marin) DANS CE GUIDE : AVERTISSEMENT • MESURES POUR VOTRE SI_CURITI_ S'IL Y A UNE ODEUR DE GAZ : DE SI_CURITI_ • MISE EN SERVICE ......... 3 &5 ............... • Plaque de cuisson 6 &9 • Cuisiniere 1. Ouvrez les fenetres et evacuez tousles occupants POUR VOTRE SI_CURITI_ du vehicule. Ne 2. Coupez I'alimentation de gaz au niveau de la bonbonne de gaz ou de la source de gaz.
Merci... d'avoir fait I'achat de notre appareil de cuisson. Pour vous aider a en tirer le maximum de satisfaction, nous vous offrons ces suggestions : Passez en revue toutes les mesures de s6curit6. #tudiez le tableau de d6pannage des pages 22 et 24 si I'appareil ne fonctionne pas correctement. Incluez les numeros de modele et de serie de votre appareil Iorsque celui-ci doit etre repare.
Lire la totalite des mesures de securite avant d'utiliser cet appareil de cuisson. Les conseils ci-dessous sont bas6s sur des consid6rations de s6curit6 et doivent etre suivis rigoureusement pour eviter toute possibilite d'incendie, d'electrocution ou de blessure. Veiller ace que votre appareil soit correctement installe et mis a la terre par un technicien qualifie et conformement aux instructions fournies.
Pour6vitertoutrisquedeblessureetemp6cher que I'appareil decuissonne setrouveendommag6, nepasI'utilisercomme appareildechauffage. Parailleurs,nepas utiliserlefournila surfacedecuissonpoury rangerde lanourritureou desplatsoucasseroles. Nepasbloquer f,r 1'6coulement de I'air servant a la combustion ou a la ventilation de I'appareil de cuisson en obstruant les conduits d'a6ration ou les prises d'air.
Utiliserdesr6cipients a fondplatdontlespoigneessont facilesa prendreenmainetrestentfroidesautoucher. teviter d'utiliser des casseroles instables, caboss6es, faciles a renverser ou dont la poignee ne tient pas bien. Les casseroles qui sont tres Iourdes une fois pleines peuvent 6galement presenter des risques. Veiller a utiliser un recipient assez grand pour la quantit6 de nourriture a cuire afin d'6viter que le contenu ne d6borde. La grandeur du recipient est particuli6rement importante pour la friture.
Votre appareil de cuisson AVERTISSEMENT peut ne pas posseder certaines des fonctions decrites dans ce manuel. SPI CIALE L'installation et le depannage de cet appareil doivent _tre realises uniquement par du personnel qualifi& Lire les <>,pages 3 a 5 avant d'utiliser I'appareil. La plaque signal6tique se trouve sous la surface de cuisson. Les renseignements suivants y sont indiqu6s • 1. Num6ros de module et de s@ie. 2. Code des caract@istiques techniques.
Plaque de cuisson pour vehicule de plaisancetop D'UN DI_TENDEUR POUR GPL. LA PRESSION #, L'ARRIVt_E DE CET APPAREIL DOlT FtTRE DI_TENDUE DE FAOON #, NE PAS FtTRE SUPt_RIEURE #, 3,5 KPA (14 PO DE COLONNE D'EAU OU 0,5 PSI). UNE PRESSION #, L'ARRIVt_E SUPt_RIEURE #, 3,5 KPA (0,5 PSI) PEUT ENDOMMAGER LE DI_TENDEUR DE L'APPAREIL ET LES AUTRES COMPOSANTS DU SYSTC:ME DE DISTRIBUTION DU GAZ DE CET APPAREIL ET POURRAIT PROVOQUER DES FUITES DE GAZ. 1.
Cuisiniere pour vehicule de plaisance d6tection de fuites. Ne pas utiliser de flamme pour voir s'il y a des fuites. 1. D6couper une ouverture suivant les indications ci-dessous (la cuisini@e peut _tre suspendue par le flasque sup@ieur ; aucun autre support n'est n6cessaire). , 2.
1. Le thermostat du four de cette cuisiniere permet de fermer la veilleuse du four en tournant simplement le s61ecteur du thermostat sur la position " Off" (arr6t). Pour allumer la veilleuse, pousser le bouton de commande et le tourner dans le sens anti-horaire sur la position " OVEN PILOT ON " (veilleuse du four allumee). Pousser de fagon continue sur le bouton de commande tout en allumant la veilleuse du four. CORDON D'ALIMENTATION AVEC FICHE DE MISE ]k LA TERRE ]k 3 BROCHES © 2.