THREE BURNER GAS GRILL Assembly/Installation Instructions and Use & Care Guide For questions about features, operation/performance, parts call: 1-800-229-5647 or visit www.sureheat.com Table of Contents..............................................................................................................................2 IMPORTANT: Save for local inspector’s use. Installer: Leave installation instructions with the homeowner. Homeowner: Keep installation instructions for future reference.
TABLE OF CONTENTS OUTDOOR GRILL SAFETY....................... 3 UNPACKING INSTRUCTIONS................... 5 ASSEMBLY REQUIREMENTS................... 5 Parts Supplied.................................................... 5 ASSEMBLY INSTRUCTIONS..................... 6 INSTALLATION REQUIREMENTS.......... 10 Location Requirements....................................... 9 Product Dimensions........................................... 9 Gas Supply Requirements..................................
OUTDOOR GRILL SAFETY Your safety and the safety of others are very important. We have provided many important safety messages in this manual and on your appliance. Always read and obey all safety messages. This is the safety alert symbol. This symbol alerts you to potential hazards that can kill or hurt you and others. All safety messages will follow the safety alert symbol and either the word “DANGER” or “WARNING.
IMPORTANT: This grill is manufactured for outdoor use only. For grills that are to be used at elevations above 2000 ft (609.6 m) orifice conversion is required. See “Gas Supply Requirements” section. It is the responsibility of the installer to comply with the minimum installation clearances specified on the model/serial rating plate. The model/serial rating plate for built-in models can be found on the right-hand side of the grill.
UNPACKING INSTRUCTIONS 1. Using a utility knife, cut the tape to open the top flaps of the carton. 10. Remove the plastic bag from the grill head. 2. Remove the Assembly/ Installation Instructions and Use and Care Guide. Excessive Weight Hazard 3. Remove the corner supports on the top of the inside of the carton. Remove the foam from the two sides. Use two or more people to move and install grill. 4. Remove the two grill cart wheels, the package of the four grill support poles and the front panel.
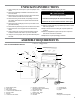
Assembly Hardware Supplied (actual size) Assembled Grill View ■■ 9 - Self-tapping screws E D F C ■■ 8 - M5 x 10 Phillips pan head screws G B ■■ 8 - M5 x 40 Phillips pan head screws ■■ 4 - M6 x 65 Phillips pan head screws H I A ■■ 1 - Side burner knob with bezel J NOTE: Other hardware required is attached to the grill where needed. Tools Needed ■■ # 2 Phillips screwdriver ■■ Adjustable wrench ■■ 1/2” wrench or socket ■■ 1/4” nut driver or socket ■■ Tape measure A.
Assemble grill head to cart base 6. Use (4) M6 x 10 Phillips pan head screws to secure the Grill cart base to the support poles as shown. Note: Add flat washer and lock washer then install the screws in position. Excessive Weight Hazard Use two or more people to move and install grill. A Failure to do so can result in back or other injury. B 1. Tilt the Grill head assembly onto back with control panel facing up. 2.
Assemble side burner valve assembly Complete grill assembly 1. 1. 11. Place the side burner grate onto the side burner tray. Position the 3 longer legs of the grate into the holes around the side burner. 2. 3. 4. 5. Using a Phillips screwdriver, remove the 2 screws from the side burner valve assembly. Set aside the screws.
INSTALLATION REEEQUIREMENTS Location Requirements Gas Supply Requirements Observe all governing codes and ordinances. IMPORTANT: This installation must conform with all local codes and ordinances. In the absence of local codes, installation must conform with American National Standards Institute, National Fuel Gas Code ANSI Z223.1 - latest edition. Explosion Hazard Do not store food tank in a garage or indoors. Do not store grill with fuel tank in a garage or indoors.
INSTALLATION INSTRUCTIONS Gas Connection Requirements Check the Burners The burners are tested and factory-set for most efficient operation. However, variations in gas supply and other conditions may make minor adjustments to air shutter or low flame setting necessary. It is recommended that a qualified person make burner adjustments. Explosion Hazard Do not store fuel tank in a garage or indoors. Checking the grill burner flames requires removing the grate and flavor grids.
OUTDOOR GRILL USE This manual covers several different models. The grill you have purchased may have some or all of the features listed. The locations and appearances of the features shown here may not match those of your model. Control Panel A B A. Left burner control knob B. Middle burner control knob C. Right burner control knob Gas Pressure C Regulator D IMPOR supplied regulato your ou To Insta 1. Ope 2. Set 3. Scre 20 l 4. Plac the E TheD.
IMPORTANT: Turn the Gas Supply On 1. For outdoor grills using a 20 lb. LP gas fuel tank: Slowly open the tank valve. NOTE: If flow limiting device activates, your grill may not light. If your grill does not light, the flames will be low and will not heat properly. Turn tank valve and all control knobs off and wait 30 seconds. After shutting off the tank, very slowly open tank valve and wait 5 seconds before lighting. Lighting the Grill 1. Do not lean over the grill. 2.
Manually Lighting the Side Burner 1. Do not lean over the grill. 2. Remove the manual lighting extension and attach a match to the split ring. 3. Strike the match to light it. 4. Guide the match to the burner ■■ Using too much oil can cause grey ash to deposit on food. ■■ T rim excess fat from meats prior to cooking to reduce flare-ups. ■■ M ake vertical cuts at 2” (5 cm) intervals around the fat edge of meat to avoid curling. ■■ Add seasoning or salt only after the cooking is finished.
OUTDOOR GRILL CARE General Cleaning IMPORTANT: Before cleaning, make sure all controls are off and the grill is cool. Always follow label instructions on cleaning products. For routine cleaning, wash with soap and water using a soft cloth or sponge. Rinse with clean water and dry at once with a soft, lint-free cloth to avoid spots and streaks. To avoid scratching the surface, do not use steel wool to clean the grill.
SIDE BURNER CAPS AND GRATE Cleaning Method: ■■ Clean with a brass bristle brush. ■■ Wash grate using mild detergent, warm water and degreaser. ■■ Rinse with clean water and dry with soft, lint-free cloth. ■■ Stainless steel cleaner. BURNERS Cleaning Method: ■■ Clean the exterior of the burner with a wire brush. ■■ Clear any clogged burner ports with a straightened paper clip. Do not use a toothpick as it may break off and clog the port. ■■ Check and clean burner/venturi tubes.
REPLACEMENT PARTS LIST 16 Hood Assembly SASCD00463B 1 set Front Face Assembly SWLCD00472A 1 set Hood Handle Assembly RCOQG00003A 1 piece Manifold & Valve Assembly RCOZE00011B 1 set Bread Warming Rack RCORC00009A 1 piece Kindling bracket SBNMC00381A 1 set Main Cooking Grate RCOMC00002A 1 piece Side Shelf SWLCB00470A 1 set Flavor Grid RCOMC00003A 1 piece Side Burner Shelf SASCD00471B 1 set Main Burner Tube RCOZZ00325B 1 piece Large Bezel RCOFZ00011A 1 piece Cotter Pin RHWAZ00061A 1 piece Large
REPLACEMENT PARTS LIST Side Burner Casting RCOZZ00050A 1 piece Cart Front Panel SBNCD00474A 1 set Side Burner Valve Assembly RCOZZ00323A 1 set Support Poles - Left Front SPSCD00004A 1 piece Side Burner Igniter RCOZZ00528A 1 piece Support Poles - Left Back SPSCD00004B 1 piece Igniter with 2 Poles RCOZZ00526A 1 piece Support Poles - Right Front SPSCD00005A 1 piece Regulator RCOZZ00125A 1 piece Support Poles - Right Back SPSCD00005B 1 piece Cart Base SBNCD00475A 1 piece Wheel Assembly SASFZ00012A 1
LIMITED WARRANTY Sure Heat Manufacturing warrants that for 5 years from the date of purchase, the stainless steel panels will not break due to defects in material or workmanship. All other components of this Amana® grill are warranted free from defects in material and workmanship for one year from the date of purchase. Sure Heat Manufacturing at its option, will repair or replace this product or any component of the product found to be defective during the warranty period.