Electric Range Owner's Manual ARR3100* ARR3400* ARR3601* * Additional alphanumeric characters representing other models in series may follow each model number. Please Read Manual Before Operating Range Important Save for local electrical inspector’s use.
Contents Model Identification ................................................. 2 Parts and Accessories ............................................ 2 Service .................................................................... 2 Asure™ Extended Service Plan .............................. 2 Important Safety Information ....................................... 3 ALL APPLIANCES .................................................. 3 SURFACE COOKING UNITS .................................. 4 OVENS ................
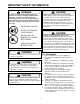
IMPORTANT SAFETY INFORMATION ! WARNING ! CAUTION To reduce the risk of the appliance tipping, it must be secured by a properly installed anti-tip bracket(s). To make sure bracket has been installed properly, remove the storage drawer or panel and look under the range with a flashlight. Bracket(s) must be engaged in the rear corner of the range. DO NOT TOUCH SURFACE UNITS OR AREAS NEAR UNITS—Surface units may be hot though they are dark in color.
SURFACE COOKING UNITS In Case of Fire 1. Use proper pan size. This appliance is equipped with one or more surface units of different size. Select utensils having flat bottoms large enough to cover the surface unit heating element. The use of undersized utensils will expose a portion of the heating element to direct contact and may result in ignition of clothing. Use of oversized utensils concentrates heat on cooking surface and can cause damage to range.
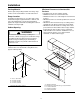
Installation Packing Material Minimum Clearances to Combustible Surfaces Remove protective packing materials from range. Tape residue can be cleaned with a soft cloth and alcohol. Using dimensions, prepare cabinet opening. • Minimum clearance to rear wall is 0 inches. • Minimum clearance to a vertical right or left side wall is 0 inches. • Minimum clearance to countertop/cabinet on each side is 0 inches.
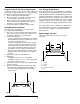
Irregular Cabinet and Countertop Heights Line Voltage Requirements Countertops such as ceramic tile tops cause cabinet and countertop to be higher than 36 inches. Follow instructions below when countertop is higher than 36 inches. 1. Raise leveling legs to maximum height. 2. Measure from floor to rangetop. If measurement is less than height of countertop, shim floor. 3. Shim floor using a piece of plywood same size as range opening. Secure plywood to floor. Plywood must be as secure as original flooring.
Range has been grounded at the factory to the center (nickel plated) terminal of the terminal block in accordance with the National Electrical Code (section 2560). When a separate ground is required by local code, disconnect the grounding strap from the terminal block. Ground frame by connecting a grounding wire to range frame using only the grounding screw removed from the grounding strap. Power Cord Requirements Power cord is not supplied with range. Power cord must be U.L.
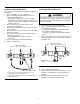
Installing 3-Wire Power Cord Installing 4-Wire Power Cord Refer to power cord instructions if available for additional information. 1. Remove rear wire cover on rear of range. 2. Place cord clamp (winged clamp) in cord access hole below terminal block. • Cord clamp is supplied with cord. Place wings through hole, entering from bottom. Screw holes in clamp should be below mounting panel. Place cord through strain relief. 3. Attach neutral (center) or white wire to center terminal on terminal block. 4.
7. Attach power lead, red wire or black wire to right terminal. Secure with hex nuts provided. Converting 3-Wire to 4-Wire Power Cord 1. Remove rear wire cover. 2. Remove bottom cord clamp screw and retain for further use. 3. Remove screw/hex nuts from terminal block and retain for further use. 4. Remove all 3-wire or cable leads from the terminal block and proceed to remove the power cord from the range by pulling in a downward motion so the cord is removed from strain relief. 5.
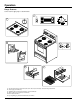
Operation Range Features Some features apply only to certain models.
Electronic Clock and Timer (Some Models) Pads CLOCK—Use to set time of day. CLOCK + + TIMER—Use to set timer. + TIMER —Use to increase time. —Use to decrease time. Setting Electronic Clock 1. Press CLOCK pad. 2. Press up or down arrow pad until correct minutes display. 3. Press CLOCK pad to set time of day. Setting Electronic Timer Electronic timer does not control bake or broil. Timer can be set up to 12 hours. Time displays and counts down in hours and minutes when more than 59 minutes are entered.
Cooking Utensils Operating Surface Elements Utensil Material Characteristic ! WARNING To avoid risk of serious personal injury, property damage, or fire, do not leave surface elements unattended while in operation. Grease and spillovers can ignite causing a fire. 1. Push in and turn surface element control to desired setting. • When any element is on, surface indicator light glows. 2. When finished cooking, turn control to OFF position.
For best cooking results, use a pan with a flat bottom. Determine if pan has a flat bottom. 1. Rotate a ruler along bottom of pan. If pan is not flat, gaps between bottom of pan and edge of ruler occur. 2. A small groove or mark on a pan does not effect cooking times. However, if a pan has a gap, formed rings, or an uneven bottom, it does not cook efficiently and in some cases may not boil liquid. Prepare to Bake Remove Items Stored in Oven Remove any pans and other cooking utensils stored in oven.
• Keep pans and baking sheets 2 inches from oven walls. • Stagger pans placed on different racks so one is not directly over the other. Broiling ! WARNING To avoid risk of fire, do not line the broiler grid with foil. • Foil may trap grease on top of grid close to burner causing a fire. • Never leave oven unattended while broiling. Overcooking may result in a fire. Broiling Tips • Remove excess fat from meat before broiling. Cut edges of meat to prevent curling.
Cooking Guide Baking Guide Follow these recommendations only as a guide for times and temperatures. Times, rack position, and temperatures may vary depending on conditions and food type. For best results, always check food at minimum time.
Beef and Pork Roasting Guide Follow these recommendations only as a guide for times and temperatures. Times, rack position, and temperatures may vary depending on conditions and food type. For best results, always check food at minimum time.
Care and Cleaning Removing Oven Door Replacing Oven Light (Some Models) ! CAUTION ! WARNING To avoid personal injury or property damage, handle oven door with care. • Door is heavy and can be damaged if dropped. • Avoid placing hands in hinge area when door is removed. Hinge can snap closed and pinch hands. • Do not scratch or chip glass, or twist door. Glass may break suddenly. • Replace door glass if damaged. • Do not lift door by handle.
Cleaning Part Materials to Use Bake and broil element General Directions Do not clean bake element or broil element. Any soil will burn off when element is heated. Bake element is hinged and can be lifted to clean oven bottom. Broiler pan and grid Soap and a nonabrasive plastic scouring pad Drain fat, cool pan and grid slightly. (Do not let soiled pan and grid stand in oven to cool.) Sprinkle with soap. Fill the pan with warm water. Let pan and grid stand for a few minutes. Wash or scour if necessary.
Before Calling for Service Problem Check Oven light does not work. Check for loose bulb. Check for burned out bulb; replace with 40-watt appliance bulb. Oven does not heat. Confirm range is plugged in. If both oven and surface elements do not heat, check circuit breaker. Check control for proper setting. Food burns on top when baking. Check that temperature knob was not set to broil when preheating. If temperature knob was set to broil, broil element will heat during bake.
Warranty W-X?hg W-X? W-X? W-X? W-X? W-X? W-X? W-X? W-X? W-X? W-X? W-X? W-X? W-X? W-X? W-X? W-X? W-X? W-X? W-X? W-X? W-X? W-X? W-X? W-X? W-X? W-X? W-X?hg ?W-X ?@@@@@@6X?f?W&@)Xf?W2@@@@@@@@@@@@@6Xf?W&@)XgW2@@@@@@@@@@@@6Xf?W&@)XgW2@@@@@@@@@@@@6Xf?W&@)XgW2@@@@@@@@@@@@6Xf?W&@)XgW2@@@@@@@@@@@@6Xf?W&@)XgW2@@@@@@@@@@@@6Xf?W&@)XgW2@@@@@@@@@@@@6Xf?W&@)XgW2@@@@@@@@@@@@6Xf?W&@)XgW2@@@@@@@@@@@@6Xf?W&@)XgW2@@@@@@@@@@@@6Xf?W&@)XgW2@@@@@@@@@@@@6Xf?W&@)XgW2@@@@@@@@@@@@6Xf?W&@)XgW2@@@@@@@@@@@@6Xf?W&@)XgW2@@@@@@@@@@@@6Xf?W&@)