Use & Care Guide Model AMC2206BA IMPORTANT Precautions SAFETY INSTRUCTIONS to Avoid Possible Microwave Energy Installation and Operation Features Operating Instructions Utensils Troubleshooting Warranty Manuel Exposure 4 ..................... d'entretian ........................ 22 ............................. Gufa de uso y cuidado 9 21 ............................ 23 ........................ et d'utilisation 6 7 ........................... and Service 2 to Excessive ......
IMPORTANT SAFETY INSTRUCTIONS What You eed to Know About Safety instructions Warning and Important Safety Instructions appearing in this Use & Care Guide are not meant to cover all possible conditions and situations that may occur. Common sense, caution, and care must be exercised when installing, maintaining, or operating microwave. Always contact your dealer, distributor, service agent, or manufacturer about problems or conditions you do not understand.
IMPORTANT SAFETY INSTRUCTIONS SAVE T ESEI ST JCTIO S
IMPORTANT SAFETY INSTRUCTIONS Precautionsto Avoid PossibleExposure to Excessive ICl'OWaVe " Energy A. DO NOT attempt to operate this oven with the door open since open-door operation can result in harmful exposure to microwave energy, it is importantnot to defeat or tamper with the safety interlocks. B. DO NOT place any object between the oven front face and the door or allow soil or cleaner residue to accumulate on sealing surfaces. C. DO NOT operate the oven if it is damaged.
IMPORTANT SAFETY INSTRUCTIONS Grounding instructions Oven MUST be grounded. Grounding reduces risk of electric shock by providing an escape wire for the electric current if an electrical short occurs. This oven is equipped with a cord having a grounding wire with a grounding plug. The plug must be plugged into an outlet that is properly installed and grounded. See Installation Instructions.
Installation and Operation CIRCUITS For safety purposes this oven must be plugged into a 15 or 20 Amp circuit. No other electrical appliances or lighting circuits should be on this line. If in doubt, consult a licensed electrician. VO LTAGE The voltage used at the wall receptacle must be the same as specified on the oven name plate located inside oven door. Use of a higher voltage is dangerous and may result in a fire or other type of accident causing oven damage. Low voltage will cause slow cooking.
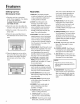
Features Oven Front Plate OVEN SPECIFICATIONS Window Door Screen I Power Supply Door Seal Input Power Display Window ;ontrol Panel Door Open Button Safety Door Lock System -- I Cooking Power 2,450 MHz 13.5A Outer Dimensions (WxHxD) 2321/32" X 13 Cavity Volume 2.0 Cu. Ft. Net Weight 41.4 Ibs.
Features Setting Up Your Microwave Oven 1. Plug the cord into a grounded outlet. Once plugged in, the display on your oven will show: PLEASE TOUCH CLOCK AND SET TIME OF DAY. 2. Open the oven door by pulling the handle on the right side of the door. 3. Wipe the inside of the oven with a damp cloth. 4. Place the pre-assembled ring in the indentation in the center of the oven. FEATURES 1.
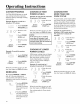
Operating Instructions LEARN ABOUTYOUR MICROWAVE OVEN This section introduces you to the basics you need to know to operate your microwave oven. Please read this information before use. KITCHEN TIMER CHILD LOCK You can use your microwave oven as a timer. Use the Kitchen Timer for You may lock the control panel to prevent the microwave from being accidentally started or used by children. timing up to 99 minutes, 99 seconds. Example: To set for 3 minutes. Ktc_:_ 1. Touch KITCHEN TIMER pad. 2.
Operating Instructions CUSTOM PROGRAM CUSTOM PROGRAM lets you recall one cooking instruction previously placed in memory and begin cooking automatically. COOKING AT HIGH POWER LEVELS Example: To cook food for 8 minutes 30 seconds at 100% power. 1, Example: Memory to cook for 2 minutes at 70% power. _: ¢ 1. Touch CUSTOM I'yl Enter the cook time. 2. Touch ENTER/ Start START pad. PROGRAM pad. 2. Enter the cook time. Po_si__' 3. Touch POWER LEVEL pad. 4. Enter the power level.
Operating COOKING Instructions GUIDE FOR POWER LEVELS The 10 power levels allow you to choose the best power level for the food you are cooking. Below are listed all the power levels, examples of foods best cooked at each level, and the amount of microwave power you are using. Boil water. Cook ground beef. Make candy. 10 High 100% Cook fresh fruits and vegetables Cook fish and poultry. Preheat browning dish. Reheat beverages. Bacon slices. 9 90% Reheat meat slices quickly.
Operating Instructions SENSOR OPERATING INSTRUCTIONS SENSOR GUIDE Sensor Cook allows you to cook most of your favorite foods without selecting cooking times and power levels. The display will indicate the sensing period by scrolling the name of the food. The oven automatically determines required cooking time for each food item. When the internal sensor detects a certain amount of humidity coming from the food, it will tell the oven how much longer to heat.
Operating BAKED Instructions POTATO The BAKED POTATO pad lets you bake one or several potatoes without selecting cooking times and power levels. NOTES: Before baking, pierce potato with fork several times. • After baking, let stand for 5 minutes. COOK REHEAT Using COOK lets you heat common microwave-prepared foods without needing to program cooking times and power levels. COOK has preset cooking times and power levels for 4 food categories: Beverage, Frozen Dinner, Frozen Breakfast, Chicken Breast.
Operating Instructions SENSOR COOKTABLE Use only one microwave-only bag of popcorn at a time. Use caution when Popcorn removing and opening the hot bag from oven. Let oven cool for at least 5 minutes before using again. Baked Potato Prick each potato several times with fork. Place on turntable in spoke-like fashion. Turn the food over when oven beeps. Let stand 3-5 minutes. Let oven cool for at least 5 minutes before using again. Use MORE(9) pad when cooking larger potatoes. 3.0-3.5 oz.
Operating Instructions SOFTEN/M ELT SOFTEN/MELT lets you soften or melt 3 categories of food : MeJt ChocoJate, Soften Cream Cheese and MeJt Butter. E×ampJe: To meJt chocoJate. 1. Touch SOFTEN/MELT pad. 2. Choose food category(1-3). iii!¸¸i !iiiii i iiiiiiiiiii i ii!iii ! ! iiiiiiiii!iii!iii iiiiiiii!i ii i !! ! !2 Melt Chocolate 1 Soften Cream Cheese 2 Melt Butter 3 3. Touch ENTER/START pad.
Operating Instructions KiDS MEALS KIDS MEALS lets you heat 4 categories of food : Chicken Nuggets, Sandwiches. Hot dogs, French Fries and Frozen Example: To cook frozen sandwiches. 1. Touch KIDS MEALS pad. 2. Choose food category(I-4). Start Chicken Nuggets 1 Hot Dogs 2 French Fries 3 Frozen Sandwiches 4 3. Touch ENTER/START pad. KiDS MEALS CHART Chicken Nuggets 1 serving (4-5 oz.) • Put a paper towel on top of plate and arrange nuggets in spoke fashion on paper towel. 2 servings (6-7 oz.
Operati.g l.structio.s SNACKS SNACKS lets you heat 4 categories of food : Nachos, Chicken Wings, Potato Skins, and Cheese Sticks. Example: To cook chicken wings. 1. Touch SNACKS pad. 2. Choose food category(I-4). 3. Select serving size. (Chicken Wings, Potato Skins, Cheese Sticks) Enter SNACKS Nachos 1 Chicken Wings 2 Potato Skins 3 Cheese Sticks 4 4. Touch ENTER/START pad. CHART Nachos 1 serving I" Place tortilla chips on plate without overlapping. • Sprinkle evenly with cheese.
Operating Instructions AUTO DEFROST DEFROSTING Defrost choices are preset in the oven. The defrost feature provides you with the best defrosting method for frozen foods, because the oven automatically sets the defrosting times according to the weight you enter. For added convenience, the AUTO DEFROST includes beeps to remind you to check or turn over the food during the defrost cycle. * Follow the instructions below when defrosting different types of food.
Operating COOKING Instructions GUIDE Guide for Cooking Meat in Your Microwave • Place meat on a microwave-safe roasting rack in a microwave-safe dish. • Start meat fat-side down. Use narrow strips of aluminum foil to shield any bone tips or thin meat areas. • Check the temperature in several places before letting the meat stand the recommended time. • The following temperatures are removal temperatures. The temperature of the food will rise during the standing time. m . i b! ........ 8-12 min.
Operating Instructions Guide for Cooking Seafood in Your Microwave • Cook fish until it flakes easily with a fork. • Place fish on a microwave-safe roasting rack in a microwave-safe dish. • Use a tight cover to steam fish. A lighter cover of wax paper or paper towel provides less steaming. • Do not overcook fish; check it at minimum cooking time. Steaks Cooking Time: 7-11 min. / lb. Arrange roasting rackpaper. with meaty portions outside ofsteaks rack.
Care and Cleaning CARE AND CLEANING Follow these instructions to clean and care for your oven. For best performance and safety, keep the oven clean inside and out-side. Take special care to keep the inner door panel and the oven front frame free of food or grease build-up. Never use rough powder or pads. Wipe the microwave oven inside and out, including the hood bottom cover, with a soft cloth and a warm (not hot) mild detergent solution. Then rinse and wipe dry.
Cooking Utensils iii 22
Troubleshooting TROUBLESHOOTING GUIDE If you have a problem you cannot solve, please call our service line: 1=800-688-9900 U.S.A. 1=800-688=2002 Canada Before you call a repair person for your oven, check this list of possible problems and solutions. Neither the oven's display nor the oven operate. • Properly insert the plug into a grounded outlet. • If the outlet is controlled by a wall switch, make sure the wall switch is turned on.
Warranty and Service What is Not Covered By These Warranties 1. Conditions and damages resulting from any of the following: a. improper installation, delivery, or maintenance. b. Any repair, modification, alteration, or adjustment not authorized by the manufacturer or an authorized servicer. c. Misuse, abuse, accidents, unreasonable use, or acts of God. d. incorrect electric current, voltage, electrical and/or gas supply. e. improper setting of any control. 2.
Manueld'entretienetd'utilisation Modele AMC2206BA CONSIGNES DE Si_CURITi_ IMPORTANTES Consignes de s6curit6 pour exposition a une quantit6 trop ondes ..................................... Installation Fonctions et utilisation Entretien Ustensiles d'utilisation Formulaire n ° : A/08/05 ....................... 30 31 33 ........................ 45 de cuisine ........................ 46 .................................
v v CONSIGNES DE SECURITE IMPORTANTES Apprenez_ reconnaitre les symboles,termes et _tiquettes relatifs_ la s_curit_. Ce que vous evez savoir sur les consignes de s_curit_ Les avertissements et consignes de securit6 figurant dans ce manuel d'entretien et d'utilisation ne sent pas destines a couvrir toutes les conditions et situations possibles. Des mesures de bon sens, de precaution et de soin doivent _tre prises Iors de I'installation, de I'entretien ou de I'utilisation du micro-ondes.
v v CONSIGNES DE SECURITE IMPORTANTES CONSE PRECI CE_ iNSTRUCTiONS 27
v r CONSIGNES DE SECURITE IMPORTANTES Consignesdes6curit6 pour6viter uneposs expositionb une quantit6tropimportante de micro-ondes A. N'UTILISEZ JAMAIS le four porte ouverte ; vous fisquefiez d'6tre expos6 & une quantite trop importante de microondes. Ne tentez jamais de neutraliser ou de passer outre le verrouillage de s6curit6. B.
/1, /1, CONSIGNES DE SECURITE IMPORTANTES D6claration FCC (Federal Communications Commission)relative CONS" raise nes de la terre Le four DOlT 6tre reli_ a la terre. La mise A la terre r6duit le risque d'61ectrocution en fournissant un fil de sortie au courant en cas de court-circuit. Ce four est 6quip6 d'un cordon disposant d'une prise de mise A la terre. La fiche doit 6tre branchee sur une prise secteur installee et mise A la terre conformement A la 16gislation en vigueur.
Installation et utilisation CIRCUITS Pour des raisons de s6curit& ce four dolt 6tre branche sur un circuit de t 5 ou 20 A. Aucun autre appareil electrique ou circuit d'6clairage ne dolt 6tre branche sur cette ligne. En cas de doute, consultez un 61ectricien qualifi& • Si le four a et6 entrepose dans un endroit tres froid, attendez quelques heures avant de le brancher. CAPACITE INTEGREE Pour obtenir des informations, appelez le : t -800-688-9900 aux €:tats-Unis 1-800-688-2002 au Canada.
Fonctions CARACTERISTIQUES TECHNIC :UES DU FOUR Fagade du four Fen6tre de la porte Joint de la porte Fen6tre d'affichage de commande Bouton d'ouverture (-.. Systeme "• de la porte .
Fonctions Fleglage de votre four micro-ondes 1. Branchez le cordon sur une prise avec mJse A la terre. Une lois le four branche, le message suivant s'affiche sur I'ecran : PLEASE TOUCH CLOCK AND SET TIME OF DAY(VEUILLEZ APPUYER SUR LA TOUCHE CLOCK POUR REGLER L'HEURE). 2. Ouvrez la porte du four en tJrant la poignee situee sur la droite. 3. Nettoyez I'int@ieur du four avec un chiffon humide. 4. Placez I'anneau pre-assembl6 dans la cavite situee au centre du four. de poulet.
Consignes d'utilisation DECOUVREZ VOTRE MICRO-ONDES 1. Appuyez sur la touche KITCHEN TIMER Cette section vous presente los fonctions de base que vous devez connaftre avant d'utiliser votre four micro-ondes. Veuillez life attentivement cos informations avant toute utilisation. (MINUTERIE). !_ C,_! 2. Saisissez la duroc a. I'aide des touches numerot6es. 3. Appuyez sur la touche ENTER/ START (ENTREE/ DEMARRER). Lorsque la duroc est ecoul6e, un signal sonore retentit et le message END (FIN) s'affiche.
Consignes d'udlisadon CUSTOM PROGRAM (PROGRAMME PERSONNALISE) Le programme personnalise vous permet de rappeler une instructionde cuisson pr6alablement enregistree et de demarrer la cuisson automatiquement. Exemple : m6moriser une cuisson 70 % pendant 2 minutes. K" ........ 1. Appuyez sur la touche CUSTOM PROGRAM (PROGRAMME PERSONNALISE). 0< • y,,,_ !:_OVC<:! ¢.7_;" 2. Saisissez le temps de 3. Appuyez sur la touche POWER LEVEL (NWEAU DE PUISSANCE). 5.
Consignes GUIDE DE CUISSON d'utilisation POUR LES NIVEAUX DE PUISSANCE FAIBLES Les 10 niveaux de puissance vous permettent de choisir le niveau le plus adapte aux aliments que vous cuisinez. Vous trouverez ci-dessous la liste de tousles niveaux de puissance, des exemples d'aliments cuisin6s pour chaque niveau et la puissance utilis6e.
Consignes d'utilisation CONSIGNES D'UTILISATION DU CAPTEUR La cuisson par capteur vous permet de cuire la plupart de vos plats pr6fer6s sans avoir b.selectionner de temps de cuisson ni de niveaux de puissance. Pour afficher le temps de detection, faites defiler le nora de I'aliment. Le four calcule automatiquement le temps de cuisson necessaire pour chaque plat. Lorsque le capteur interne detecte la teneur en eau de I'aliment, il transmet au four le temps de chauffe n6cessaire.
Consignes d'utilisation BAKED POTATO (POMME DE TERRE AU FOUR) La touche BAKED POTATO (POMME DE TERRE AU FOUR) vous permet de cuire une ou plusieurs potatoes de terre sans s61ectionner ni temps de cuisson ni niveau de puissance. REMARQUES : • Avant de les mettre au four, piquez les potatoes de terre plusieurs fois b.I'aide d'une fourchette. • Apres la cuisson, laissez reposer pendant 5 minutes. Exemple :Pour faire cuire 2 potatoes de terre.
Consignes d'utilisation TABLEAU DE CUISSON AVEC CAPTEUR _ATE_JE Popcorn _UA_ j E N'introduisez qu'unseulpaquetde popcornspecialmicro-ondes a la fois.SoyezprudentIorsquevousretirezle sachet 85 & 100 g dufouret quevousI'ouvrez.Laissezle fourrefroidirpendantau moins5 minutesavanttoutenouvelleutilisation. 1 paquet Pomme de terre au four Piquezchaque pomme de terre plusieursfois a I'aide d'une fourchette.Disposez-lesde mani@euniforme sur le plateau.
Consignes d'udlisation RAMOLLIR/FONDRE La fonction RAMOLLIR/FONDRE vous permetde faire ramollir ou fondre les 3 categories d'aliments suivantes : Faire fondre du chocolat, faire ramollir du fromage a la creme et faire fondre du beurre. Exemple : pour faire fondre du chocolat. Mcit 1. Appuyez sur la touche SOFTEN/MELT (FNRE RAMOLLIR/FONDRE). 2. S6bctionnez b.3). Start la cat6gorie d'aliments (t 3. Appuyez sur la touche ENTER/START (ENTREE/DEMARRER).
Consignes d'udlisadon REPAS ENFANTS La fonction KiDS MEALS (REPAS ENFANTS) vous permetde faJre rechauffer les 4 categories d'aliments suivantes : Beignets de poulet, Hot-dogs, frites et sandwiches surgel_s. Exemple : pour faire cuire un sandwich surgel& 1. Appuyez sur la touche KIDS MEALS (REPAS ENFANTS) 2. Selectionnez la cat6gorie d'aliments (1 & 4). @Start 3. Appuyez sur la touche ENTER/START (ENTREE/DEMARRER).
Consignes SNACKS d'udlisadon (EN-CAS) SNACKS (EN-CAS) vous permetde rechauffer 4 cat6gories d'aliments : des nachos, des ailes de poulet, des potatoes de terrefarcies et des b_tonnets de fromage. Exemple : Pour faire cuire des ailes de pouiet. Snacks 1. Appuyez sur la touche SNACKS (ENCAS). iiiiiiiiii i !i i ii ii ii ii ii ii ii ii ! ¸! iiii ii i !iiii iiii ii iiii iii ii iiiii Nachos 1 2. Selectionnez la cat6gorie d'aliments (1 a.4).
Consignes d'utilisation AUTO DEFROST GUIDE DE DECONGELATION (DECONGELATION AUTOMATIQUE) Suivez les instructions ci-dessous Iorsque vous decongelez diff@ents types d'aliments. Le four propose plusieurs fonctions de decongelation. La fonction Decongelation est la meilleure fagon de decongeler vos aliments car le four programme automatiquement le temps de decongelation b, partir du poids de I'aliment que vous avez saisi.
Consignes d'utilisation GUIDE DE CUISSON Guide de cuisson de la viande darts votre micro-ondes • Placez la viande sur une grille b. r6tir transparente aux micro-ondes, dans un plat allant au micro-ondes. • Lancez la cuisson en pla(_ant la viande c6te gras vers le bas. Recouvrez les os ou les parties comportant peu de chair de petites bandes de papier aluminium. Verifiez la temperature b. diff6rents endroits avant de laisser la viande reposer le temps recommande.
Consignes Guide de cuisson d'utilisation des fruits de met darts votre micro-ondes • Cuisez le poisson jusqu'b, ce qu'il s'emiette facilement & la fourchette. • Placez le poisson sur une grille a r6tir transparente aux micro-ondes, dans un plat allant au micro-ondes. Utilisez un couvercle herm6tique pour cuire le poisson a I'etuv6e. I'utilisation de papier sulfuris6 ou d'une serviette en papier comme couvercle produit moins de vapeur.
Entretien et nettoyage ENTR ETI EN ET N ETTOYAG E Pour un fonctionnement optimum et dans un souci de s6curit6, gardez I'int6rieur et I'ext6rieur du four propres. Veillez ace que la pattie int6rieure de la porte du four et le cadre avant ne contiennent pas de traces d'aliments ou de graisse incrust6es. N'utilisez jamais de poudre ou de tampons b. recurer.
Ustensiles 46 o o e cuisine
D pannage GUIDE DES PANNES Avant de faire appel b.un d@anneur pour votre four, consultez la liste des problemes et solutions possibles. L'affichage et le four ne fonctionnent pas. • Ins@ez correctement la fiche dans une prise avec mise b. la terre. • Si la prise est commandee par interrupteur mural, assurez-vous que celui-ci est ouvert. • Retirez la fiche de la prise, attendez dix secondes, puis rebranchez-la. • Remettez le disjoncteur en place ou remplacez les fusibles grilles.
GarantJe et assistance Ne sont pas couverts par ces garanties 1. Les problemeset dommagesresultantdes situationssuivantes: a. Miseen service, livraisonou entretien effectuesincorrectement. b. Toute reparation,modification,alterationet tout reglage non autorisespar le fabricantou par un prestatairede serviceapr6s-venteagre& c. Mauvaisemploi, emploiabusif,accidents,usagenon raisonnable,ou catastrophenaturelle. d. Courant electrique,tension,alimentationelectriqueou en gaz incorrects. e.
Guia de uso y cuidado iViodelo AIVIC2206BA INSTRUCCIONES IMPORTANTES 50 Precauciones para evitar la posible e×posicion energfa de microondas e×cesiva ............... a 52 Instalaci6n 54 y funcionamiento Caracterfsticas Manual Cuidado Conserve Asegurese DE SEGURIDAD .................. .............................. de instrucciones y limpieza ...................... .......................... 55 57 69 Utensilios para cocinar ....................... 70 Solucion de problemas ............
INSTRUCCIONES DESEGURIDAD IMPORTANTES Reconozca los s[rnbolos,advertencias y etiquetas de ! iurl Lo que necesita saber sobre las instrucciones de seguridad Las advertencias e instrucciones importantes sobre seguridad que aparecen en esta Gufa de uso y cuidado no est_.n destinadas a cubrir todas las posibles condiciones y situaciones que puedan ocurrir. Debe actuar con sentido comtJn,precauci6n y cuidado cuando instale, realice el mantenimiento o ponga en funcionamiento el microondas.
INSTRUCCIONES DESEGURIDAD IMPORTANTES CON ESTAS INSTRUCCIONES 51
INSTRUCCIONES DESEGURIDAD IMPORTANTES Precauciones para evitarla pos exposici6na energ[ade microondasexcesiva A. NO intente hacer funcionar este homo con la puerta abierta dado que el funcionamiento con la puerta abierta puede dar como resultado una exposici6n nociva a energia de microondas. Es importante no alterar ni modificar las trabas de seguridad. B.
INSTRUCCIONES DESEGURIDAD IMPORTANTES Instruccionesde cone×ion a tierra f El homo DEBE estar conectado a tierra. La conexi6n a tierra reduce el riesgo de descarga electrica ya que ofrece un cable de escape para la corriente el6ctrica en caso de que haya un cortocircuito. Este homo esta equipado con un cable que tJene un conductor a tierra con un enchufe con conexJ6n a tJerra. El enchufe debe conectarse a un tomacorriente que este correctamente instalado y conectado a tierra.
Instalaci6n y funciona ClRCUITOS Para fines de seguridad este homo debe enchufarse a un circuito de 15 POSIBlUDAD DE SER EMPOTRADO Para obtener mas informaci6n Ilame: o 20 Amp. No debe haber nJngQnotto artefacto electrico o circuito de luz 1-800-688-9900 en EE.UU. en esta line& Si tiene alguna duda, consulte a un electricista matriculado. 1-800-688-2002 en CanadA.
Caracteristicas ESPECIFICACIONES DEL HORNO Placa delantera del homo Pantalla de la ventana de la puerta Traba de pnerta Ventana de visualizaci6n Alimentaci6n electrica 120 VCA, 60 Hz Potencia de entrada 1.550W Potencia de cocci6n 1.100W (Norma60705IEC) Panal de control Bot6n de apertura de la puerta ___ Sistema seguridad J Plato g_ratoHo de cierre de de la puerta Frecuencia 2.
CaracteristJcas Cgnfigur.ar su homo de mIcroonaas 1. Enchufe el cable en un tomacorriente conectado a tierra. Una vez enchufado, la pantalla de su homo mostrar& PLEASE TOUCH CLOCK AND SET TIME OF DAY. (PORFAVOR OPRIMA CLOCK (RELOJ) Y CONFIGURE LA NORA DEL D[A.) 2. Abra la puerta del homo tirando de la manJja en el lado derecho de la puerta. 3. LimpJe el interior del homo con un patio hQmedo. 4. Coloque el anillo pre-montado en la muesca del centro del homo.
Manual de instrucciones CONOZCA SU HORNO DE MICROONDAS CHILD LOCK (BLOQUEO PARA NII_IOS) Ejemplo: Para programar 3 minutos. {tc/o Esta secci6n describe los elementos basicos que debe conocer para manejar su homo de microondas. Por favor lea esta informaci6n antes de utilizarlo. 1. Oprima la tecla KITCHEN TIMER (TEMPORIZADOR DE LA COCINA). 2. Ingrese la hora utilizando el teclado num@ico. 3. Oprima la tecla ENTER/START (INGRESAR/ COMENZAR).
Manual de instrucciones CUSTOM PROGRAM (PROGRAMA PERSONALiZADO) CUSTOM PROGRAM (PROGRAMA PERSONALIZADO) le permite recuperar una instrucci6n de cocci6n previamente incorporada a la memoria y comenzar a cocinar automb,ticamente. COClNAR CON NIVELES DE POTENCIA ALTOS Ejemplo: Para cocinar alimentos durante 8 minutos 30 segundos a una potencia de1100%. _ L/ Ejemplo: Memoria para cocinar durante 2 minutes a una potencia del 70%. _i_;si o_' %J Le/e 0 1.Oprimala teclaCUSTOM PROGRAM(PROGRAMA PERSONALIZADO).
Manual de instrucciones GUiA DE COCCl6N PARA NIVELES DE POTENCIA iVlAS BAJOS Los 10 niveles de potencia le permiten eiegir el nivel de potencia m6,s adecuado para los alimentos que cocina. A continuaci6n se enumeran los niveles de potencia, ejemplos de alimentos que se cocinan mejor a cada nivel y la )otencia del microondas que utiliza.
Manual de instrucciones INSTRUCCIONES SENSOR DEL La Cocci6n con Sensor le permite cocinar la mayoria de sus alimentos favoritos sin seleccionar los tiempos de cocci6n y los niveles de potencia. La pantalla indicara el perfodo de detecci6n desplazando el nombre del alimento. El homo determina autom_.ticamente el tiempo de cocci6n para cada alimento. Cuando el sensor interno detecta una cierta cantidad de humedad proveniente del alimento, le indicara al horno cub,nto tiempo mas calentarlo.
Manual de instrucciones REHEAT BAKED POTATO (PAPAS AL HORNO) La tecia BAKED POTATO (PAPAS AL HORNO) le permite hornear una o varias papas sin seieccionar los tiempos de cocci6n y los niveles de )otencia. 1 Congeladas Verduras 2 • CantJdades recomendadas La funci6n REHEAT (RECALENTAMJENTO) le permite calentar alimentos sin necesidad : 1-4 porciones. NOTAS: ,,Antes de homear, perfore la papa con un tenedor vadas veces. ,, Despues de hornear, deje reposar durante 5 minutos.
Manual de instrucciones TABLA DE COCCION Palomitas de maiz Papas al homo Rebanada de pizza CON SENSOR Utilice s61o una balsa para microondas de palomitas de mdz a la vez. Tenga cuidado cuando saque y abra la balsa caliente del homo. Deje enfriar el homo durante al menos 5 minutos antes de utilizarlo nuevamente. 3.0 a 3.5 oz. 1 paquete Pinche cada papa varias veces con un tenedor. Col6quelas en el plato giratorio al estilo de los rayos de una rueda.
Manual de instrucciones SOFTEN/M ELT(SUAVIZAR/D ER R ETI R) SOFTEN/MELT lepermite ablandar o derretir 3 categorfas de alimentos : Derretir chocoJate, Ablandar Derretir manteca. queso crema y Ejemplo: Para derretir chocolate. VIii: 1. Oprima [a tecla SOFTEN/MELT (SUAVIZAR/DERRETIR). 2. Elija la categorfa de alimento (1-3). Sta_ TABLA 3. Oprima la tecla ENTER/START (INGRESAR/COMENZAR).
Manual de instrucciones KIDS IVIEALS(COiVIIDAS PARA Nl ,lOS) KIDS MEALS le permite calentar 4 categor[as de alimentos : Croquetas y Emparedados congelados. de polio, Perros calientes, Perros calientes Ejemplo: Para cocinar emparedados congelados. _:i_:_; iV1_;:__; 1. Oprima la tecla KIDS MEALS (COMIDAS PARA NII_OS). 2. Elija la categoria de alimento (1-4). 3. Oprima la tecla ENTER/START (INGRESAR/COMENZAR).
Manual de instrucciones SNACKS SNACKS lepermite calentar 4 categorfas de alimentos : Nachos, Alitas de polio, Conchas queso. de papa, y PMitos de Ejemplo: Para cocinar alitas de polio. 1. Oprima la tecla SNACKS. 2. Elija la categorfa de alimento (1-4). 3. Seleccione el tamafio de la portion. (Alas de polio, Conchas de papa, Palitos de queso) 1 Alas de polio 2 Conchas de papa 3 Palitos de queso 4 4. Oprima la tecla ENTER/START (INGRESAR/COMENZAR).
Manual de instrucciones AUTO DEFROST (DESCONGELAIVlIENTO AUTOMATICO) Las opciones de descongelamientoestan programadas en el horno. La funci6n de descongelamiento le ofrece el mejor metodo de descongelamiento para alimentos congelados, dado que el homo configura automaficamente los fiempos de descongelamiento de acuerdo con el peso que usted ingresa.
Manual de instrucciones GU[A DE COCClON Guia para cocinar * GoJoque Ja came sobre came una en su microondas asadera para mJcroondas en una fuente para mJcroondas. * Comience a cocinar la came con el lado de la grasa hacia abajo. Utilice tiras finas de papel de aluminio para proteger cualquier punta de hueso o area de came delgadas. , Verifique la temperatura en varios lugares antes de dejar que la came repose el tJempo recomendado.
Manual de instrucciones Gu[a para cocinar pescado y mariscos en su microondas • Cocine el pescado hasta que se pueda desmenuzar f6,cilmente con un tenedor. • Coloque el pescado sobre una asadera para microondas en una fuente para microondas. • Utilice una cubierta ceSida para cocinar el pescado al vapor. Una cubierta mas liviana de papel de cera o toalla de papel genera menos vapor. • No deje que el pescado se pase, contr61elo en el tiempo de cocci6n mfnimo. Bistecs Hasta 1,5 Ibs.
Cuidado y limpieza CUIDADO Y LIMPIEZA Para un mejor desempefio y mayor seguridad, mantenga el homo limpio pot dentro y pot fuera. Preste especial cuidado para que el panel interior de la puerta y el marco delantero del homo se mantengan limpios y sin acumulaci6n de restos de alimentos o grasa. Nunca utilice polvos abrasivos o esponjas duras.
Utensilios para cocinar 7O
Soluci6n de probIemas GU[A DE SOLUCION DE PROBLEMAS Antes de Ilamar a un t6cnico para su homo, verifique esta lista de posibles problemas y soluciones. No funcionan ni la pantalla del homo ni el homo. • Inserte correctamente el enchufe a un tomacorriente conectado a tierra. • Si el tomacorriente esta controlado pot un interruptor de pared, aseg0rese de que el interruptor de pared este encendido. • Retire el enchufe del tomacorriente, espere diez segundos y vuelva a enchufarlo.
Garantia y servicio t cnico Lo que No Cubren Estas Garantias: 1. Situaciones y da_os resultantes de cualquiera de las siguientes situaciones: a. Instalaci6n, entrega o mantenimiento inapropiados. b. Cualquier reparaci6n, modificaci6n, alteraci6n o ajuste no autorizados por el fabricante o taller de servicio autorizado. c. Mal uso, abuso, accidentes, uso no razonable o hechos fortuitos. d. Corriente, voltaje, suministro electrico o suministro de gas incorrectos. e. Ajuste inadecuado de cualquier 2.