Owner's Manual Covering TM ACF4255A and TM ACF4265A Contents TM Electric Smoothtop Range Keep instructions for future reference. Be sure manual stays with range. Important Safety Information .............. 3 Cooking on the Smoothtop ................. 6 Cookware Suggestions ...................... 8 Oven Cooking Methods ...................... 9 Before Using the Oven ..................... 10 Features ........................................... 11 Displays and Signals ........................
Thank you for buying an Amana Range! Please take the time to complete the registration card and return promptly. If the registration card is missing, call Amana Consumer Affairs Department.
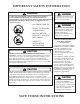
IMPORTANT SAFETY INFORMATION ! WARNING ! WARNING To reduce risk of the appliance tipping, it must be secured by a properly installed anti-tip bracket. To verify bracket has been installed properly, remove the storage drawer or panel and look under the range with a flashlight. Bracket must be engaged in the rear corner of the range.
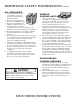
IMPORTANT SAFETY INFORMATION (contd) ALL APPLIANCES SURFACE COOKING UNITS 1. Proper Installation—Be sure your appliance is properly installed and grounded by a qualified technician. 2. Never Use Your Appliance for Warming or Heating the Room. 3. Do Not Leave Children Alone— Children should not be alone or unattended in the area where the appliance is in use. They should never be allowed to sit or stand on any part of the appliance. 4.
IMPORTANT SAFETY INFORMATION OVENS In Case of Fire 1. Use Care When Opening Door—Let hot air or steam escape before removing or replacing food. 2. Do Not Heat Unopened Food Containers—Build-up of pressure may cause container to burst and result in injury. 3. Keep Oven Vent Ducts Unobstructed. 4. Placement of Oven Racks—Always place oven racks in desired location while oven is cool. If rack is removed while oven is hot, do not let potholder contact hot heating element in oven. 5.
Cooking on the Smoothtop Cooking Safely with Surface Elements ! WARNING To avoid risk of serious personal injury, property damage, or fire, do not leave surface elements unattended while in operation. Grease and spillovers can ignite causing a fire. ! WARNING To avoid risk of electrical shock or serious personal injury, • never cook on a broken smoothtop cooking surface. Spillovers can penetrate broken surface and cause electric shock. • never clean broken cooktop.
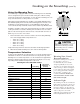
Cooking on the Smoothtop (cont'd) Using the Warming Zone Your new range is equipped with a convenient warming zone. The warming zone is designed to keep hot foods hot until serving time. When cooking such foods as pancakes, fried chicken, or even stir-fry the warming zone can keep cooked foods hot as other portions are cooked. All food placed on the warming zone should be covered with aluminum foil or a lid to maintain quality.
Cookware Suggestions What Should You Consider in Cookware? Flat Pan Test For best cooking results, use a pan with a flat bottom. To determine if pan has a flat bottom. 1. Rotate a ruler along bottom of pan. If pan is not flat, gaps between bottom of pan and edge of ruler can be seen. 2. A small groove or mark on a pan does not affect cooking times. However, if a pan has a gap, formed rings, or an uneven bottom, it does not cook efficiently and in some cases may not boil liquid.
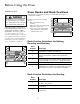
Oven Cooking Methods Oven Cooking Methods Bake Bake Broil Bake (lower) and broil (upper) elements operate during bake. Bake element is not visible on oven bottom. Broil element will cycle on and off during bake and is only used to heat oven quickly and brown top of food. Broil element will not glow red during a bake cycle. Bake can be used to cook foods which are normally baked. Oven should be preheated. Broil Broil Upper element operates during broil.
Before Using the Oven Aluminum Foil ! WARNING To avoid risk of personal injury, property damage or fire, do not line oven bottom, racks, or broiler pan and grid with aluminum foil. When placed on the oven bottom or racks, aluminum foil not only creates a hazard, but also affects cooking performance. To minimize spills in the oven, place a shallow pan or cookie sheet on rack underneath food items that drip or spill. The pan must not touch the oven walls, front, or back.
Features 12-hour automatic cancel This safety feature prevents oven from continuing to operate if it has been left on for over 12 hours. If a cooking function continues longer than 12 hours without any options on oven control being touched, this feature turns oven off. Any time an option is touched, 12-hour automatic cancel is reset. Sabbath mode ¸ Sabbath mode overrides the normal 12-hour automatic cancel function of the oven and allows prolonged oven operation for up to 37 hours.
Features Oven temperature control adjustment Your range is calibrated at the factory for proper temperature. Due to individual variances and preferences, it may be necessary to adjust ovens once they have been installed. When first using the oven, follow recipe times and temperatures. Before adjusting oven baking temperature, test a recipe, such as ready-to-bake biscuits, by setting oven temperature higher or lower than the suggested temperature.
Display and Signals S E T HR CONV ON COOK START TIMER DOOR STOP CLEAN LOCK S E T BROIL BAKE HR CONV ON COOK START TIMER DOOR STOP CLEAN LOCK DISPLAY DESCRIPTION Displays when cook time is being set for a timed bake. SET STOP TIME Displays when stop time is being set for a delayed bake or delayed self clean cycle. SET CLEAN TIME Displays when cycle length for a self clean cycle is being set. SET TIMER Displays when the timer is being set. BROIL Displays while oven is set to broil.
Using the Oven Control Setting Electronic Clock Flashing Display When power is connected or interrupted, oven display flashes. Press CLOCK to reset display. Clock may need to be reset. Timer Signal When time elapses, timer will sound three one-second beeps and then once every 30 seconds. END also displays. Press TIMER ON/OFF pad to stop timer and return to clock display. 12 hour clock does not display AM, PM or military time.
Using the Oven Control (contd) Baking While oven is still cool, remove any stored items from the oven cavity. 1. Place racks in desired position and close oven door. 2. Press BAKE pad. • SET and BAKE flash in display. • Temperature default of 350° displays. 3. Use digit pads (1 through 0) to enter desired oven temperature if it is different than 350°F. • Temperature range is 170°F to 550°F. 4. Press START pad. • Bake mode starts automatically • BAKE, ON and bake element graphic display.
Using the Oven Control (contd) What's the difference between TIMED and DELAYED cooking? When using TIMED cooking, the oven begins to heat immediately after the oven control is set. Then, the oven cooks for the desired length of time set. When using DELAYED cooking, the oven begins to cook later in the day. Set the time that you want to stop cooking and how long you want to cook. The oven calculates the time to begin cooking and cooks for the specified length of time.
Using the Oven Control (contd) Self-cleaning ! CAUTION Self-clean feature uses high oven temperature to clean oven interior. For the oven to operate through a complete self-clean cycle, the self-clean must be set when the oven is cool. 1. Prepare oven for self-cleaning (see below right). 2. Close door. 3. Press CLEAN pad. • SET CLEAN TIME flashes in display. • The default self-clean cycle length of 3 hours displays. • Adjust clean cycle length by using digit pads (1 through 0).
Using the Oven Control (contd) ! WARNING To avoid risk of personal injury, do not touch range top, oven door, oven vents, or area around vents, during self-cleaning. These areas can become hot enough to cause burns. ! CAUTION To avoid fire or smoke damage, • remove any flammable materials from storage drawer. Items like plastic containers and paper manuals can melt or burn. • clean excess spills before starting a self-clean cycle.
Cooking Baking Guidelines When baking with a new oven, keep in mind temperatures vary from oven to oven. Store-bought thermometers are generally not accurate and should not be used to calibrate oven temperatures. Hints for Cookies, • • Shiny, flat cookie sheets should be used. Avoid cookie pans with high sides—this will cause uneven browning on the top. Cookie sheet should not touch the sides of the oven or door. • Follow recipe’s directions for pan size. Shiny pans work best for cakes.
Cooking (contd) Common Baking Problems If you begin to notice consistent problems refer to the chart below for possible solutions. If results are still poor, contact Amana Consumer Affairs at (800) 843-0304. Test your cakes for doneness while they are still in the oven. Because of variances across individual ovens, it is best to test for the proper consistency rather than solely relying on time and visual appearance as an indicator.
Cooking (contd) Meat Basics While cooking has always been a talent, it is now becoming a science, also. Amana provides this information as a guide to aid in preparation. For specific questions regarding meat preparation, handling, or storage contact USDA (United States Department of Agriculture) Meat & Poultry Hotline at (800) 535-4555. Handling Hints Cooking Tips Storage Safety • • • • • • • • When shopping, put meat in its own separate plastic sack to keep drips off other foods.
Cooking (contd) Broiling Guidelines Broiling is a dry heat cooking method that allows a restaurant quality charbroiled flavor. Meat is exposed directly to the heating element at high temperatures. 1. Place meat on rack in broiler pan, with the surface of cuts the specified distance from the heating element (specified below). 2. Broil for half the recommended time, or until the surface is browned. 3. Turn meat and continue broiling to desired internal temperature. 4. Season, if desired. 5.
Cooking (contd) Roasting Guidelines Tender cuts such as rib and loin cuts are best cooked by dry heat methods, such as roasting. To roast: 1. Heat oven to desired temperature. 2. Place roast directly from refrigerator fat side up in a shallow roasting pan. 3. Insert ovenproof meat thermometer so tip is centered in thickest part of roast. Make sure thermometer does not rest in fat or on bone. 4. Remove roast 5°F below desired degree of finished internal temperature. 5.
Cooking (contd) Braising Guidelines Less tender cuts such as those from the round, chuck, brisket and shank require moist cooking. A longer cooking time at lower temperatures with moisture helps soften the meat. 1. Brown meat with a small amount of oil in heavy pan. 2. Pour off excessive drippings, season, if desired. 3. Add small amount of liquid (1/2 to 2 cups) and cover tightly. • Simmer gently over low heat on top of the range or in a 325°F oven, until meat is fork tender.
Care and Cleaning ! CAUTION To avoid personal injury or property damage, handle oven door with care. • Do not lift door by handle. • Remove storage drawer. • Door is heavy and can be damaged if dropped. • Screwdriver can scrape or chip range or oven finish. • Do not scratch or chip glass or twist door. Glass may break Cleaning Oven Door Not all areas of the oven are cleaned by the self-clean cycle.
Care and Cleaning (contd) Replacing Oven Light ! WARNING To avoid risk of burns or electrical shock: • disconnect electrical supply to oven before changing light bulb. • before replacing light bulb make sure oven and bulb are cool. • Do not operate oven without bulb and cover in place. 1. Disconnect electrical supply. 2. Remove oven door if desired. 3. While wearing protective gloves, unscrew counter clockwise the light bulb cover located in rear of oven cavity.
Care and Cleaning (contd) Caring for the smoothtop For routine cleaning, allow top to cool before cleansing. Wash surface with a dampened cloth and smoothtop cleaner conditioner. Use another clean damp paper towel to wipe off the cleaner. Use a dry paper towel, buff the smoothtop to make sure all the cleaner conditioner is removed. The smoothtop cleaner conditioner provides a thin layer of protective polish that helps to prevent scratching. Do not use a harsh cleanser or steel wool pad.
Care and Cleaning (contd) Cleaning Stainless Steel Damage to stainless steel finish due to improper use of cleaning products, or using non-recommended cleaning products, is not covered under warranty. For Amana recommended products, call Consumer Affairs at 1(800) 843-0304 or online at www.amana.com. Our stainless steel appliances have been factory finished for high shine and luster.
Troubleshooting You may save time and money by checking items below before calling for service. List includes common concerns that are not the result of defective workmanship or materials. If your question is not explained below, contact Amana Consumer Affairs Department at 800-843-0304. Topic Possible Cause Solution Appliance not working Power outage Make sure appliance is plugged in. Verify that circuit breaker is not tripped. Replace household fuse but do not change fuse capacity.
Troubleshooting (contd) NOISE Frequent cycling off and on of oven. Normal To maintain a temperature for baking, the oven cycles on and off. Cracking or popping sound Normal Wet cooking utensils or possible spillage. Expansion and contraction or metal components. Gritty dirt or rough surface on cooking utensils Use recommended smoothtop cleaner conditioner. APPEARANCE Scratches May be a metal mark. Make sure surface is cool. Use a safety scraper to carefully scrape off the mark.
Amana Warranty Full ONE Year Warranty Amana Appliances will repair or replace, including related labor and travel, any part (f.o.b. Amana Iowa) which proves defective as to workmanship or materials. Limited Warranty After one year from the date of original retail purchase, Amana will provide a free part, as listed below, to replace any part that fails due to a defect in materials or workmanship. The owner will be responsible for paying all other costs including labor, mileage, and transportation.