GAS RANGE Use & Care Guide For questions about features, operation/performance, parts, accessories or service, call: 1-800-843-0304 or visit our website at... www.amana.com Table of Contents .................................................
TABLE OF CONTENTS RANGE SAFETY .............................................................................3 The Anti-Tip Bracket ....................................................................4 BATTERY USE ................................................................................5 Installing/Replacing the Battery ...................................................5 Battery Status Indicator ...............................................................6 COOKTOP USE .............................
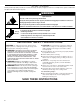
RANGE SAFETY Your safety and the safety of others are very important. We have provided many important safety messages in this manual and on your appliance. Always read and obey all safety messages. This is the safety alert symbol. This symbol alerts you to potential hazards that can kill or hurt you and others. All safety messages will follow the safety alert symbol and either the word “DANGER” or “WARNING.
The Anti-Tip Bracket The range will not tip during normal use. However, the range can tip if you apply too much force or weight to the open door without the anti-tip bracket fastened down properly. WARNING Tip Over Hazard A child or adult can tip the range and be killed. Verify the anti-tip bracket has been properly installed and engaged per installation instructions. Re-engage anti-tip bracket if range is moved. Do not operate range without anti-tip bracket installed and engaged.
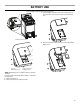
BATTERY USE Installing/Replacing the Battery 3. Using a Phillips screwdriver, remove the metal battery top from the bottom of the range and open the plastic battery box. A A. Battery holder location 4. Remove the battery holder and insert a new 9V DC alkaline battery into it. A BAT C Y TER B D A. Screw B. Metal battery top* C. Plastic battery box D. Battery holder *NOTE: Metal battery top is included in the bag containing literature.
5. Replace the battery holder in the plastic battery box with the battery facing the bottom and the blue wires facing up, and close the plastic battery box. Battery Status Indicator ■ The battery status indicator on the control panel will show the recommended time to replace the battery. Battery status indicator ■ 6. Reinstall the metal battery top and secure it with the screw. IMPORTANT: Do not operate bake burner without the metal battery top installed and secured. 7.
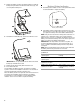
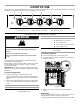
COOKTOP USE This manual covers several different models. The range you have purchased may have some or all of the items listed. The locations and appearances of the features shown here may not match those of your model. B A OFF OFF LO HI BATTERY STATUS 2 10 E D C OFF HI LO 8 4 BROIL 400 PUSH TO TURN A. Surface burner locator B. Left rear burner control 500 450 8 LO HI 2 10 2 10 4 6 6 LO HI 350 8 OFF OFF 2 300 10 F 8 4 4 6 6 PUSH TO TURN OVEN TEMP C.
3. Clean the gas tube opening with a damp cloth. 4. Clean clogged burner ports with a straight pin as shown. Do not enlarge or distort the port. Do not use a wooden toothpick. If the burner needs to be adjusted, contact a trained repair specialist. Surface Burners A C B D 5. Replace the burner cap onto the burner base, making sure the alignment pins are properly aligned with the burner cap. E A. Burner cap (underside) B. Alignment pins C.
Use the following chart as a guide for cookware material characteristics. COOKWARE CHARACTERISTICS Aluminum ■ Heats quickly and evenly. ■ Suitable for all types of cooking. ■ Medium or heavy thickness is best for most cooking tasks. ■ Heats slowly and evenly. ■ Good for browning and frying. ■ Maintains heat for slow cooking. ■ Follow manufacturer’s instructions. ■ Heats slowly, but unevenly. ■ Ideal results on low to medium heat settings.
Bakeware The bakeware material affects cooking results. Follow manufacturer’s recommendations and use the bakeware size recommended in the recipe. Use the following chart as a guide. BAKEWARE/ RESULTS RECOMMENDATIONS Light colored aluminum ■ Light golden crusts ■ Baking and Roasting IMPORTANT: To avoid damage to the interior finish, do not place food or cookware directly on the oven door or the oven bottom.
BROILING CHART For best results, place food 3" (7.0 cm) or more from the broil element. Times are guidelines only and may need to be adjusted for individual foods and tastes. COOK TIME (in minutes) SIDE 1 SIDE 2 FOOD Chicken bone-in pieces, boneless breasts 15-17 11-13 15-17 11-13 Fish Fillets ¹ ₂-³ ₄" (1.3-1.8 cm) thick 7-8 3-4 Frankfurters 5-6 2-3 Ground meat patties* ³ ₄" (1.8 cm) thick, well-done* 11-13 6-7 COOK TIME (in minutes) SIDE 1 SIDE 2 FOOD Ham slice, precooked ¹ ₂" (1.
CONTROL PANEL To avoid damage to the control panel, do not use abrasive cleaners, steel-wool pads, gritty washcloths or abrasive paper towels. Cleaning Method: ■ Glass cleaner and soft cloth or sponge: OVEN DOOR EXTERIOR Cleaning Method: ■ Glass cleaner and a soft cloth or sponge: Apply glass cleaner to soft cloth or sponge, not directly on panel. ■ Apply glass cleaner to soft cloth or sponge, not directly on panel.
Oven Door For normal range use, it is not suggested to remove the oven door. However, if removal is necessary, make sure the oven is off and cool. Then, follow these instructions. The oven door is heavy. To Replace: 1. Grasp the door on the sides with your fingers on the front of the door and your thumbs on the inside surface. To Remove: 1. Open the oven door. Insert hinge pins, included with your range, into both hinge hangers. Do not remove the pins while the door is removed from the range. A 2.
TROUBLESHOOTING Try the solutions suggested here first in order to avoid the cost of an unnecessary service call. Nothing will operate Cookware not level on cooktop ■ Is the main gas shutoff valve in the off position? See the Installation Instructions. ■ Is the range level? Level the range. See the Installation Instructions. ■ Is the range properly connected to the gas supply? Contact a trained repair specialist or see the Installation Instructions.
Baking results not what expected Slow baking or roasting ■ Was the oven preheated? Wait for oven to preheat before placing food in oven. ■ Was the oven preheated? Wait for oven to preheat before placing food in oven. ■ Are the racks positioned properly? See the “Positioning Racks and Bakeware” section. ■ Is there proper air circulation around bakeware? See the “Positioning Racks and Bakeware” section.
AMANA® MAJOR APPLIANCE WARRANTY LIMITED WARRANTY For one year from the date of purchase, when this major appliance is operated and maintained according to instructions attached to or furnished with the product, Amana brand of Whirlpool Corporation or Whirlpool Canada LP (hereafter “Amana”) will pay for factory specified parts and repair labor to correct defects in materials or workmanship. Service must be provided by an Amana designated service company.