
Installation Instructions


4
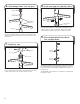
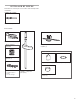
8. Lock arm support collar into place
Press the release buttons on the top pole and slide the arm
support collar over them to lock it into place. There will be
some resistance from the spring as you slide it into place.
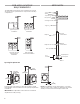
7. Install top cap
Fit the top cap onto the end of the top pole. Pressing down on
the top cap, align the holes in the top cap with the pilot holes
in the top pole, and secure in place with two screws.
6. Slide hanger arms onto top pole
Slide both the hanger arms, toothed side facing up, onto the
top pole, allowing them to rest on the release buttons. Then,
slide the top washer and spring onto the top pole above the
hanger arms.
Top
washer
Hanger
arms
Top pole
Screws
Top cap
Top pole
Pilot holes
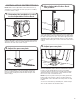
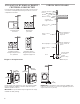
9. Place Adjustable Clothes Rack
into storage mode
To simplify installation of the Adjustable Clothes Rack, place it
into storage mode by pressing the release buttons for the top
pole and mid pole (if extended) and sliding them down into
the base pole.
The Adjustable Clothes Rack is now ready to be installed onto
the washer or dryer.
Release
buttons
Arm support
collar
Spring
Release
buttons
Release
buttons