milestone XProtect Smart Client 2.
Milestone XProtect Smart Client; User’s Manual Target Audience for this Document This document is aimed at users of Milestone XProtect Smart Client. This document provides detailed descriptions of Milestone XProtect Smart Client features. It furthermore provides a number of targeted “how-to” examples, guiding users through completing common tasks in Milestone XProtect Smart Client.
Milestone XProtect Smart Client; User’s Manual Contents INTRODUCTION.......................................................... 6 About the Smart Client ......................................................................... 6 What are Remote Users Able to do with the Smart Client? ........................ 6 How does the Smart Client get Images from the Surveillance System? ....... 7 How can User Rights Affect Use of the Smart Client? ................................ 7 DOWNLOAD AND INSTALLATION .........
Milestone XProtect Smart Client; User’s Manual Which Types of Groups Can You Edit Views in?................................... 22 Using Static Images in Views.............................................................. 23 Using HTML Pages in Views ................................................................ 23 Changing the Properties of an Imported HTML Page ................................24 Navigating an Imported HTML Page ......................................................25 Renaming Groups ..
Milestone XProtect Smart Client; User’s Manual Selecting a View ................................................................................. 37 Enlarging Images from a Particular Camera ...........................................38 Time Navigation.................................................................................. 38 Master Time .......................................................................................38 Browse Buttons .......................................................
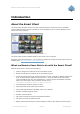
Milestone XProtect Smart Client; User’s Manual Introduction About the Smart Client The Smart Client provides remote users with extremely feature-rich access to the surveillance system. With the Smart Client it is possible to access multiple servers at a time, allowing remote user access across systems. Example of the Smart Client, displaying images from 16 cameras The Smart Client must be installed locally on the remote user’s computer. DirectX 9.0 and .Net Framework 1.
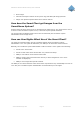
Milestone XProtect Smart Client; User’s Manual Print images. Assign user-specific keyboard shortcuts to common actions. Generate and export evidence in AVI (movie clip) and JPEG (still image) formats. How does the Smart Client get Images from the Surveillance System? Images viewed by Smart Client users are provided by the Image Server. The Image Server runs as a service on the surveillance system server; it does not require separate hardware.
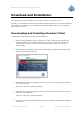
Milestone XProtect Smart Client; User’s Manual Download and Installation The Smart Client must be installed on your computer before you are able to use it. Typically, you download the Smart Client from the surveillance system server, and then install it on your computer. Alternatively, your surveillance system administrator may ask you to install the Smart Client from a CD. Downloading and Installing the Smart Client To download and install the Smart Client, do the following: 1.
Milestone XProtect Smart Client; User’s Manual Installing the Smart Client from a CD To install the Smart Client from a CD, do the following: 1. Insert the CD, and run the Smart Client installation file (MilestoneXProtectSmartClient.exe) from the CD. 2. When the installation wizard starts, click Next to continue the installation and follow the steps in the installation wizard. www.milestonesys.
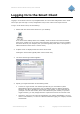
Milestone XProtect Smart Client; User’s Manual Logging In to the Smart Client Logging in to the Smart Client is very straightforward. So is the initial configuration of the Smart Client upon your first login—in fact, configuration may in some cases not be required at all. To log in to the Smart Client, do the following: 1.
Milestone XProtect Smart Client; User’s Manual Password: Type your password as specified by your system administrator. The password is case-sensitive. 5. Click OK. 6. After a short wait, the Smart Client window will open. The Smart Client window has three tabs: Live, Browse and Setup: The Live tab is used for viewing live images from cameras, the Browse tab is used for browsing recorded images from cameras, and the Setup tab is used for configuring the Smart Client.
Milestone XProtect Smart Client; User’s Manual Creating Views The way in which images from one or more cameras are displayed in the Smart Client is called a view. A view may contain images from up to 16 cameras*. A Smart Client can handle an unlimited number of views, allowing you to switch between various collections of camera images.
Milestone XProtect Smart Client; User’s Manual When that is the case, you can start using your Smart Client straight away; creating further views in your Smart Client will not be necessary unless you want to supplement the views in the shared groups with views of your own, placed in private groups.
Milestone XProtect Smart Client; User’s Manual Example of Views section containing no expandable folders In this case, you must create at least one view on the Setup tab before you can begin using the Smart Client. If the Views section contains one or more expandable folders labeled [Private] ..., you have already created one or more views in private groups.
Milestone XProtect Smart Client; User’s Manual Creating Views in Private Groups To create your first view in a private group, you first create a group under the Private top-level group, and then create the required view within the group. If you have created views in private groups before, you may create new views in existing private groups, or you may create a new private group for the view. Note: Views are created on the Smart Client’s Setup tab.
Milestone XProtect Smart Client; User’s Manual Creating a View in a Private Group To create a view in a private group, do the following: 1. In the Setup tab’s Views section, make sure the group in which you want to create the view is selected: Example: Selecting required group 2. Click the Create New View button: 3. Select the required layout for your new view: Tip: Layouts marked Wide are particularly suited for widescreen monitors. 4. A new view is created under the group you selected.
Milestone XProtect Smart Client; User’s Manual 5. Overwrite the default name with a view name of your choice: Example: Overwriting the default view name You are now able to add cameras to the view. Tip: A group, whether private or shared, can contain an unlimited number of views. More than one private and shared group can exist.
Milestone XProtect Smart Client; User’s Manual Example: A new group is created 4. Overwrite the default name New Group with a group name of your choice: Example: Overwriting default group name Tip: Bear in mind that shared groups are visible by all Smart Client users connected to the surveillance system server; therefore, use a name that will be meaningful to all users. You are now able to create a view within the group.
Milestone XProtect Smart Client; User’s Manual Tip: Layouts marked Wide are particularly suited for widescreen monitors. 4. A new view is created under the group you selected. The new view carries the default name New View plus an indication of the selected layout: Example: A new view is created 5.
Milestone XProtect Smart Client; User’s Manual Layout of selected view is outlined in main section (indicated in red frame in this example) 2. In the Setup tab’s System Overview section, click the plus sign engine (server) to view a list of available cameras: next to the required Example: Engine with a number of available cameras 3. Click the name of a camera, and drag the camera name to the required position in the view.
Milestone XProtect Smart Client; User’s Manual Tip: In addition to cameras, you are able to add static images and HTML pages to views. Read more in Further Configuration on page 22. Using Your Views on Different Computers Your user settings, including your private views, are stored on the surveillance system server. This means that you are able to use your private views on any computer that has a Smart Client installed, provided you log in to the Smart Client with your own user name and password. www.
Milestone XProtect Smart Client; User’s Manual Further Configuration In addition to creation of groups and views, the Smart Client’s Setup tab lets you edit existing groups and views. The Setup tab furthermore lets you adjust camera settings, and set up joystick control for PTZ (Pan/Tilt/Zoom) cameras. Note: Particular user rights may be required in order to access the Setup tab. Your ability to edit groups and views also depends on your user rights.
Milestone XProtect Smart Client; User’s Manual Using Static Images in Views You are not limited to viewing camera images in a view; you are able to view static images (such as GIF or JPEG) as well. Example: A company logo inserted as a static image (in this case viewed on the Live tab). The feature could equally well be used for inserting maps, floor plans, photos of wanted persons, etc. To use a static image in a view, do the following on the Setup tab: 1.
Milestone XProtect Smart Client; User’s Manual Tip: When your imported HTML pages contain links, it is recommended that links have the target='blank' attribute (example: Link). This will make the links open in separate windows, which will help you avoid losing view of the Smart Client window itself due to a link opening a web page in the same browser window as the Smart Client. To include an HTML page in a view, do the following on the Setup tab: 1.
Milestone XProtect Smart Client; User’s Manual URL: Click the New button to specify a new URL or location of the required HTML page. Scaling: Select the required scaling of the HTML page. The optimal scaling depends entirely on the content of the imported HTML page and how you want to display it. As a rule of thumb, with a high scaling value, e.g. 1280×1024, text on the HTML page will appear relatively small, and a considerable amount of content will be visible without the need for scrolling.
Milestone XProtect Smart Client; User’s Manual To delete a group, do the following on the Setup tab: 1. Select the unwanted group in the Views section. 2. Click the Delete button: You will be asked to confirm that you want to delete the selected group and all of its content. Renaming Views To rename a group, do the following on the Setup tab: 1. Select the required group in the Views section. 2. Click the Rename button: 3. Overwrite the existing group name with a new name of your choice.
Milestone XProtect Smart Client; User’s Manual Camera Name The Camera Name field displays the name of the selected camera. The field is read-only. Image Quality The Image Quality setting determines the quality of the images when viewed, but also affects bandwidth usage. If the Smart Client is used over the internet, over a slow network connection, or if for other reasons you need to limit the bandwidth used by the Smart Client, image quality can be reduced on the server side by selecting e.g.
Milestone XProtect Smart Client; User’s Manual Apply to All The Apply To All button lets you quickly apply the camera settings for the selected camera to all cameras in the view. Customizing Joystick Setup You are able to customize joystick setup for control of PTZ (Pan/Tilt/Zoom) cameras in the Smart Client. Customizing joystick setup requires that a joystick is attached to the computer running the Smart Client.
Milestone XProtect Smart Client; User’s Manual Joystick Setup window, displaying available axes and buttons on a selected joystick 4. In the Axis Setup section, specify settings for the available axes.
Milestone XProtect Smart Client; User’s Manual 5. In the Button Setup section, specify an action for each required joystick button. You select the required action in the Action column. Tip: To quickly verify that you are indeed configuring the required button, simply press the required button on the joystick. When the button is pressed, a dark blue color will appear in the Button Setup section’s Preview column for the button in question.
Milestone XProtect Smart Client; User’s Manual 3. When the Keyboard Setup window appears, click in the Press shortcut key fields, then press the required key combination. Note: Key combinations must begin with CTRL or ALT. Example: CTRL + B (i.e. first pressing the CTRL key, then—while still pressing the CTRL key—pressing the B key). This will display the pressed key combination in the Press shortcut key field. 4. In the Select action list, select the required action for the shortcut key combination. 5.
Milestone XProtect Smart Client; User’s Manual Viewing Live Images You view live images on the Smart Client’s Live tab. When you select the Smart Client’s Live tab, the Smart Client will connect to the surveillance system server, and display live images from the cameras in the selected view. Note: Particular user rights may be required in order to access the Live tab.
Milestone XProtect Smart Client; User’s Manual The image bar is blue. When you select a particular camera in the view, the image bar of the selected camera image becomes a lighter blue. Camera image; enlarged detail shows image bar The image bar displays the name of the camera as well as the name of the device to which the camera is connected. The device name is displayed first, in square brackets, followed by the camera name.
Milestone XProtect Smart Client; User’s Manual Event Control If manual triggering of events has been defined on your surveillance system, you can trigger events from the Smart Client. Note: Depending on your user rights, access to manually triggering events may be restricted. What is an Event? Events are used by the surveillance system for triggering actions. Typically, events on the surveillance system are generated automatically.
Milestone XProtect Smart Client; User’s Manual Note: Depending on your user rights, access to triggering outputs may be restricted. To trigger an output, select the required output in the Output Control section, and click Activate. The list of selectable outputs is grouped by server (engine) and camera/device to which the output is attached. In the above illustration, the output Lights on is attached to the device [Door] Camera 1 on the server with the default name Engine.
Milestone XProtect Smart Client; User’s Manual PTZ Control section PTZ Preset Positions If preset positions have been defined for the selected PTZ camera, you are able to select such positions from the Presets list. Selecting a preset position from the list will make the PTZ camera move to the specified position. Preset positions are defined by the system administrator; the Presets list will be empty if no preset positions have been defined for the selected PTZ camera.
Milestone XProtect Smart Client; User’s Manual Viewing Recorded Images You view recorded images on the Smart Client’s Browse tab. When you select the Smart Client’s Browse tab, the Smart Client will connect to the surveillance system server, and display recorded images from the cameras in the selected view. This way, you are able to browse recorded images. Note: Particular user rights may be required in order to access the Browse tab.
Milestone XProtect Smart Client; User’s Manual Enlarging Images from a Particular Camera To enlarge images from a particular camera in a view, double-click the blue title bar above the image. Double-clicking blue bar above image enlarges view To return to normal view, simply double-click the blue title bar again. Tip: If you have selected reduced image quality for the camera (on the Setup tab), images from the camera will be displayed in full quality when viewed enlarged.
Milestone XProtect Smart Client; User’s Manual the case, the last image in the camera’s database prior to the specified point in time will be displayed in the view. Master Time area. Date and time format may be different on your computer. The Master Time area also displays the current playback speed (example: 1.00x, indicating realtime). Browse Buttons The Time Navigation section’s browse buttons lets you manually navigate through recordings from the camera selected in the view.
Milestone XProtect Smart Client; User’s Manual Playback Slider and Buttons The Time Navigation section’s playback slider lets you specify the required playback speed. In the slider’s middle position, playback speed is real-time (1.00x). Drag the slider to the left for a slower playback speed; drag to the right for a faster playback speed. An indication of the exact playback speed is displayed in the upper right corner of the Time Navigation section’s Master Time area.
Milestone XProtect Smart Client; User’s Manual Each sequence will be listed with date and time as well as the length of the sequence. Clicking a sequence in the list will move all images in the view to the time of the sequence. If the Preview check box is selected, you are able to quickly view each sequence by placing the mouse pointer over the required sequence in the list: Sequences section; placing mouse pointer over a sequence indication lets you quickly view the incident.
Milestone XProtect Smart Client; User’s Manual To get a list of events, do the following: 1. Select the required event or events in the Alerts list. You may either select a single event: Or all events on a particular server (engine): 2. Click the Get List button. This will display a list of detected events. You are able to click the listed events to view recordings from the required event in the view.
Milestone XProtect Smart Client; User’s Manual 1. Select the Browse tab’s Smart Search section: 2. Select the Smart Search section’s Show Grid check box: 3. Select the required camera in the view. A blue grid overlay will appear on the image from the camera; this is the grid you selected in the previous step: The overlay can be removed by clearing the Show Grid check box. Tip: For a better view, enlarge the camera image by double-clicking the blue bar above the image. 4.
Milestone XProtect Smart Client; User’s Manual Example of selected area With the Smart Search section’s Include and Exclude options, you are able to toggle between including/excluding areas when you drag. With the Smart Search section’s Invert button, you are able to quickly invert your selection, if required. Example: Original selection (left) and inverted selection (right) 5. Click the Smart Search section’s Save button to save your search area settings.
Milestone XProtect Smart Client; User’s Manual When a sequence with motion inside the selected area(s) is found, it will be displayed in the view. Motion will be highlighted: Motion highlighted in light green color Tip: The Browse tab’s Time Navigation section control panel will show exact corresponding time information. 10. If required, click the Next or Previous button again to continue the smart search.
Milestone XProtect Smart Client; User’s Manual PTZ Control section Presets The Presets list does not apply for navigating recorded images from IPIX cameras. IPIX PTZ Positions You are able to move to a specific position in the IPIX view, and then save that position by clicking the Save button. When you later want to return to the saved position, click the Load button. Printing Images With the Browse tab’s Print section, you are able to print recorded images.
Milestone XProtect Smart Client; User’s Manual Window with preview and information about printed image. Date and time format may be different on your computer. 4. Optional: If you want to change or verify paper size, source and orientation for the printout, click the Smart Client Surveillance Report window’s Page Setup button to open the Page Setup window: Page Setup window When ready, click the Page Setup window’s OK button to return to the Smart Client Surveillance Report window. 5.
Milestone XProtect Smart Client; User’s Manual Exporting Images With the Browse tab’s Export section, you are able to export recorded images in the AVI (movie clip) and JPEG (still image) formats. Export section. Date and time format may be different on your computer. For detailed information about exporting recorded images, see Exporting Evidence in AVI and JPEG Formats in the following. www.milestonesys.
Milestone XProtect Smart Client; User’s Manual Exporting Evidence in AVI and JPEG Formats With the Smart Client you are able to quickly generate and export video evidence in the AVI (movie clip) and JPEG (still image) formats. Note: Depending on your user rights, access to generating AVI or JPEG evidence from some cameras may be restricted. Date and time formats used when browsing recorded images may vary depending on your computer’s regional settings.
Milestone XProtect Smart Client; User’s Manual Export dialog. Date and time format may be different on your computer. The export dialog will list the specified start time, end time, and camera. 6. In the export dialog’s Export Type section, select the required export format: AVI (movie clip) or JPEG (still images). 7. Select whether to add timestamps from the surveillance system to the exported images.
Milestone XProtect Smart Client; User’s Manual 9. This step applies for export in the AVI format only; if using the JPEG format, go to step 10 In the AVI Codec list, select required AVI codec. The list will contain the video codecs available on your computer. Tip: A video codec is a particular compression/decompression technology used when generating video files. Your choice of codec will affect the quality and size of the AVI file. The Indeo® video 5.
Milestone XProtect Smart Client; User’s Manual Logging Out of the Smart Client To log out of the Smart Client, simply click the Log Out button in the Smart Client’s top bar: Log Out button www.milestonesys.
Milestone XProtect Smart Client; User’s Manual Glossary A AVI: A popular file format for video. Files in this format carry the .avi file extension. C Codec: A technology for compressing and decompressing audio and video data, for example in an exported AVI file. MPEG and Indeo are examples of frequently used codecs. D DirectX: A Windows extension providing advanced multimedia capabilities. F Frame Rate: A measure indicating the amount of information contained in motion video.
Milestone XProtect Smart Client; User’s Manual Copyright, Trademarks and Important Information Copyright © 2005 Milestone Systems A/S. Trademarks XProtect is a registered trademark of Milestone Systems A/S. Microsoft and Windows are registered trademarks of Microsoft Corporation. All other trademarks mentioned in this document are trademarks of their respective owners. Disclaimer This document is intended for general information purposes only, and due care has been taken in its preparation.
Milestone XProtect Smart Client; User’s Manual Index —.— .Net ................................................................................................................................... 6 —A— Absolute Positioning ........................................................................................................... 29 Actions, Assigning Keyboard Shortcuts to.............................................................................. 30 Adding Cameras to a View ................................
Milestone XProtect Smart Client; User’s Manual Installation.......................................................................................................................... 8 IP Address .............................................................................................................. 8, 10, 53 IPIX .............................................................................................................6, 35, 36, 45, 53 IPIX Split Mode................................................
Milestone XProtect Smart Client; User’s Manual System Overview Section......................................................................................... 20, 23, 24 —T— Target Audience................................................................................................................... 2 Text Message, Mobile Phone....................................................................................... See SMS Time Navigation Section ........................................................
Milestone XProtect Smart Client; User’s Manual Milestone Systems A/S Copenhagen, Denmark Tel.: +45 88 300 300 Fax: +45 88 300 301 info@milestonesys.com www.milestonesys.com SC20-um-2-161205 www.milestonesys.