
User`s manual


Milestone XProtect Smart Client; User’s Manual
www.milestonesys.com Page 35 Viewing Live Images
Note: Depending on your user rights, access to triggering outputs may be restricted.
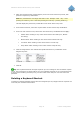
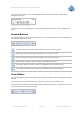
To trigger an output, select the required output in the Output Control section, and click Activate.
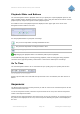
The list of selectable outputs is grouped by server (engine) and camera/device to which the output
is attached. In the above illustration, the output Lights on is attached to the device [Door] Camera
1 on the server with the default name Engine.
PTZ Control
PTZ (Pan/Tilt/Zoom) and IPIX (technology allowing creation and viewing of 360-degree panoramic
images) cameras can be controlled from the Smart Client.
Note: Depending on your user rights, access to PTZ controls from some cameras may be
restricted.
Point-and-Click Control
Many PTZ cameras may be controlled simply by pointing and clicking inside the images from the
camera.
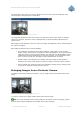
If you see a set of crosshairs when placing your mouse pointer over the images from a PTZ
camera, point-and-click control is supported for the camera.
Crosshairs indicate point-and-click control.
For some cameras, crosshairs may look different.
For some cameras, crosshairs surrounded by a square may be displayed.
When this is the case, you are able to zoom in on an area by dragging a square around the
required area in the image.
For such cameras, zoom level is controlled by holding down the SHIFT key on your keyboard while
moving the mouse up or down; this will display a zoom level slider inside the image.
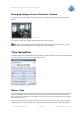
PTZ Navigation Buttons
As an alternative to point-and-click PTZ control, use the navigation buttons in the PTZ Control
section to move the selected PTZ or IPIX camera.
The round middle button lets you quickly move the camera to its home (i.e. default) position.
The plus and minus buttons lets you zoom in and out respectively.