PIX-15 Electronic Time Recorder Operation Manual
Thank you… for purchasing another fine product from Amano Cincinnati, Inc. Important Note that the government standard for Daylight Saving Time (DST) is subject to change. Your clock is factory-set for correct DST based upon when it was manufactured, but any revision to DST begin or end dates may require updating the system-set DST calendar.
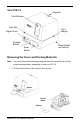
Your PIX-15 Keyhole Print Window Print Slot Print Margin Digital Clock Change Button Reset Switch (on bottom) Enter Button Removing the Cover and Packing Materials Note: You must remove the packaging spacers from the printer block and the printer carriage before attempting to use your PIX-15. 1. Lift the printer block and remove the spacer.
2. Insert the key provided and turn clockwise to open the case. Lift the cover to remove. Open Closed 3. Remove the spacer between the Ribbon Cartridge and the Printer Carriage. Remove Spacer 4. 2 Re-install the cover.
Before You Change Any Settings Take a moment to familiarize yourself with the items explained below. The Front Panel LCD Display Window CHANGE Button ENTER Button Normally, the Display Window shows the date and time. When you use the Quick Set or Program Mode to change the settings of the PIX-15, the instructions to change the clock are shown in this window. The two buttons on the front panel are used to navigate through the Quick Set and Program Mode to change the clock’s settings.
Making a Test Print 1. Plug in the power cord. 2. Insert a piece of paper or time card into the PIX-15. The clock will automatically print YEAR, MONTH, DATE and TIME with AM or PM (in Pacific Time). Note: The PIX-15 will automatically adjust for Daylight Saving Time. If these conditions are unsatisfactory, you must change the program settings. 3. If the imprint is satisfactory, and you are going to place the PIX-15 on a desk, table, or shelf, the PIX-15 is ready to be used. 4.
Entering the Clock Program The following steps describe how to get into the clock program. To set the print style and time, use a code chosen from the list (see page 4). For example, the following directions use code 6570. 1. Entering a Code a. Press and hold the RESET button on the bottom of the clock. (Refer to page 3 for location.) b. While holding down the RESET button, press and hold the ● right button on the front panel. c. While holding the ● right button, release the RESET button. d.
2. Setting the Year, Month and Date a. With the display flashing Pl dA E, tap the ● right button and the display will show year, month, and date. b. Press the ◄ left button until the correct year appears, then tap the ● right button. c. Press the ◄ left button until the correct month appears, then tap the ● right button. d. Press the ◄ left button until the correct date appears, then tap the ● right button. e. When the display flashes the correct year, month and date, tap the ● right button. f.
4. Setting the Beginning Date of Daylight Saving Time (DST) Note: The government standard for DST is subject to change. Your clock is factory-set for correct DST based upon when it was manufactured, but any revision to DST begin or end dates may require updating the system-set DST calendar. The steps below change the begin date for DST. Updating the begin date for DST needs to be done just one time*, since the clock’s rolling calendar function will auto-calculate the begin date for each year thereafter.
d. Tap the ◄ left button until the correct date appears, then tap the ● right button. e. With the display flashing the correct year, month and date, tap the ● right button. f. With the display flashing P4 EdLt, tap the ◄ left button to move to the end of the Program (End will display). Note: To disable the Daylight Saving Setting, set the beginning and ending date to the same date. 6. Exiting the Program Mode When the display flashes End, tap the ● right button to exit the program mode. 7.
Replacing the Ribbon 1. Insert the key into the key hole (see page 2 for keyhole location) and turn the key. 2. Grab the cover on both sides and lift to remove it. 3. Pull the two catches (B) upward and hold them with your index and middle fingers. Remove the ribbon cassette. Note: If the print mechanism is in the down position and a piece of paper cannot be inserted, press the RESET button to move the carriage up. This will make the ribbon installation easier. 4.
Mounting the Clock 1. Remove the cover as per the instructions above. 2. With the clock facing you, remove the mounting bracket by pulling the top tabs (A) towards you, and then pushing the tabs down (see below). Printer Frame Wall Mounting Bracket 3. Securely mount the PIX mounting bracket on the wall using three #10 wood screws or equivalent. 4. Place the PIX-15 on the Mounting Bracket by sliding the top tabs into the slots on each side of the case.
Error Messages Home Sensor, Motor Carriage Stuck Timing Sensor, Motor Carriage Stuck Carriage Stuck General Print Error Home Sensor Daylight Saving Time Program If any of these messages appear on the display, unplug the clock from your outlet then plug it back in again. If the message still appears on your display, please contact us at 1-800-253-9836 for assistance. CAUTION: Do not use any chemical solvents or oils to clean or lubricate your PIX-15. This will damage your clock.
Specifications Power Requirements: For PIX-15 Input: AC16.5V, 60Hz, 0.6A (Max.) For AC Adapter: AC120V ± 10%, 60Hz AC230V ± 10%, 50Hz AC240V ± 10%, 50Hz Ambient Temperature: -10°C to 45°C (14°F to 113°F) Ambient Humidity: 10% to 90% (no condensation) Dimensions: 140mm (W) x 150mm (H) x 165mm (D) (5½" x 6" x 6½") Weight: 1.8Kg (4.2Lbs.) Environment: Indoor use only; dust-free environment Keep out of direct sunlight PIX-15 with 120V AC Adapter: Listed and Certified by Underwriters Laboratories, Inc.
AJR-211902 • Copyright © 2007 Amano Cincinnati, Inc.