TCX-45 Atomic Time Clock Operation Manual
Proprietary Notice This document contains proprietary information and such information may not be reproduced in whole or part without the written permission from Amano Cincinnati, Inc. 140 Harrison Ave., Roseland, New Jersey 07068. Amano Cincinnati, Inc. reserves the right to make equipment changes and improvements, which may not be reflected in this document. Portions of this document may have been updated to include the latest hardware or firmware version, if applicable.
Warranty Notice Any claim for warranty, express or implied, due to the clock’s failure to properly receive the radio signal because of interference, whatever the source of this interference may be, are hereby expressly excluded. For more information about the WWVB radio signal, actual signal coverage in North America visit NIST’s website at: http://tf.nist.gov/stations/radioclocks.htm For actual signal coverage in North America visit: www.boulder.nist.gov/timefreq/stations/wwvbcoverage.
Display View The LCD Display contains an Ink Capacity gauge. This gauge indicates the amount of ink remaining in the ribbon cartridge using four bar segments, from E (Empty) to F (Full). The TCX-45 calculates the ink capacity of the ribbon cartridge from the number of imprints made. As the ink capacity decreases, the bars in the gauge will disappear. When the ribbon capacity drops below 25%, the “E”, “F” and “INK” characters will blink until the ribbon is replaced and the ink counter is reset.
Setting the Time (If Displayed Time is Incorrect or In Different Time Zone) 1. Unlock and remove the cover. 2. Press the HOUR advance button until the correct hour appears. 3. Press the MINUTE advance button until the correct minute appears. Note – You must follow this procedure if you are installing the TCX-45 in a different Time Zone from where it is currently programmed. Setting the Month and Date 1. Press the PROGRAM button until dA E PI appears, then release. Next press the ENTER button. 2.
Changing the Print Style 1. Press the PROGRAM button until dA E PI appears. 2. Press the CHANGE button until Prn P4 flashes in the display. Press the ENTER button. 3. The display will flash the current setting. Press the CHANGE button until the desired print style code appears (see diagram). 4. When the display flashes the correct setting, press the ENTER button and press the PROGRAM button to exit. Changing the Print Direction 4 1. Press the PROGRAM button until dA appears. 2.
Enabling or Disabling Daylight Saving Time Note – when this setting is set to ON, the clock’s time will automatically change for DST. When this setting is set to OFF, the clock’s time will not change for DST. (To program the dates for the begin and end DST, refer to the Other Options Menu sections, below.) 1. Press the PROGRAM button for two seconds, then press the CHANGE button until dL S P3 flashes in the display. 2. Press the ENTER button. 3. Press the CHANGE button to alternate between ON and OFF.
. Press the CHANGE button until the date shows the correct date for the beginning date for the DST modification. 9. Press ENTER. The month flashes. 10. Press the CHANGE button until the month shows the correct month for the beginning month for the DST modification. 11. Press ENTER. 12. When the display flashes the correct selection, press the ENTER button, then the PROGRAM button, to save changes and exit the DST function.
Enabling or Disabling Auto Print 1. Press the PROGRAM button until dA appears. 2. Press the CHANGE button until 0 hr P5 flashes in the display. Press the ENTER button. 3. Press the CHANGE button until A Pr I 4 flashes in the display. Press the ENTER button. 4. Press the CHANGE button until the desired code appears on the display, then press the Enter button. The Auto Print codes are as follows: Code Mode Description P on Auto Print Will automatically print a single print when media is inserted.
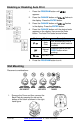
2. Using the Back Plate as a template, mark the lower mounting hole on the wall. 3. Mount the plate using a #10 wood screw (or equivalent) in the center mounting hole. 4. Level the Back Plate and mark the location of the two upper mounting holes. Secure to the wall using #10 wood screws (or equivalent). 5. Feed the cable of AC Power Adapter through one of the holes in the Back Plate. 6. Align the clock with the two upper tabs on the back plate.
Please visit to http://tf.nist.gov/stations/radioclocks.htm for more information about how radio-controlled clocks work, where they work, and what to do when they don’t work. Disabling or Enabling the Atomic Clock By default, the Atomic Clock function is enabled. If you wish to disable the atomic clock synchronization, or if you wish to re-enable synchronization, please do the following: 1. Press the PROGRAM button until dA PI appears. 2. Press the CHANGE button until 0 hr P5 flashes in the display.
Ribbon Cartridge Replacement Step 1. Insert the clock key (required to unlock the cover), turn clockwise, lift up the cover (see figure), and remove for ribbon access. Locate the ribbon cradle. Note: You MUST have the key to remove the cover for ribbon replacement. The Amano TCX-45 clock pictured to the right, shows a typical layout with the ribbon cartridge installed in the cradle. Step 2. Pull the two release tabs ("B") upward, and hold with index and middle fingers (see figure). Step 3.
Step 5. Turn the knob on the cassette clockwise one turn to take up any slack in the ribbon (see figure). Step 6. Reset the INK indicator by pressing the CHANGE and ENTER buttons at the same time. Step 7. Stamp a card to check the printing quality and confirm that you have installed the ribbon properly. Step 8. Replace the cover (locks automatically). The TCX-45 ribbon cartridge in Black ink is: Amano Part No. CE-315151 Order now! The TCX-45 ribbon cartridge in Red ink is: Amano Part No.
Error Messages In the event of an error, a message will appear in the display. The possible error messages are listed in the following table along with their probable causes and solutions. Note – An error message can be possibly cleared by pressing the “Reset” button. The Reset button is located on the bottom right back corner of clock. It is a small button inside the hole (see figure). You DO NOT have to remove the back plate to press the Reset button.
Table: Error Messages Error Message Cause Solution E r Pr General Print Error. Unlock cover and remove. Press the Reset button (see above figure). If the error clears, try to stamp a card. If the unit stamps without having the error message come up again replace the cover and lock. The configuration is still programmed in the clock. E I Pr Home Sensor Motor, Carriage Stuck. Unlock cover and remove. Set TCX-45 on side with the ribbon side up.
Figure: Ribbon Carriage Grease Should you need further assistance in clearing an error message: 1. Visit our website at: http://www.amano.com/time or 2. Call us at: 1 (800) 253-9836 Monday – Friday 8:00am – 5:00pm (EST) Clearing the Memory on the TCX-45 – “Prt er” Error Message Before you begin, press the reset button on the bottom of the unit. The reset button is located in the back right corner on the bottom of the clock. (Inside an opening).
7. Press the ENTER button once. Your display will read “00”. The zero on the right should be flashing. 8. Press the CHANGE button 2 (two) times. The display will read “02”. 9. Press the ENTER button once. The left zero should now be flashing. 10. Press the CHANGE button 3 (three) times. The display will read “32”. 11. Press the ENTER button 2 (two) times. The display will now read “dIA9 18” 12. Press the PROGRAM button once to exit from programming.
NOTES 16 www.amano.
www.amano.com/time AJR-331502 Copyright © 2009 Amano Cincinnati, Inc.