
Installation and User's Guide


Time Guardian Series – Advanced Labor/Rate Module 15-3
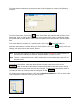
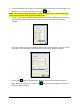
The Labor Names window for the selected Labor Level will appear as shown in the following
example:
To add a Labor Name, click on the
button. All the fields in the window will go blank. In the
Name field, enter a name for the Labor Name. In the number field, enter a number that will be
associated with the Labor Name. Enter a brief description of the Labor Name in the Description
field.
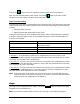
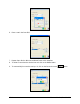
If the Labor Name is to expire on a specified date, click on the
button and select an
expiration date from the calendar. When you have finished, click on the
button to save your
settings and return to the Labor Names window.
Note: When the labor expires, the labor name will be flagged in Red (see User Accounts) and
the EXPIRED LABOR WILL NOT BE DOWNLOADED TO THE CLOCK!!
Note: There is a 4 digit maximum for a labor number that can be downloaded to the MTX-15
terminal (clock).
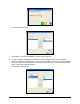
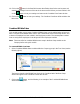
To modify a Labor Name, select the desired Name from the active list and click on the
button to view the Labor Names General tab window for that labor name, change
current labor name to new name and save your changes. To add a new Labor Name make an
inactive level active by clicking on the box alongside “Active”
.
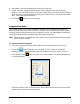
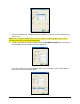
To create Labor Levels Associations, click on the Labor Associations tab. Click on each Labor
Level dropdown to select the Level you want to link to.