
Installation and User's Guide


16-4 Time Guardian Series – Access Control Module
Configuring Nexus 220
The following paragraphs detail the steps involved in integrating data between the Time &
Attendance software and the Nexus 220 system.
Step A. Configure the Nexus 220 settings with the following procedure:
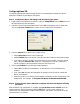
1. Login to the Time & Attendance software, select the Setup Wizard from the Edit menu and
the Setup Wizard screen will appear.
2. From the General Tab of the Setup Wizard, select Yes to integrate Access Control, then
click on the Access Control button and the Access Control screen will appear.
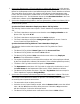
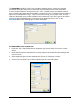
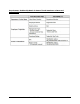
3. From the General tab on the Access Control screen;
• Select Nexus 220 as the Access Control type.
• Select Firebird (Nexus 220 version 1.0 only works with Firebird) as the Database type.
• If you want to process all valid Transactions during synchronization, leave the default
value = 0 for the Reason Code. Otherwise, set the Reason Code to a value that is
specific (to filter) for those transactions that you want to process.
4. Click on the Firebird tab to enable the Firebird database.
• Select Yes if the Nexus 220 database is on the same PC as Time & Attendance
software.
• If not, select No and enter the appropriate IP Address for the PC which contains the
Nexus 220 database.
• Enter the location or use the file chooser button to select the location for the Nexus 220
database file. For example: C:\Program Files\Nexus 220\Database\DB220.FDB
Step B. Synchronize the Time & Attendance software and Nexus 220 with the following
procedure:
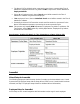
After the Nexus 220 configuration is complete, the Synchronize Access Control menu will
appear under the Time & Attendance software File menu. Use this menu selection to
synchronize Time & Attendance software with the Nexus 220 system. The procedure for this
synchronization is as follows: