electric fireplaces INSTALLATION AND OPERATING INSTRUCTIONS For Built-in units Blt-in-38, blt-in-58, blt-in-36 & blt-in-62 INSTALLER: LEAVE THIS MANUAL WITH THE APPLIANCE. CONSUMER: RETAIN THIS MANUAL FOR FUTURE REFERENCE.
table of contents Important Instructions Page 3 BLT-IN-38 Specifications Page 4 BLT-IN-58 Specifications Page 5 BLT-IN-36 Specifications Page 6 BLT-IN-62 Specifications Page 7 Installation Overview Page 8 Built-In Installation Page 10 Wall Mount Installation Page 12 Fire Glass Media Installation Page 13 Installing the Front Page 14 Operating the Unit Page 15 Fireplace Maintenance Page 17 Warranty Page 18 Dealer Contact Information Back Page 1
important instructions WARNING! Do not operate appliance before reading and understanding operating instructions. Failure to operate appliance according to operating instructions could cause fire or injury. • Do not install damaged, incomplete or substitute components. • To disconnect fireplace, turn controls to off, then remove plug from socket. • Do not use outdoors. • Do not run cord under carpeting. Do not cover cord with throw rugs, runner, or the like.
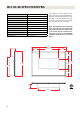
blt-in-38 Specifications Model Number BLT-IN-38 Description Built-In Appliance Voltage 12 Watts 10.5 Amps .2 Appliance Width (Glass & Stone) 24-7/16” or 62 cm Appliance Height (Glass & Stone) 19-1/8” or 48.5 cm Appliance Depth Glass Models 6-5/8” or 16.8 cm Appliance Depth Stone Models 7-5/16” or 18.5 cm Gross Weight Glass Models 80 lbs or 36.
blt-in-58 specifications Model Number BLT-IN-58 Description Built-In Appliance Voltage 12 Watts 10.5 Amps .2 Appliance Width (Glass & Stone) 39 5/16” or 99.8 cm Appliance Height (Glass & Stone) 20 1/16” or 51 cm Appliance Depth Glass Models 6-5/8” or 16.8 cm Appliance Depth Stone Models 7-5/16” or 18.5 cm Gross Weight Glass Models 108 lbs or 46kg Gross Weight Stone Models 128 lbs or 58.
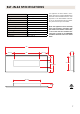
blt-in-36 Specifications Model Number BLT-IN-36 Description Built-In Appliance Voltage 12 Watts 10.5 Amps .2 Appliance Width 24-7/16” or 62 cm Appliance Height 19-1/8” or 48.5 cm Appliance Depth 7-5/16” or 18.5 cm Gross Weight 58 lbs or 26.5 kg Plug Location Right side Cord Length 76” or 193 cm 7 5/8 8 3/16 This appliance has been tested in accordance with the ETL Intertek Standards for fixed and location-dedicated electric room appliances in the United States and Canada.
blt-in-62 specifications Model Number BLT-IN-62 Description Built-In Appliance Voltage 12 Watts 10.5 Amps .2 Appliance Width 39 5/16” or 99.8 cm Appliance Height 20 1/16” or 51 cm Appliance Depth 7-5/16” or 18.5 cm Gross Weight 75 lbs or 34.2 kg Plug Location Right side Cord Length 76” or 193 cm This appliance has been tested in accordance with the ETL Intertek Standards for fixed and location-dedicated electric room appliances in the United States and Canada.
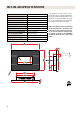
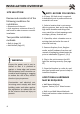
iNSTALLATION OVERVIEW Site Selection Review and consider all of the following conditions for installation: • Dimensions of the unit • Unit requires a minimum of two (2) wall studs in order to ensure a secure installation. Two possible installation methods: • Built-In (page 10) • Wall Mount (Page 12) NOte: Before you install A 15 Amp, 120 Volt circuit is required. A dedicated circuit is preferred but not essential in all cases. 1.
iNSTALLATION OVERVIEW Figure 1 Locate fire glass media and set aside for later installation. (See Page 13) Remove sides of box Remove packaging surrounding the unit and front. Figure 2 Figure 3 Figure 4 Discard packaging materials and store fireplace in a safe, dry location.
fireplace installation - BUILT-in Built-in CAUTION: Two people may be needed to perform this installation. 1. Prepare a wall with a framed opening to accomodate the size of your unit. (Figure 5) Warning: Ensure that the Main ON/OFF Switch is set to the OFF Position (page 16) and that the circuit on which the fireplace is to be installed on has the power cut off at the service panel until installation is complete. Warning: Do not attempt to wire your own new outlets or circuits.
fireplace installation - built-in NOte: Before you install • For Glass front Models: Units must stick out of the wall a minimum of 2” or 5 cm. • For Stone and Steel front Models: Units must stick out of the wall a minimum of 2-3/4” or 7 cm. 1. Lift fireplace and insert into opening. Adjust the unit to achieve the desired amount of depth. (Figure 6) 2. Make sure that the power supply port is not behind the wall. 3. Level the fireplace. 4.
fireplace installation - Wall Mount NOte: Before you install It is strongly recommended that the screws be screwed into the wall studs where possible. If the wall studs cannot be used, ensure that plastic anchors are used. Figure 8 Mounting holes for wall bracket Stakes for hanging 1. Affix the provided mounting bracket to the wall. (Figure 8) • Make sure it is level. 2. Lift fireplace unit and insert the stakes for hanging into the keyholes on the back of the unit.
fire Glass Media installation NOte: Before you install CLEANING THE MEDIA: The media may contain a fine white dust that needs to be cleaned prior to installation. Clean the media with soap, drain, rinse thoroughly and dry before placing into the tray. Figure 11 1. Choose the colour of Fire Glass Media you would like to use. (Figure 11) 2.
Front installation NOte: Before you install It is recommended that two people install the front onto the appliance, wear safety glasses and gloves when handling glass. Figure 13 1. Lift fireplace front (Figure 13) and line up the brackets with the four (4) shoulder screws on the side of the appliance body (Figure 14, or Figure 15) 2. Attach the front to the unit.
Operating the unit Getting power to the unit Figure 16 1. Make sure the appliance is switched OFF (refer to page 16 for instruction) Wall 2. Attach the provided adaptor to the power port on the right hand side of the unit. (Figure 16) 3. Plug unit into electrical outlet. Warning: Do not attempt to wire your own new outlets or circuits. To reduce the risk of injury, electric shock or fire, use a licensed electrician.
Operating the unit controlling the fireplace buttons and indicators There are three (3) buttons on the remote controller (Figure 14), and three (3) on the control panel of the fireplace, each pair of buttons with the same label perform the same function. There are three buttons on the remote control: (Figure 17) button controls the power to the appliance. button is used to adjust the brightness of simulated flames. button is used to adjust the speed of the motor.
fireplace maintenance Warning: Disconnect power before performing any maintenance or cleaning to reduce the risk of fire, electric shock or damage. led light bulb replacement LED light bulbs are to be replaced by the manufacturer, it’s service agent or similar qualified person in order to avoid hazard. Warning: Allow at least 5 minutes for LED bulbs to cool off before handling bulbs to avoid burns.
Warranty Amantii Imports Corp. (“Amantii”) warrants that your newly purchased Amantii electric fireplace is free from manufacturing and material defects for a period of one (1) year from the date of the first purchase, subject to the conditions and limitations contained below.
electric fireplaces www.amantii.