INSTALLATION AND OPERATING INSTRUCTIONS FOR WALL- MOUNT AND BUILT- IN UNITS WM-BI-26-3623 WM-BI-26-3623-WHTGLS WM-BI-34-4423 WM-BI-34-4423-WHTGLS WM-BI-48-5823 WM-BI-48-5823-WHTGLS WM-BI-72-8123 WM-BI-72-8123-WHTGLS BI-50-FLUSHMT-BLKGLS BI-50-FLUSHMT-WHTGLS BI-50-DEEP BI-72-DEEP WM-BI-2428-VLR 09 13-01
TABLE OF CONTENTS CONGRATULATIONS! In selecting this Amantii Wall Mount OR Built-in electric fireplace, you have chosen the finest and most dependable fireplace on the market today. A beautiful and functional addition to the finest homes. Welcome to the family of satisfied Amantii electric fireplace owners. Please read and carefully follow all of the instruction sfound in this manual. Please pay special attention to the safety instructions provided in this manual.
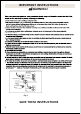
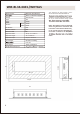
IMPORTANT INSTRUCTIONS WARNING! 5. Do not use outdoors. 15. ded Cover Of Grounded Outlet Box Metal Screws Grounding Pin A B Adapter C D Grounding Means Grounding Pin Fig.
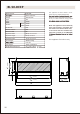
WM-BI-26-3623-/WHTGLS WM-BI-26-3623 -/WHTGLS Model Number Built-In or Wall Mount Appliance Voltage 120V AC,60Hz Amps 12A This appliance has been tested in accordance with the UL Standand 2021 for appliances in the United States and Canada. If you need assistance during installa- 1500W HEATER HIGH 1500W LOW 750W NO HEATER 25W MOTOR HEATER 19W MOTOR FLAME Appliance Width 4W 35 1/2” or 90.20 cm Appliance Height 23” or 58.40 cm Appliance Depth 6 3/4” or 17.30 cm Gross Weight 55.
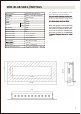
WM-BI-34-4423-/WHTGLS Model Number WM-BI-34-4423 -/WHTGLS Voltage 120V AC,60Hz Amps 12A This appliance has been tested in accordance with the UL Standand 2021 for Built-In or Wall Mount Appliance appliances in the United States and Canada. If you need assistance during installa- 1500W HEATER HIGH 1500W LOW 750W NO HEATER 25W MOTOR HEATER 19W MOTOR FLAME Appliance Width 4W 43 1/2” or 110.50 cm Appliance Height 23” or 58.40 cm Appliance Depth 6 3/4” or 17.30 cm Gross Weight 65.
WM-BI-48-5823-/WHTGLS Model Number WM-BI-48-5823 -/WHTGLS Voltage 120V AC,60Hz Amps 12A Built-In or Wall Mount Appliance This appliance has been tested in accordance with the UL Standand 2021 for appliances in the United States and Canada. If you need assistance during installa- 1500W HEATER HIGH 1500W LOW 750W NO HEATER 25W MOTOR HEATER 19W MOTOR FLAME Appliance Width 4W 57 1/2” or 146 cm Appliance Height 23” or 58.40 cm Appliance Depth 6 3/4” or 17.30 cm Gross Weight 82.
WM-BI-72-8123-/WHTGLS Model Number WM-BI-72-8123 -/WHTGLS Voltage 120V AC,60Hz Amps 12A This appliance has been tested in accordance with the UL Standand 2021 for Built-In or Wall Mount Appliance appliances in the United States and Canada. If you need assistance during installa- 1500W HEATER HIGH 1500W LOW 750W NO HEATER 25W MOTOR HEATER 19W MOTOR FLAME Appliance Width 4W 81” or 205.7 cm Appliance Height 23” or 58.40 cm Appliance Depth 6 3/4” or 17.30 cm Gross Weight 1331.
BI-50-FLUSHMT-BLKGLS/WHTGLS Model Number BI-50-FLUSHMT -BLKGLS/WHTGLS Built-In or Wall Mount Appliance Voltage 120V AC,60Hz Amps 12A This appliance has been tested in accordance with the UL Standand 2021 for appliances in the United States and Canada. If you need assistance during installa- 1500W HEATER HIGH 1500W LOW 750W NOTE: This appliance must be electrically wired and grounded in accordance with local codes. In the absence oflocal codes, us the current CSA C22.
BI-50-DEEP Model Number BI-50-DEEP Built-In Appliance Voltage 120V AC,60Hz Amps 12A This appliance has been tested in accordance with the UL Standand 2021 for appliances in the United States and Canada. If you need assistance during installa- 1500W HEATER HIGH 1500W LOW 750W NOTE: This appliance must be electrically wired and grounded in accordance with local codes. In the absence oflocal codes, us the current CSA C22.
BI-72-DEEP Model Number BI-50-DEEP Built-In Appliance Voltage 120V AC,60Hz Amps 12A This appliance has been tested in accordance with the UL Standand 2021 for appliances in the United States and Canada. If you need assistance during installa- 1500W HEATER HIGH 1500W LOW 750W NOTE: This appliance must be electrically wired and grounded in accordance with local codes. In the absence oflocal codes, us the current CSA C22.
WM-BI-2428-VLR Model Number WM-BI-2428-VLR Voltage 120V AC,60Hz Amps 12A This appliance has been tested in accordance with the UL Standand 2021 for Built-In or Wall Mount Appliance appliances in the United States and Canada. If you need assistance during installa- 1500W HEATER HIGH 1500W LOW 750W NO HEATER 25W MOTOR HEATER 15W MOTOR FLAME Appliance Width 4W 24” or 61cm Appliance Height 28” or 71.1 cm Appliance Depth 9 1/8” or 23.1 cm Gross Weight 57.
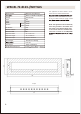
INSTALLATION OVERVIEW NOTE: BEFORE YOU INSTALL SITE SELECTION wall. Review and consider all of the following condir r wo (2) wall - overhead light- et for ease of electric and all hardware fr ox and r ove all aterials prior to installapackaging relat Power supply Wire Gage Voltage Wire Gage Fuse 14 G . ht and away fr electric t-In (page 17) W nt (Page 22) 120 v re etc. dir ing.
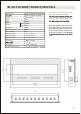
PACKAGE CONTENTS B C A E D Part A B C D E Glass 1 1 1 1 1 Wall Bracket Decorative Media CONTENTS Part 14 Description Quantity A Screw 0.16 in. x 1.0 in. 20 B Wall Plug 0.3 in. x 1.5 in. 20 C Wood Screw 0.16 in. x 0.6 in.
PACKAGE CONTENTS C B A E D Part A B C D E 1 1 1 1 1 Trim Glass Decorative Media CONTENTS Part Description Quantity A Screw 0.16 in. x 1.0 in. 20 B Wall Plug 0.3 in. x 1.5 in. 20 C Wood Screw 0.16 in. x 0.6 in.
PACKAGE CONTENTS B C A F E D Part A B C D E F 1 1 1 1 1 1 Glass Appliance Wall bracket Fire Glass Media Brackets for Valor Front CONTENTS Part 16 Description Quantity A Screw 0.16 in. x 1.0 in. 10 B Wall Plug 0.3 in. x 1.5 in. 10 C Wood Screw 0.16 in. x 0.6 in.
NEW CONSTRUCTION OR RENOVATION Two people may be needed to min. 5 cm 2 in moisture and is located at least 0.91 m or als such as curtains or drapes, furniture, bedding, paper, etc. WALL CAUTION: Sides ---------------------- 2 in / 5 cm Floor ---------------------- 13 3/4 in / 35 cm Top ---------------------- 2 in / 5 cm Back ---------------------- 0 in / 0 cm 2. Place the appliance in selected loca- min. 5 cm 2 in FLOOR min. 35 cm 13 3/4 in and store appliance in a safe, dry and 4.
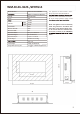
FIREPLACE INSTALLATION BUILT IN NOTE BEFORE YOU INSTALL Units (models listed in table below) must stick out of the wall a minimum of just the unit to achieve the desired amount of depth. k 2 1/4" or 5.8 cm r w ow and the wall studs. 214" [58mm] Wall H The rough wall opening size of the fireplace.
BI-50-FLUSHMT INSTALLATION BUILT IN NOTE BEFORE YOU INSTALL BI-50-FLUSHMT units must stick out of the wall a minimum of 1/2" or 1.3 cm. just the unit to achieve the desired amount of depth. k r ow w and the wall studs. 1" [13mm] 2 Wall H The rough wall opening size of the fireplace.
BI-50/72-DEEP INSTALLATION- BUILT IN NOTE BEFORE YOU INSTALL The BI-50-DEEP and BI-72-DEEP can be flush mounted to the wall allowing finishing materials to be built right down to the glass trim. just the unit to achieve the desired amount of depth. k r ow w and the wall studs. H The rough wall opening size of the fireplace.
WM-BI-2428-VLR INSTALLATION NOTE BEFORE YOU INSTALL The WM-BI-2428-VLR can mount on a flat wall or across a corner. It can also be built-in. just the unit to achieve the desired amount of depth. k r ow w and the wall studs. 3/4" 20mm H The rough wall opening size of the fireplace. wall W D wall WM-BI-2428-VLR W(") 20 D(") 9 H(") 26 wall Mount on the wall corner. Mount on the flat wall.
NOTE: BEFORE YOU INSTALL It is strongly recommended that the screws be screwed into the wall studs where possible. If Stakes for hanging wall bracket anchors are used. ke sure it is level. 13 3/4 inch hanging into the keyholes on the back of the unit. Floor 3. Check the appliance for stability ensuring that the appliance will not pull free from the wall. 4. Drive mounting screws into the mounting bracket on the bottom of unit.
Media op ons Models WB-BI-26-3623, WM-BI-34-4423, WM-BI-48-5823, WM-BI-72-8123, BI-50-FLUSHMT-BLKGLS are shipped with an LED ember log that is pre-installed. 3 colours of fire glass media are also included. See page 24 for log removal instruc ons. See page 24 for media installa on instruc ons.
Fire Glass Media - Log Installa on 1. Removing the log Unplug the unit from wall and make sure controls are switched off. The LED log is shipped in place. The log has tabs on each side that hold it secure. Remove the side panel to remove the log set and the LED strip. 1. Installing the fire glass media Pour the fire glass media into the tray as shown below. Fee free to use any combina on of fire glass media that you find most appealing.
FRONT INSTALLATION NOTE: BEFORE YOU INSTALL It is recommended that two people install the front onto the appliance, wear safety glasses and gloves when handling glass. 1.Lift fireplace front and line up the brackets with the four (4) shoulder screws on the side of appliance body NOTE: Before you lift the front glass. Unscrew two screws on both side of the fireplace as below shown.
OPERATING THE UNIT 1. Make sure the appliance is switched OFF (refer 30 Wall on the right hand side of the unit. 3. Plug unit into electrical outlet. HARD-WIRE INSTALLATION If it is necessary to hard wire this appliance, a qualified electrician may remove the cord connection, and wire the appliance directly to the house hold wiring. 1. Unscrew two screw show in the below. Remove the cover plate and the power cord fix piece, remove power cord. Remove the knockout. 2.
OPERATING THE UNIT Plug the fireplace in and turn the power switch to “ I “ to turn the power on. The “ I ” indicates ON and “ O ” indicates OFF. When the unit is turned on, there will be chiming sound. NOTE: The power switch is located at the bottom left hand side of the unit. When using remote control, always point it at the middle of the fireplace, and keep not far away than 6 metres. The button located at the top position of the remote control is ON/OFF. Press it, the flame and ember will be on.
NOTE: All white glass front model use the remote as Figure 20. The button located at the top position of the remote control is ON/OFF. Press it, the flame and ember will be on. The heater will be off. Press again, the fireplace will turn off. Switching the fireplace flame and ember bed light ON/OFF. It has functions of setting memory. Adjust the blue colour brightness of flame and ember. Adjust the yellow colour brightness of flame and ember. Switching the fireplace heater ON/OFF.
ReMoTe coNTRol opeRATIoN 1. For remote to function make sure the heater is plugged-in and mains power switch located on the bottom right hand side is at position I. 2. When operating the remote make sure you point the remote to the centre of the heater unit and make sure each time you press the button the LED indicator located on top right hand corner of the remote blinks. The buzzer inside the unit will beep once; if the LED fails to blink check the batteries.
1. Power ON/OFF switch 2. Heat control button 3. Flame control button 4. HEATER LED 5. POWER LED Plug the heater into a suitable outlet. 1) “Power ON/OFF” Set this switch to position I to turn the product ON. Setting it to O to turn the product OFF. POWER LED will be lit when the fireplace insert is on. The 2) “Heat control button” Press the HEAT button repeatedly to set the heater to the desired heat setting.
REPLACING THE REMOTE CONTROL BATTERY When the remote control stops operating or its range seems reduced, it is time to replace the batteries with new ones. Remove the batteries if the remote control won’t be used for a long period of time. 1. The battery compartment is located on the back end of the remote. 2. Press the small tab inward as you slide the battery door open and remove the old batteries. 3.
CARE AND MAINTENANCE CLEARANCE TO COMBUSTIBLES Keep electrical cords, drapery, furniture and other combustibles at least 3 ft. from the front of the heater and away from the sides. CLEANING TRIM Clean the metal trim using a soft cloth, slightly dampened with a citrus oil-based product and buff with a clean soft cloth. Do not use brass polish or household cleaners as these products will damage the metal trim. Citrus oil-based products can be obtained at supermarkets or hardware stores.
FIREPLACE MAINTENANCE WARNING: Disconnect power before performing any maintenance or cleaning to reduce the risk of LED LIGHT BULB REPLACEMENT LED light bulbs are to be replaced by the manufacturer, it’s service agent or similar quali- WARNING: UNIT DISPOSAL Do not dispose with other household wastes.
TROUBLE SHOOTING WARNING Disconnect power before performing any maintenance and allow to cool before servic- SYMPTOM POSSIBLE CAUSES Fireplace doesn’t work. Fireplace inner temperature over heatng or home circuit breaker has opened. or log set and ember is not glowing. LED Light(s) burt out or wiring is loose. Remote Control does not work. CORRECTIVE ACTION Reset switch by turning main power switch off and waiting five mimutes, then turning it back on. if necessary.
SERVICE HISTORY This heater must be serviced annually depending on usage.
WARRANTY Amantii Imports Corp. (”Amantii”) warrants that your newly purchased Amantii electric fireplace is free from manufacturing and material defects for a period of one (1) year from the date of the first purchase, subject to the conditions and limitations contained below.
ELECTRIC FIREPLACES