ELECTRIC FIREPLACES SAFETY INFORMATION AND INSTALLATION MANUAL ZECL-26-2923, ZECL-30-3226, ZECL-33-3624, ZECL-39-4134, ZECL-2923 INSERT-26-3825, INSERT-30-4026, INSERT-33-4230 ZECL-26-FLUSHMT, ZECL-30-FLUSHMT Read these instructions completely before beginning installation. Failure to follow them could cause a heater malfunction and result in serious injury and/or property damage. WARNING: All electric heaters have hot or sparking parts inside.
Keep this manual for future reference. SAFETY INFORMATION Due to high temperatures, the insert should be located out of traffic and away from furniture and draperies. Do not place clothing or other flammable material on or near the insert. Never place any objects on the insert. The insert can become very hot when running. Keep children and adults away from hot surfaces to avoid burns or clothing ignition. The insert will remain hot for a time after shutdown. Allow surfaces to cool before touching.
12. Use this heater only as described in this manual. Any other use not recommended by the manufacturer may cause fire, electric shock or injury to persons. 13. Avoid the use of an extension cord because the extension cord may overheat and cause a fire. If you have to use an extension cord, the cord should be No. 14 AWG minimum size and rated not less than 1875 WATTS. 14. Always use a properly grounded, protected (fuse or circuit breaker), and polarized outlet. 15.
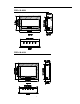
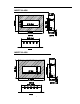
ZECL-26-2923 ZECL-30-3226 4
ZECL-33-3624 ZECL-39-4134 5
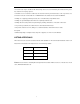
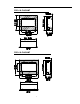
ZECL-2939 INSERT-26-3825 6
INSERT-30-4026 INSERT-33-4230 7
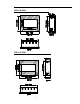
ZECL-26-FLUSHMT ZECL-30-FLUSHMT 8
LOCATING THE FIREPLACE INSERT WARNING: Never locate this heater where it may fall into a bathtub or any water container. NOTICE: All clearances must be maintained to combustibles. Illustrations throughout these instructions reflect typical installations and are for design purposes only. Actual installations may vary slightly due to individual preferences. Heater must be placed so it remains level (use included level to verify).
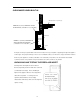
CLEARANCES WHEN BUILT-IN MANTEL(maximum 12" (305mm) deep WALL MINIMUM 3/8" (10mm) CLEARANCE TO TOP 2"[50.8 mm] OF APPLIANCE( combustible or non-combustible) FRONT GLASS MINIMUM 1" (25.4mm) CLEARANCE TO APPLIANCE SIDE VIEW SIDES AND BACK OF APPLIANCE (combustible or non-combustible) FLOOR The fireplace insert may be placed within a framed enclosure that is level, dry, and capable of supporting the weight of the appliance and front glass.
INSTALLATION CAUTION: The unit's power supply cord must be connected to a properly grounded and protected 120-volt outlet. Always use ground fault protection where required by the electrical code. WARNING - RISK OF FIRE! To prevent a possible fire, do not block the grills, louvers, or air openings on the fireplace insert in any manner. WARNING - RISK OF FIRE! The power cord must not be pinched or placed against a sharp edge.
INSTALLATION OVERVIEW – MASONRY FIREPLACES Cover plate is required if chimney does not have suitable rain cap. one Silic 2” (50mm) Minimum HINT: Close and seal the damper to prevent air infiltration. Attach the "This fireplace has been altered..." plate to the fireplace (use two screws or other suitable method). You may wish to place it in a location where it will be covered by the surround glass.
INSTALLATION OVERVIEW – ZERO-CLEARANCE (METAL) FIREPLACES Cover plate is required if chimney does not have suitable rain cap. one Silic The log shelf, screen, and doors (if present) must be removed. 2” (50mm) Minimum HINT: Close and seal the damper to prevent air infiltration. HINT: Paint the interior of the fireplace with latex paint to prevent fireplace odors from entering the home. Attach the "This fireplace has been altered..." plate to the fireplace (use two screws or other suitable method).
OPTIONAL DECORATIVE INTERIORS This insert is shipped with an under-lit log pre-installed. Glowing embers are also included with the fireplace insert if you want a different appearance. Glowing Embers Harvest Moon Clear Sun Tea Removing The Log The under-lit log is shipped in place. On newer units, the log has tabs on each side that hold it in place. Remove the black interior side panel (or carefully remove the tabs) to remove the log set.
OPERATING INSTRUCTIONS REMOVING THE SURROUND GLASS Before removing the surround glass, make sure to have a suitable location to place the surround glass once it is removed. Do not place the glass on sharp or uneven areas that may chip or damage the tempered glass. Use both hands to lift the surround glass directly up. The hooks on the glass will disengage from the pins that protrude from the side of the insert.
REMOTE CONTROL OPERATION (continued) Note. The remote control requires 2 AA batteries (not included). Note: The heater may release a slight odor the first time it is turned on. This is normal. The heating elements inside the heater will burn off any accumulated oils or dust during initial heating. This may also occur when dust accumulates on the heating elements over periods of non-use. 2. When operating the remote make sure to point the remote at the center of the fireplace insert.
REMOTE CONTROL OPERATION (continued) 5. Heater " ON/OFF " button: Press this button to turn the heater ON. The heater will always start at high heat setting 1500W. To turn the heater off press this button again. HIGH button: Press the high button to switch the heater to high heat setting 1500W. LOW button: Press the low button to switch the heater to LOW heat setting 750W. TEMP button: Press the TEMP. button to switch the heater to AUTO mode. See page 15 for details. 6.
DIRECT OPERATION 1. Power ON/OFF switch 2. Heat control button 3. Flame control button 4. HEATER LED 5. POWER LED Plug the heater into a suitable outlet. 1) “Power ON/OFF” Set this switch to position I to turn the product ON. Setting it to O to turn the product OFF. POWER LED will be lit when the fireplace insert is on. The 2) “Heat control button” Press the HEAT button repeatedly to set the heater to the desired heat set.
CLEANING AND MAINTENANCE WARNING: Always disconnect the power and allow the heater to cool before performing any cleaning, maintenance or relocation. Turn the controls to OFF and remove the plug from the outlet or turn off the circuit breaker before attempting any cleaning. FRONT GLASS 1. Remove dust by buffing lightly with a clean dry cloth. 2. To remove fingerprints or other marks, the glass can be cleaned with a damp cloth using a good quality household glass cleaner.
REPLACEMENT PARTS ( continued) REF NO PART NO.
TROUBLE SHOOTING WARNING: Always disconnect power and allow the heater to cool before performing any cleaning, maintenance or relocation. Turn the controls to OFF and remove the plug from the outlet or turn off the circuit breaker before attempting any cleaning.
SERVICE HISTORY 22