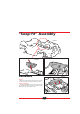
AMAV ENTERPRISES AMAV ® ® TM OWNER’S MANUAL ® ® FOR MODEL 9532 See additional photo instructions at our website: www.amav.com IF YOU ENCOUNTER ANY PROBLEMS WITH THE ASSEMBLY OR FUNCTIONING OF THIS TOY, DO NOT RETURN IT TO THE STORE WHERE YOU PURCHASED IT THEY ARE NOT EQUIPPED TO ASSIST YOU. CALL THE APPROPRIATE NUMBER BELOW TO REACH A CUSTOMER SERVICE REPRESENTATIVE. AMAV CUSTOMER TOLL FREE: 1-866-395-2628 YOU MUST CHARGE THE BATTERY FOR 24 HOURS BEFORE FIRST USE SEE PAGE 9 FOR INSTRUCTIONS.
WARNING • In the assembly of this toy there are some sharp edges and small parts which can harm small children. This item also contains electrical items that can be hazardous for children. Please exercise caution in the unpacking of this product. Children should not handle parts, battery or take part in the assembly of this vehicle. THIS TOY SHOULD ONLY BE ASSEMBLED BY AN ADULT • While assembling the vehicle, keep small parts away from children and discard any plastic bags immediately.
Parts list This parts list applies to AMAV Power Rider™, model 9532, Dream Cruiser. Parts indicated in UNDERLINE must be installed by the consumer. This is not an assembly diagram. For assembly instructions, see the following pages. Key Quan. RR BB CC Z OO T DD MM Q AA R F G EE C C A FF E J N I M W V ............1 A..........1 B..........1 C..........1 ............1 D..........1 E..........1 F ..........1 G .........1 H..........1 I ...........2 J ..........3 K..........1 L ..........1 M .
“Snap-Fit” Assembly Figure 1 Figure 3 Figure 2 Dashboard Figure 4 Figure 1 When you take the car and all the parts out of the box, you will see the body of the car, as shown in Figure 1. Figures 2, 3 and 4 To attach the dashboard to the car, just line up the center hole with the steering column, and slide the dashboard down. Then snap it down in front.
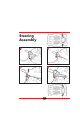
Steering Assembly 1 2 3 4 5
Figure 6 Figure 5 Windshield Hood Figures 5 and 6 Now you can attach the windshield and side mirrors to the car. As you can see in Figure 5, the windshield and mirrors slant towards the back of the car when installed. Be sure to line them up as shown before snapping them in place. The windshield posts slide through the holes in the mirror frame, through the dashboard, and snap into the car body.
Figure 12 A B Figure 10 Figure 11 Wheels Figure 10 Look at the 4 wheels. On one side, there are 5 molded bolts (small bumps). When installing the wheels, this is the outside of the wheel, and should be facing you. Tabs Figures 11 and 12 Slide the wheel onto the axle, and take a locking pin A (it looks the same as the locking pin you used to attach the steering wheel). Push in the locking pin, and turn until it clicks into place.
Locking pin Figure 15 Figure 16 Steering Wheel Figure 15 To attach the steering wheel, first make sure that the wheels are pointing straight. You can move them by hand if necessary. Now take the steering wheel, and hold it so that you are facing it. Make sure that the 3 “arms” of the steering wheel, are positioned at 8 o’clock, 4 o’clock and 12 o’clock (pointing up in the center, and down to the left and right). Slide the steering wheel on to the steering column in this position.
Roll Bar, Seat Belt and Flag Figure 20 To attach the roll bar, just line up the four ends with the holes in the car body and snap it into place. Figures 21, 22 and 23 Your seat comes with the seatbelt installed, but without the clips in place. (Figure 21). There are two clips (male and female) as shown in Figures 22 and 23. Attach the male clip to the short strap by sliding the strap in and through as shown in Figure 22.
Battery charging, replacing and disposing The 6 volt battery installed in the car must be charged for 24 hours before you use it for the first time. Never leave the charger plugged in for more than 30 hours. For charging instructions, see the section below. Read the following warning before proceedi charge for more than 30 hours. • Do not run the battery completely down before charging. • Do not store battery in a discharged condition.
WARNING IF BATTERY LEAK DEVELOPS: BATTERY DISPOSAL Your 6-volt sealed lead acid battery cannot be disposed of in your household trash. Place it in a plastic bag. It must be collected and recycled or disposed of in a manner that respects the environment. Contact your local environmental agency for disposal options in your area. - Avoid contact with leaking battery acid. - Place battery in a plastic bag, and follow disposal instructions.
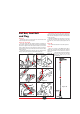
Stickers and Decals... Figures 31 to 37 You are now ready to decorate your car with the sticker and decal sheets. To apply the decals, just peel them off the sticker and decal sheets, and apply them to the car. Press down firmly, and wipe with a clean dry cloth to remove any bubbles. To apply the mirror surfaces, cut out the design with a pair of scissors. Cut out an area slightly larger than the area outlined on the sticker sheet. Peel back one edge and line up the sticker on the mirror frame.
STICKERS Figure 34 D CC B Q A B C D A B J . *K L . M . N . O . P . Q . R . S . T . U . *V W. X . Y . Z . AA BB CC DD EE . FF . GG HH JJ . D C D FF X Y Figure 35 J CC GG FF J U P Figure 36 . . . . . . . . .Left door sticker .Right door sticker .Hood sticker .Car model stickers . . . . . . . . . . . . . . . . . . . . . . . . . . . . . . . . . . . . . . . . . . . . . . . . . . . . .Windshield wipers .Brush guard vent holes .Speed dial .Phone touch pad .Vent .Stereo .Heater .Power Rider .
Troubleshooting Guide PROBLEM Car doesn’t go Car only runs for a short time Wheels spin backwards, when trying to go forward. POSSIBLE CAUSE SOLUTION Battery needs to be charged. Plug battery into charger for 18 hours. Never more than 30 hours. Connections are loose. Check all wire connections. Make sure they are tight. Fuse is blown. Change fuse with 30 amp fuse, from an authorized Power Rider™ Service Center. For the center nearest you, call the customer service number on page 1.
PROBLEM POSSIBLE CAUSE SOLUTION Loose wires and/or connections. Check all connections and tighten if loose. Fuse is blown. Replace fuse with authorized replacement part. Too much weight in the vehicle. Your Power rider™ car is designed to carry only one child. Total weight is 55 lbs. (25 kg) Do not attempt to tow anything. Too much stress on the motor due to driving conditions. Avoid inclines of more than 6°. If conditions are too stressful fuse may blow.
AMAV ENTERPRISES AMAV ® ® Limited Warranty 90-DAY LIMITED WARRANTY FOR AMAV POWER RIDER™ 6-MONTH LIMITED WARRANTY ON 6 VOLT BATTERIES that were installed at time of manufacture. This Limited Warranty covers the AMAV Power Rider™ and the installed 6 volt batteries to the original purchaser against defects in materials and workmanship. The AMAV Power Rider™ must only be used under adult supervision.