
User Manual


13
EN
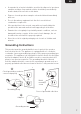
• Look into both eyepieces (Z/AA), adjust the distance of the
interpupillary distance adjustment (C) until the two images merge
intoone.
NOTICE
After focusing, there is an option to push up the locking set
(S) to keep the adjustment knobs (L, M) in place.
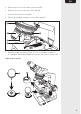
• Rotate the nose piece (E) to the next objective lens, increasing in
magnification power. Re-adjust the focus using the fine focus knob
(M) if needed.
• After using the microscope, remove the slide from the stage (G), take
off the eyepieces (Z/AA) and place the eyepiece covers (A) back on.
• Turn to minimum the adjustment wheel (Q).
• Switch off (R) and disconnect the power cord (AF) from the power
outlet.
• Clean the work area and dispose of the used specimens.
Cleaning and Maintenance
CAUTION
Risk of electric shock! To prevent electric shock,
unplug the product before cleaning.
CAUTION
Risk of electric shock! During cleaning do not immerse
the product in water or other liquids. Never hold the product under
running water.
Cleaning
• To clean the lenses (V, W, X, Y, Z, AA), only use lens cleaning tissues.
Do not use cloth, paper or hands. Rotate the objective lenses (V, W,
X, Y) counter-clockwise to remove them from the nose piece (E).
• To clean the product, wipe with a soft, slightly moist cloth.
• Never use corrosive detergents, wire brushes, abrasive scourers,
metal or sharp utensils to clean the product.
Maintenance
• After each use, place the dust cover (AC) on the microscope. Place
the accessories back into their respective plastic bags to prevent
dust from collecting.
• Slight greasing or putting oil may be needed for the mechanical
moving parts. Apply the appropriate oil discreetly.
• Keep the product and its accessories within the required ambient
temperature and humidity to avoid mildewing.